![]()

VisTrak EVS Installation instructions
![]()
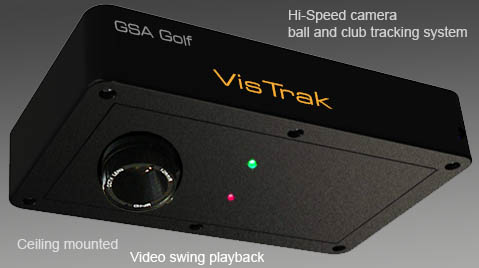
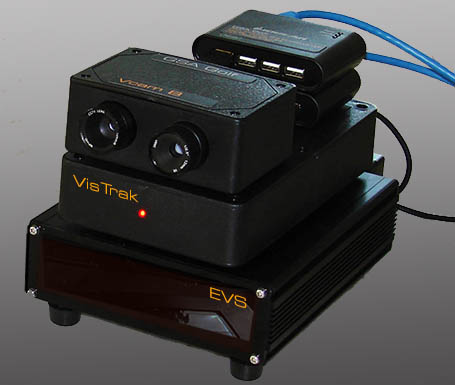
VisTrak EVS
The VisTrak EVS consists of one overhead mounted camera (VisTrak Eagle)
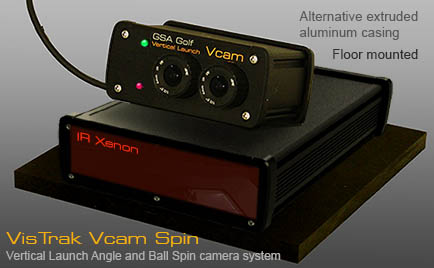
and two floor mounted cameras with dual IR Xenon flash units (VisTrak Vcam B)
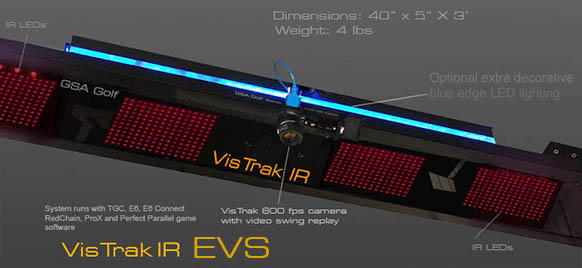
The VisTrak Eagle can be optionally ordered with IR LED panel lighting or with separate IR LED unit lighting.
VisTrak Eagle
To get started, first follow all the VisTrak Eagle installation instructions

! Please Note !
It is strongly recommended to first get the system to run in VisTrak Eagle mode before attaching the Vcam B cameras.
i.e. you are able to play a complete round just in this mode first.
Click above button to read about the VisTrak Eagle installation
![]()
VisTrak Vcam B spin cameras
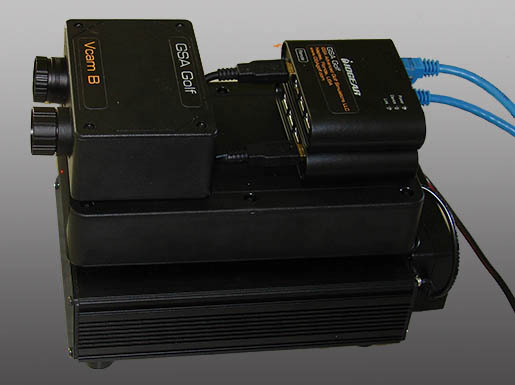
The Vcam B Spin camera system measures ball vertical launch angle and ball spin
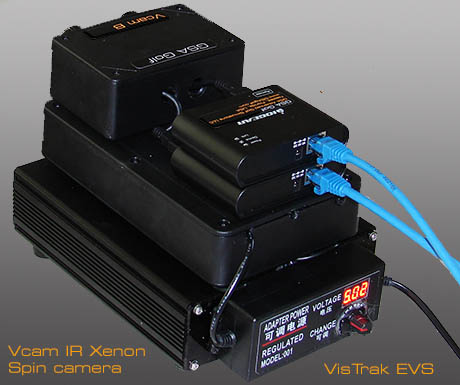
The unit consists of dual IR Xenon flashes installed in a metal case with a 5 volt regulated power supply,
a circuit board case mounted on top, 2 cameras and 2 USB to Cat adapters.
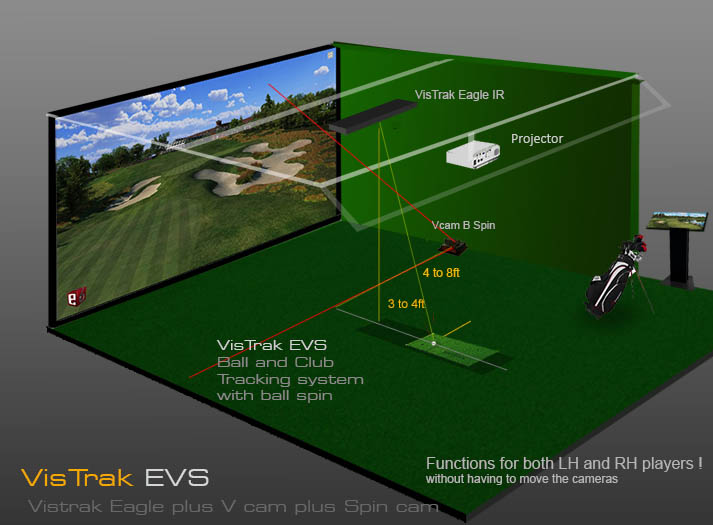
The Vcam B Spin camera is mounted at floor level as shown in the above diagram
![]()
Vcam B wiring
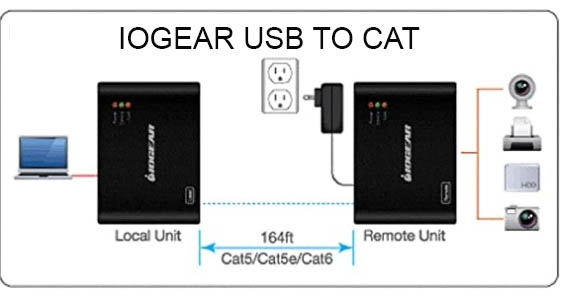
The Vcam B features 2 USB to Cat cable adapters .
Cat cable is used because USB 2 cables can only reach 9ft and Cat cables can reach over 50ft
The IOGEAR remote adapters on the unit are powered by the supplied 2 x 5 volt power adapters.
The local adapters are connected to the PC via the supplied short USB2 cable and don't require any power.
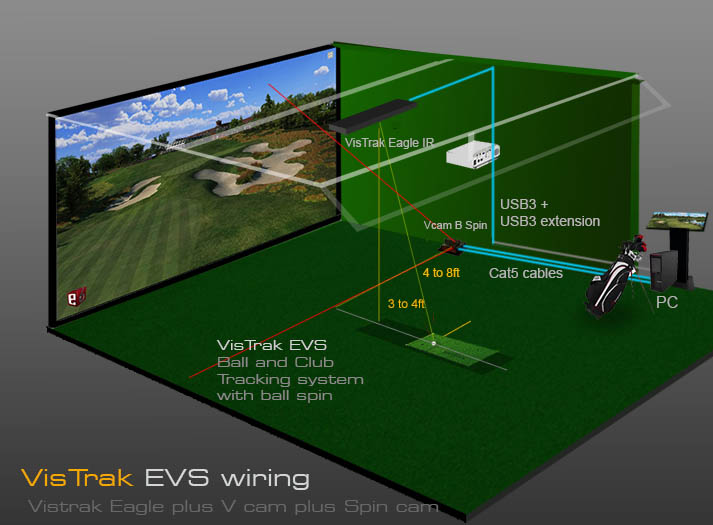
Run the USB3 and Cat cables as shown in the above diagram
![]()
EVS Control Panel settings
Please ensure that you are using the latest Control Panel update
![]()
Click above button to see the latest CP updates
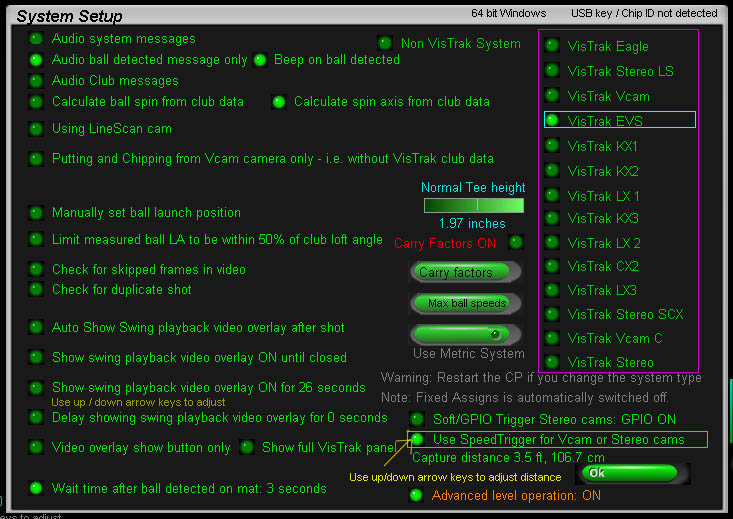
Set the settings as in the above image In the control panel's Setup window
Set the "Capture distance" for the Speed Trigger to the distance the Vcam is from the ball launch position.
This is usually around 3 to 4ft.
Right click on the "Defaults" button in all 3 camera windows.
Ensure "Auto Camera Assigns" is ON and restart the Control Panel.
![]()
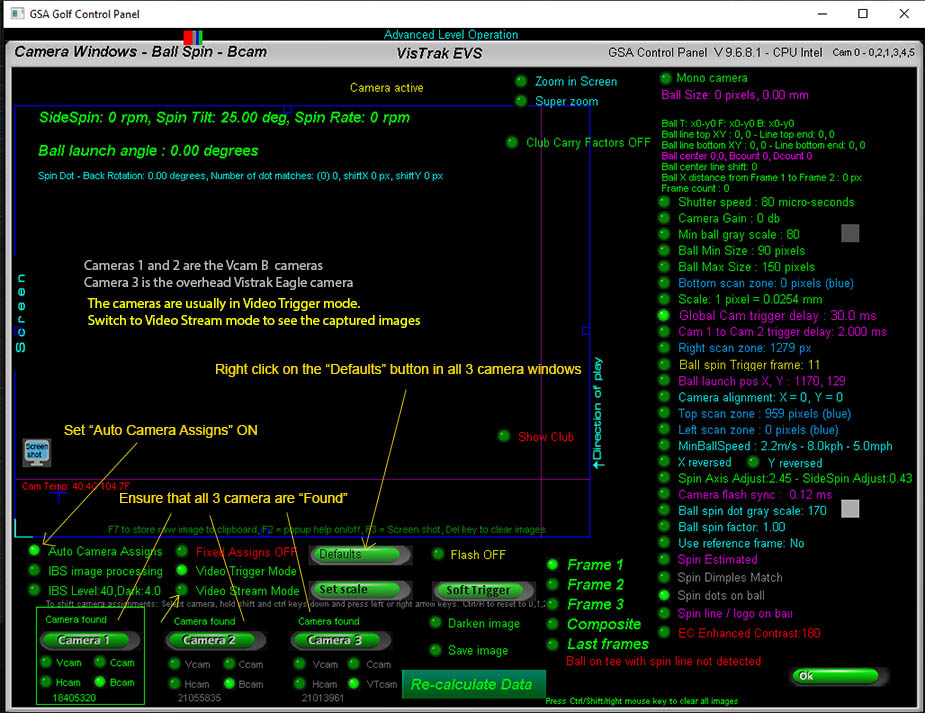
EVS Camera Lenses
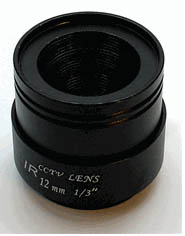
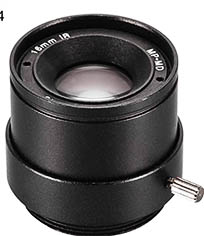
12mm lens are used for VisTrak Eagle
Depending on the distance the Vcam is from the center line of the enclosure,
either 8, 12 or 16mm lenses are used.
If distance is less than 4ft to 5ft, then 8mm lenses are used, if greater, then 12 to 16 mm lenses are used.
Vcam Lens focusing and aiming
It's important that the camera lenses are in focus.
To focus, place a ball on the center line of the enclosure mounted on a box (r any othe object) and point the camera at the ball.
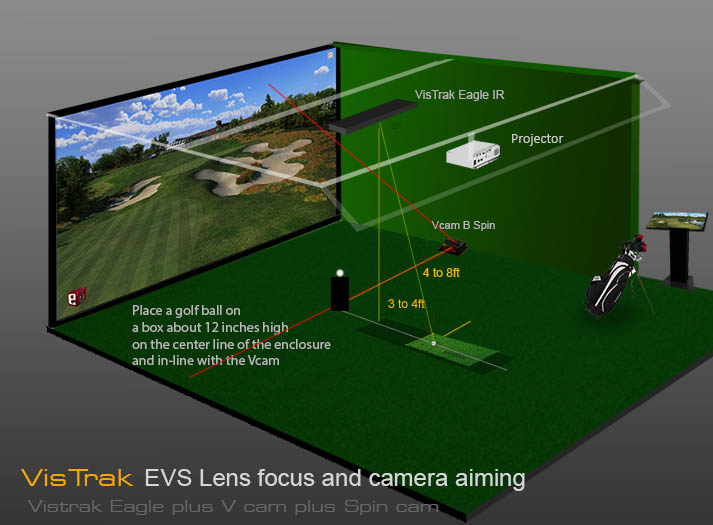
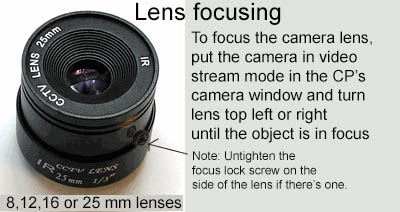
Switch to "Video Steam Mode" in the CP's camera window so that you see the captured images.
Rotate the outer dial on the lens in or out until you see that the ball is in focus.
![]()
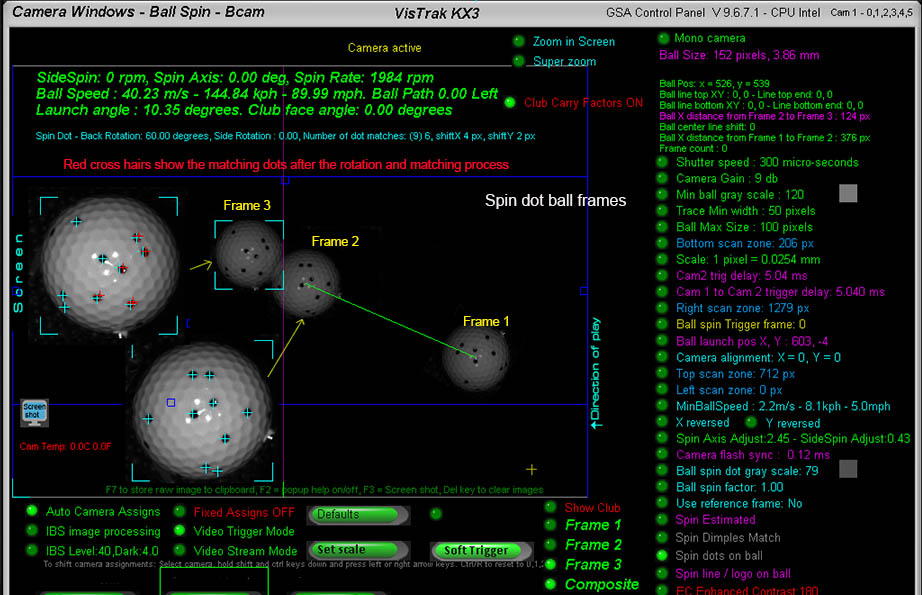
Ball Vertical Launch Angle
In order to detect the vertical launch angle of the ball, the system has to know where the ball was on the mat at before ball strike.
There are two methods of informing the system of where the ball was on the mat: Auto and Manual.
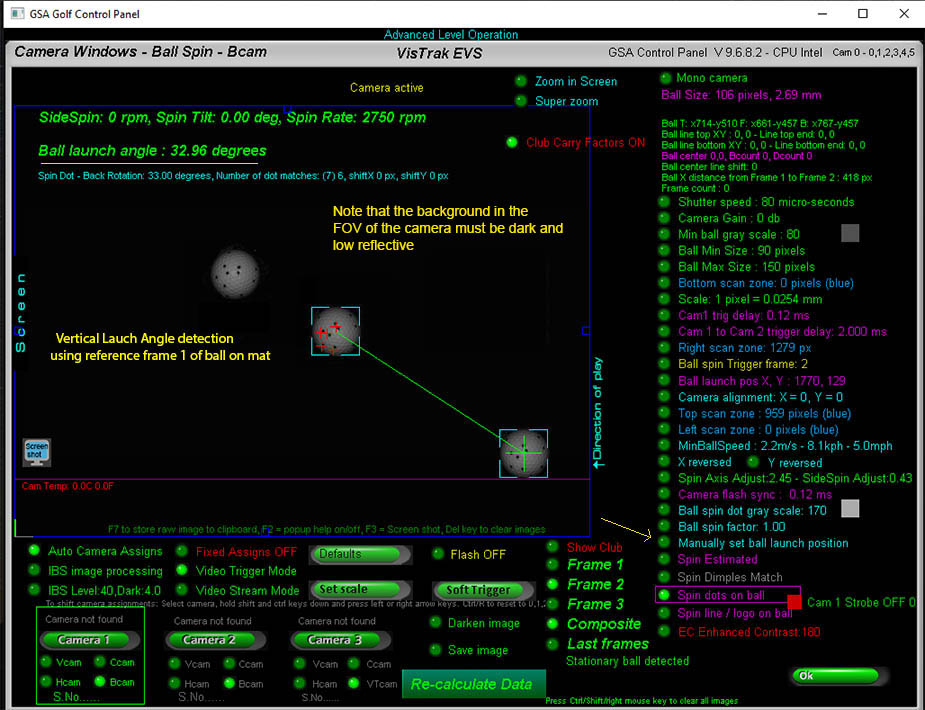
In this image, the Auto method is being used.
i.e. the setting "Manually set ball launch position" is OFF.
In order for the auto method to function, camera 1 has to see the ball on the mat.
i.e. it's FOV must be great enough to show the ball on the mat as well as the ball in flight after ball strike.
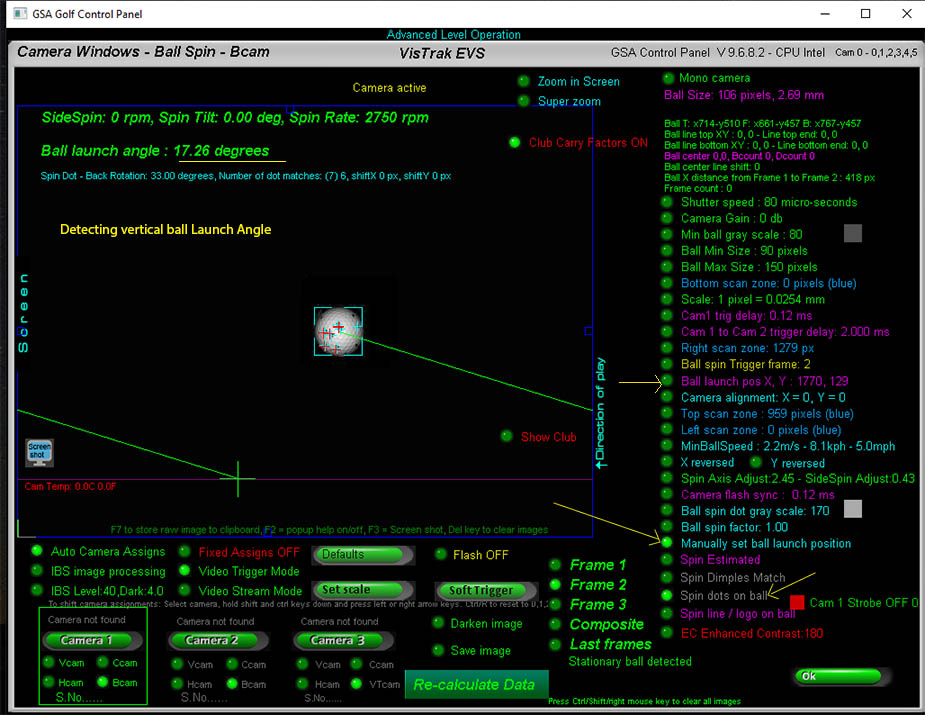
In the above image, the manual method is used.
i.e. the setting "Manually set ball launch position" is ON.
If the FOV of the cameras are not great enough to see the ball on the mat, then the ball launch position has to be set manually.
In order to set the manual launch position, proceed as follows:
1. place a ball on an object of certain height on the center line of the enclosure in-line with the Vcam camera.
2. Switch to camera 1, frame 2 in the CP's camera window and press the "Soft Trigger" to grab a new image.
Ensure that the camera detects the ball.
3. Measure the distance from the ball launch position on the mat to the elevated ball.
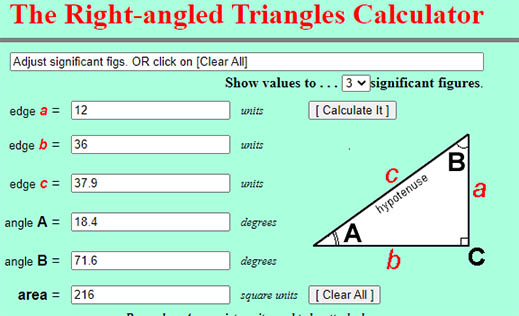
4. using the above online calculator, enter the height of the ball to the edge a
and the distance from the mat to edge b.
Note the "angle A" from the calculator.
5. Using the "Ball Launch Position" in the CP's camera window,
move the position using the left / right / up / down arrow keys on your PC's keyboard.
Move the ball launch position until the measured ball launch angle in the CP is the same as the "angle A" from the calculator.
![]()
Ball Markings
In order to measure ball spin, the EVS system requires that the balls have markings on them.
Markings can either be the pre-printed ball's logo or stripe.
Or you use balls with black dots on them.
10 marked spin dot and marked balls are supplied with every unit.
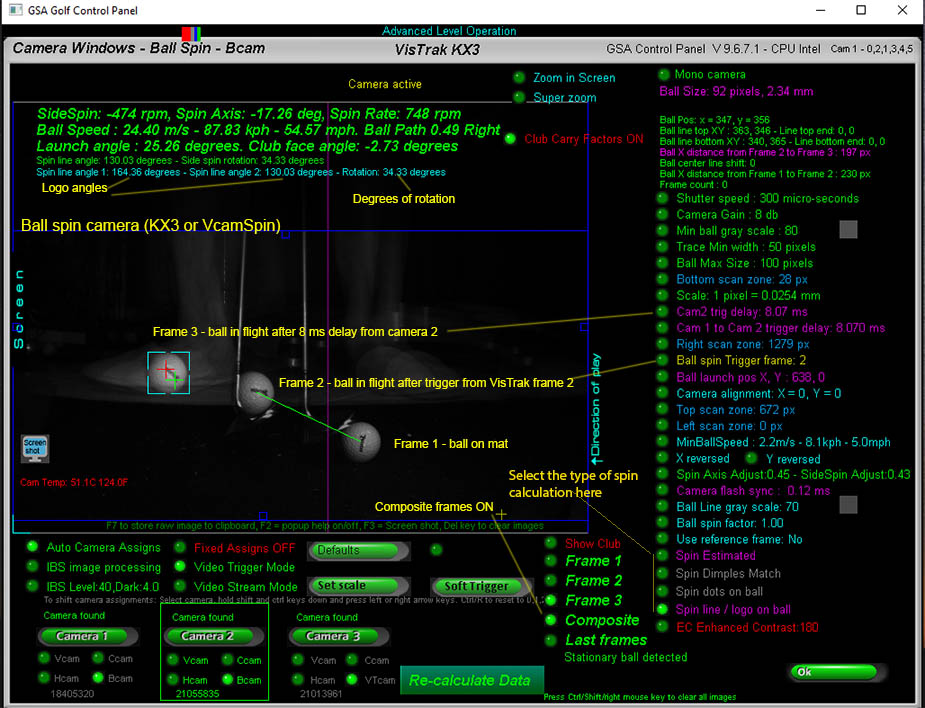
Select the type of spin calculation and balls being used from the camera window's 4 spin methods.
Note that the "Spin Dimples Match" method is not yet available though.
If the system cannot detect any markings, then the spin rate will be estimated from club data.
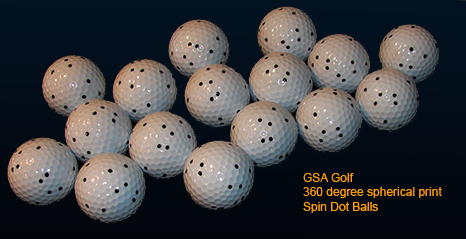
You can use either the supplied spin dot balls or use your own balls that feature a manufacturers logo.
The advantage of using marked spin dot balls
The main advantage of using spin dot balls is that you don't have to bend down and adjust the ball
so that the ball logo or the applied metallic dot is facing in a certain direction.
BTW from what I gather, Trackman and Mevo systems do require you bend down and adjust the ball so that their metal dot
- that you are required to apply to the ball - is facing upwards or in the direction of play.
Another advantage is that you can visible see and thus verify the rate of rotation during the video swing playback with visible ball markings.
In contrast, you won't see this if the ball has no markings so you'd have to just believe that the measured ball spin rate is correct.
![]()

Click above to read more about the Vcam B spin camera setup and theory

Technical Support


Email and remote access support is available for all original purchasers of GSA Golf systems.
For all non original purchasers (i.e. purchasers of used GSA Golf systems) remote access support can be purchased separately.
Click above images for more information.
![]()
![]()
 Home
Home Products
 Cameras
 Software
 Enclosures
 GSA Courses
 E6 Courses
 Business
 Tech News