![]()


![]()
Important !
Please note that many of the installation links on this page are intended only for older systems.
If you have recently purchased a new GSA Golf SCX or Eagle system,
then please use one of the two links below
SCX Installation

Click the above button to go to the SCX installation page
Eagle Installation

Click the above button to go to the Eagle installation page
![]()
VisTrak Installation
![]()
 -
- -
-
 -
- -
- 

![]()
VisTrak Eagle Setup
VisTrak Installation and Setup Videos
 -
-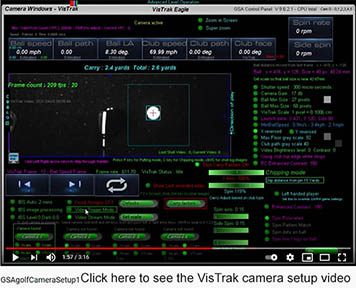
Click the above images to watch the VisTrak installation and setup videos
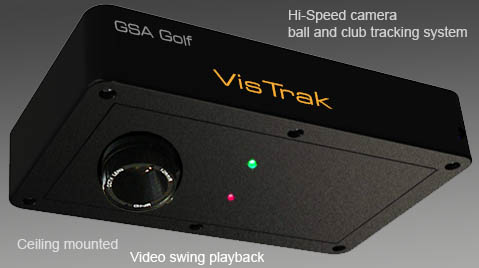
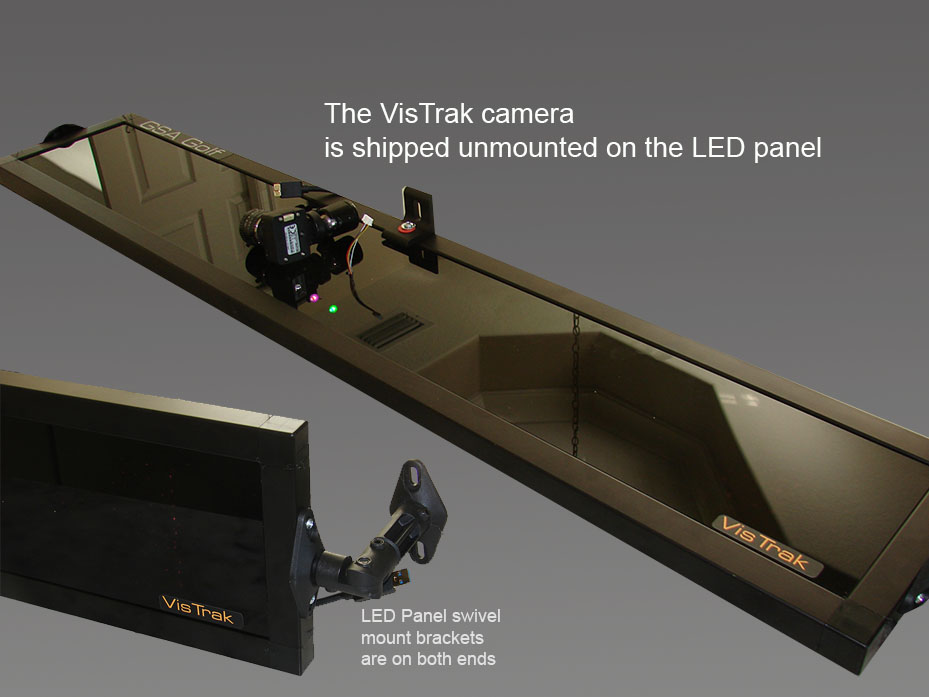
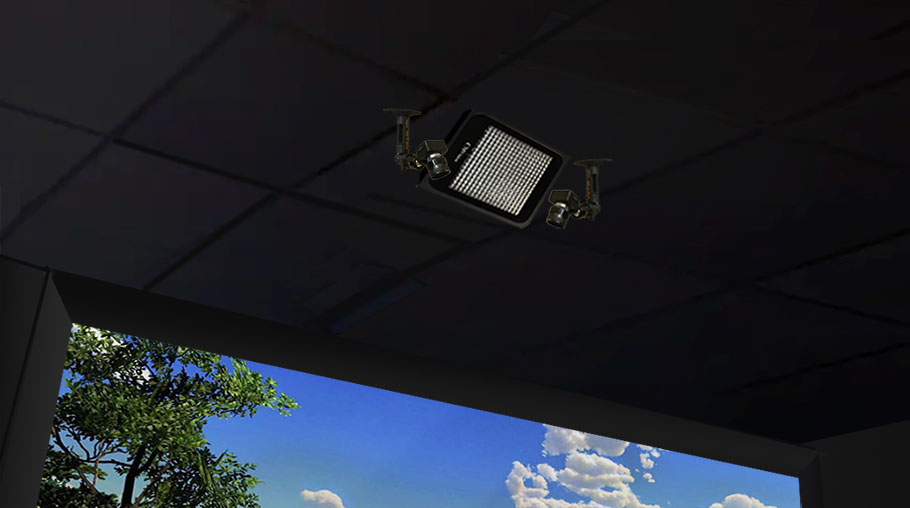
The VisTrak Eagle with adjustable mounting.
![]()
VisTrak Eagle Camera installation Video

SSi camera driver installation
![]()
Click above to read more
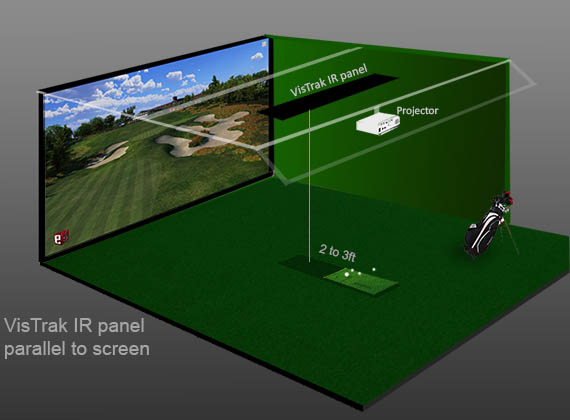
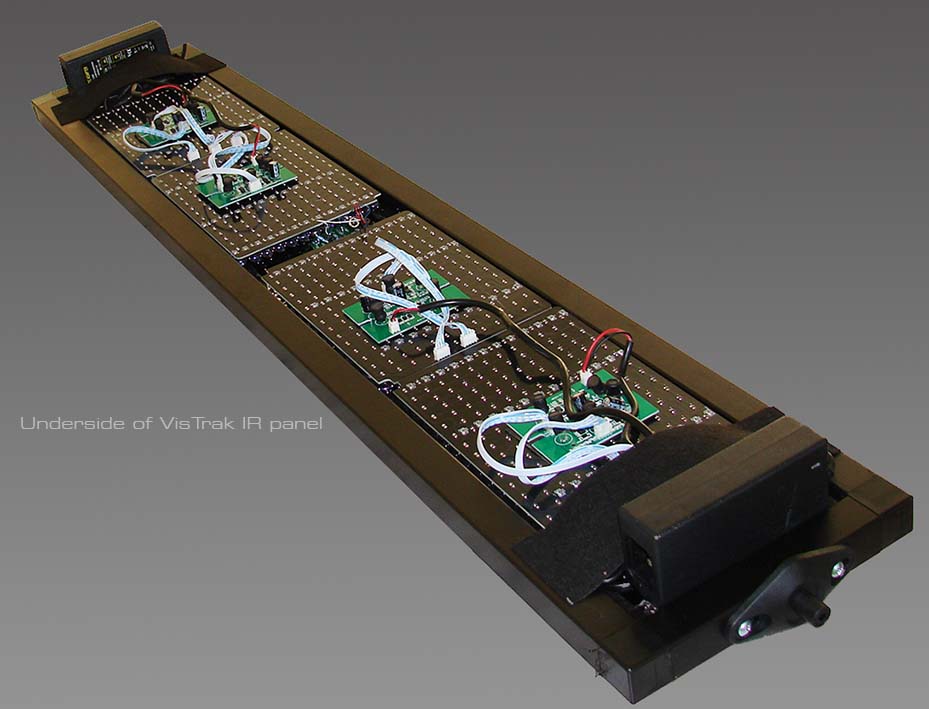
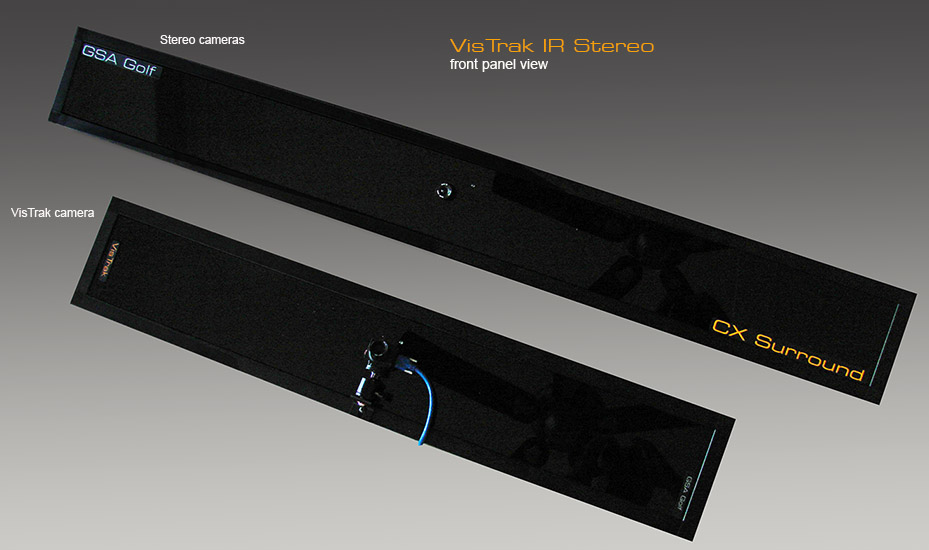
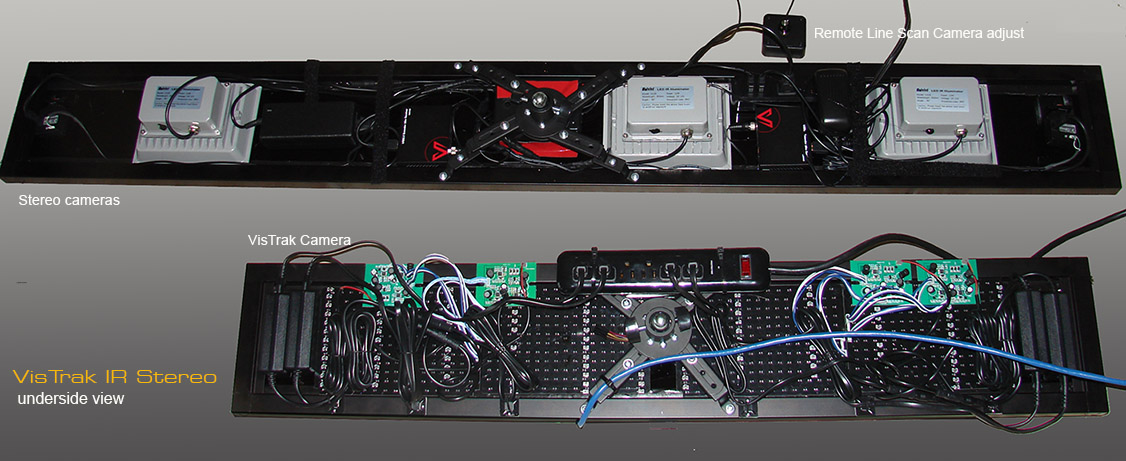
VisTrak IR Panel Mounting

 -
-
You can mount the VisTrak IR panel two ways
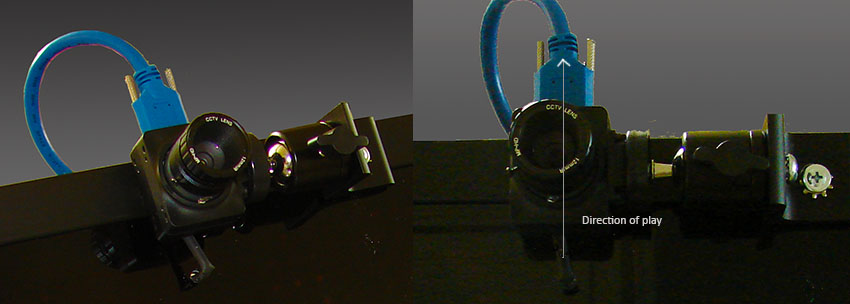
The camera can be rotated so that its direction of play always points to the screen no matter which way the panel is mounted

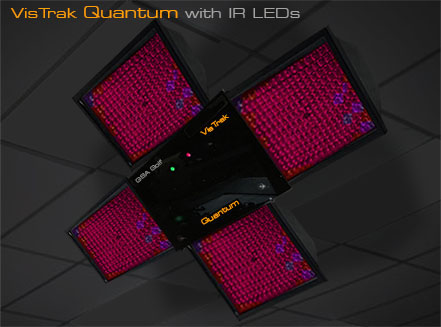
VisTrak Eagle Lighting
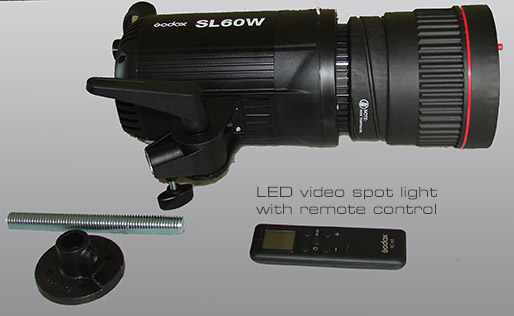
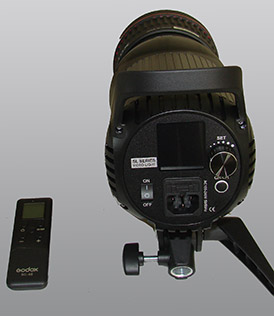
The VisTrak's LED spot light with lens, remote control and mounting hardware.
Alternatively, use the VisTrak IR lighting
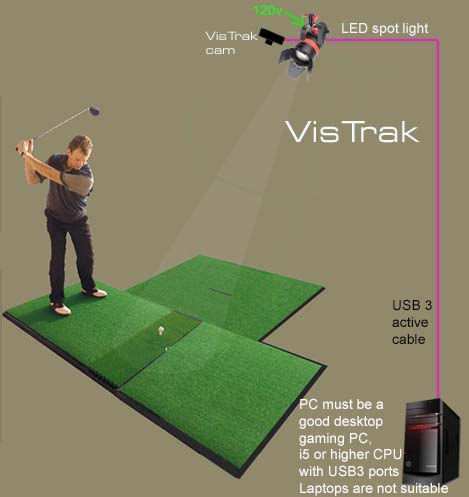
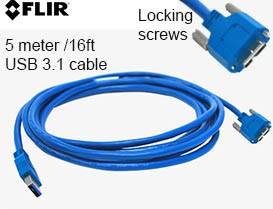
VisTrak wiring
The VisTrak camera uses an active powered USB3 30ft long cable that is connected between the camera and a USB 3 port on the PC.
The USB3 cable is powered by a power supply adapter that is connected to the cable near the camera,
This power adapter is connected to a 120v or 240v outlet near the camera on the ceiling.
You will thus require an 120v or 240v power outlet or source close to the camera.
In addition, the LED spot light will also require 120v or 240 v power close to the LED spot light.
LED spot light lighting
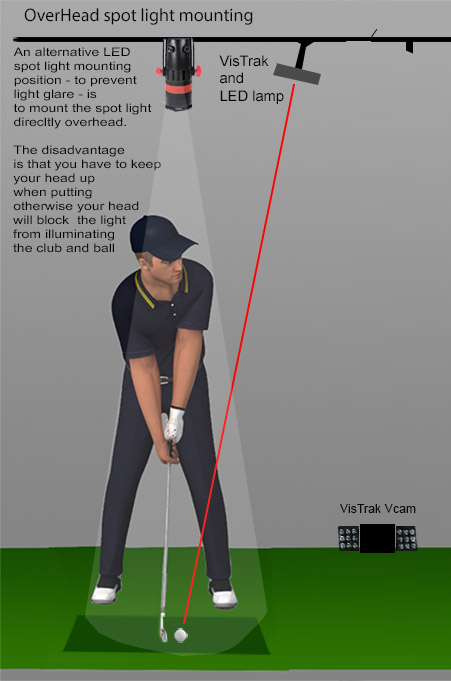
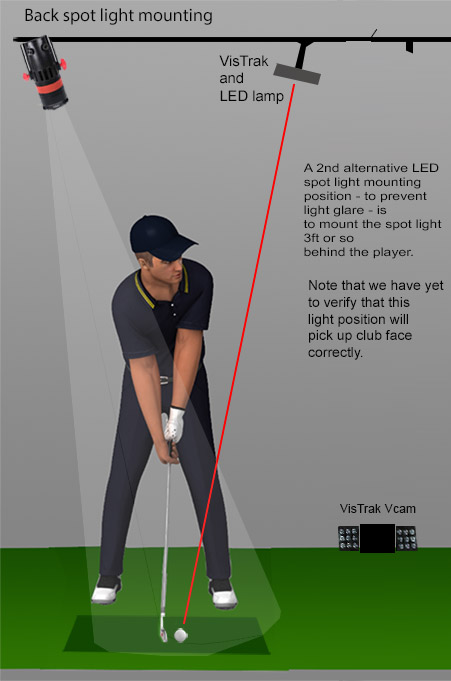
Mounting the camera and LED spot light
Turn the power control to max light output of 100%.
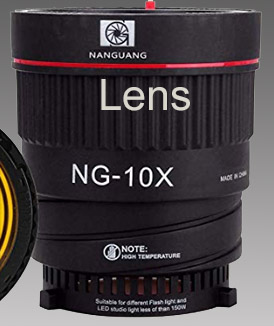
Fit the lens to the spotlight and twist out to its max extension so that the beam is narrow (10 degrees)
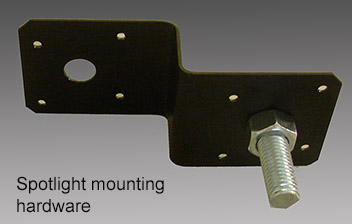
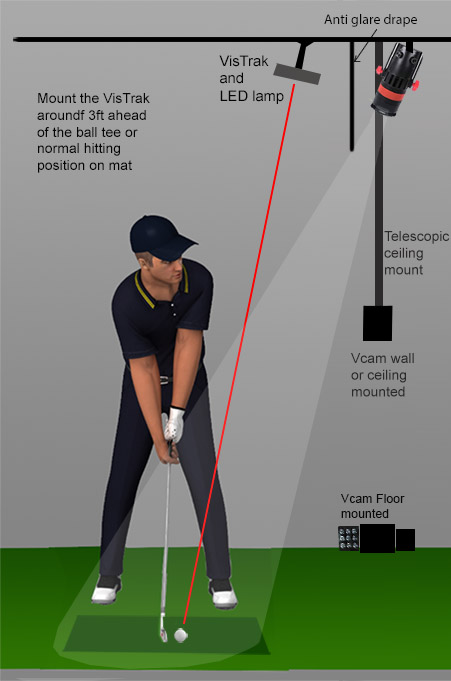
Mount the spotlight mounting bracket to the ceiling inline with the ball hitting position
and about 3ft ahead. Screws and anchors are supplied.
Attach the spotlight to the protruding bolt and tighten the wing nut on the spotlight.
 --
--
 --
--
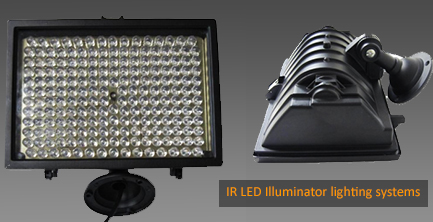
IR LED lighting
If not using the VisTrak IR with built in IR LED lighting,
then 4 individual LED lamps should be mounted either around the VisTrak camera
or somewhere close to it.
Aim all 4 lamps directly towards the hitting mat.
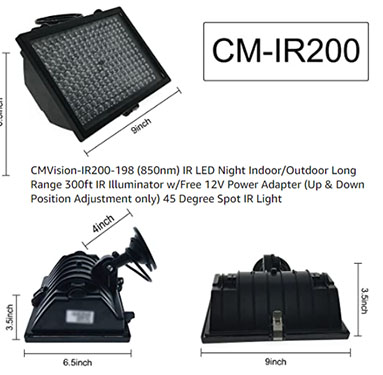
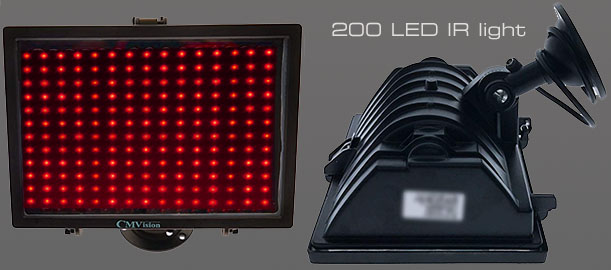
Note: If you have purchased the VisTrak camera without IR LED lighting, then the recommended IR light is the CM vision 200.
VisTrak Lighting options
If you have purchased just the cameras, the following lighting is recommended.
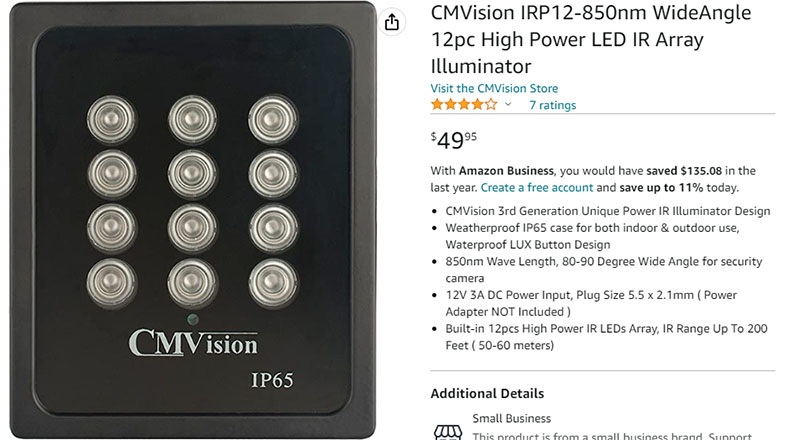
Used for LX systems (2 to 3 required)
Note that the power supplies are not included when purchasing on Amazon
You will require 3 amp 12v power supplies for this IR Illuminator
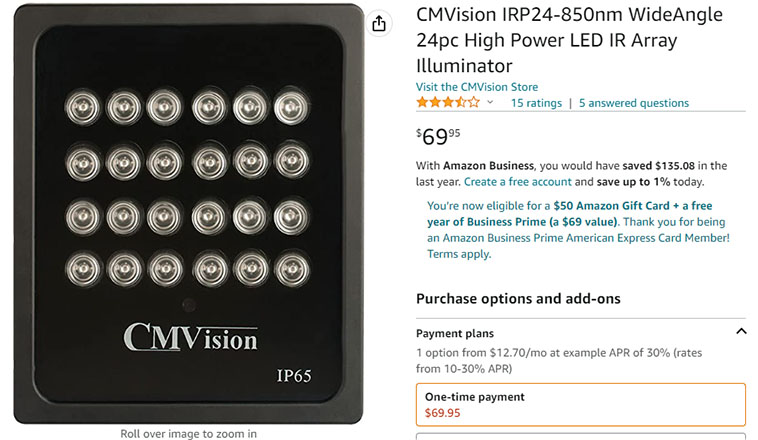
Used for all other VisTrak systems such as Eagle, SCXi and EVi
Minimum 1 required for each camera
Note that the power supplies are not included when purchasing on Amazon
You will require 5 amp 12v power supplies for this IR Illuminator
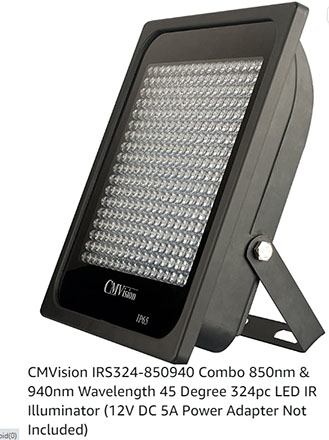
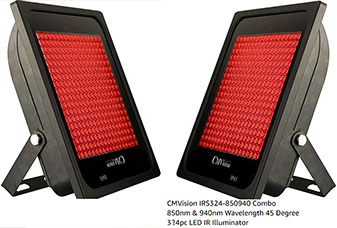
3 x CM Vision IRS324 850 nm IR Illuminators
Available on Amazon for $79 + $20 for 5 amp CM Vision power supply
Alternatively 3 x CM Vision IR 200 - 850nm IR Illuminators
Available on Amazon for $69 with 3 amp CM Vision power supply
Note: these illuminators are - at the time of this writing - currently sold out on Amazon but are still available at CMvisionSecurity .com.
Mounting the VisTrak IR
The VisTrak IR has built in IR LED lighting
so there's no requirement to add on any additional lighting with this unit.
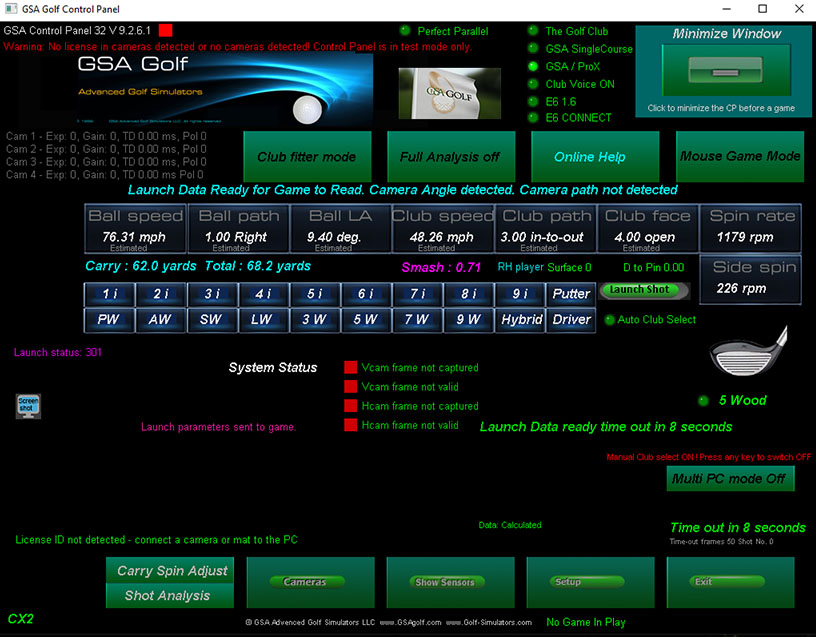
GSA Golf system minimum PC requirements
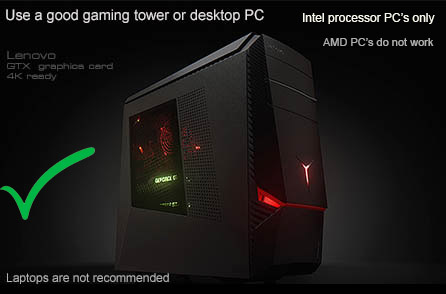
Intel i5 or above Processor
Warning! Do not use PC's with AMD processors.
8GB RAM Nvidia 1070 Graphics Card or equivalent
25GB of Hard Drive Space
Windows 10 or 11 (Required)
Internet Connection
(Required if using 3rd party game software such as E6, TGC or GSPro)
2 X USB3 ports (Required)
Note: The cameras are USB3 cameras
and will only run at the correct speed when connected via USB3 cables directly to separate USB3 ports on the PC
Warning
If using 2 cameras, do not connect the cameras together with a Hub !
All cameras must be directly connected to separate USB3 ports on the PC
Use only powered USB3 extension cables if the supplied cables are not long enough
Important ! USB 3 only

The VisTrak camera is a USB 3 camera and must be connected to a USB 3 port on your PC.
You can identify a USB 3 port by the SS symbol next to the port
The VisTrak hi-speed camera will require a PC that is capable of running hi-speed cameras.
While most good desktop gaming PCs featuring i5 or i7 CPUs can do this, laptops are not suitable.
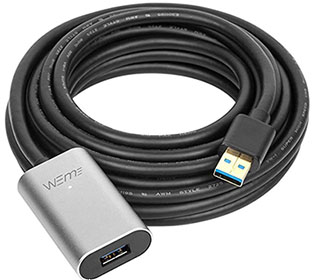
Current max VisTrak cable length is 16ft to 32ft
Warning! not all commercially available cables will work with the VisTrak camera
Use only the supplied cables or the ones shown above.
Installing the software.
![]()
Technical Support


Email and remote access support is available for all original purchasers of GSA Golf systems.
For all non original purchasers (i.e. purchasers of used GSA Golf systems), e-mail support can be purchased separately.
Remote access support is avaiable for all purchasers avaiable for $75 per session (max 1 hr per session)
Click above images for more information.
![]()

For new installations, download and run the following programs and files
GSA Control Panel (CP) full version download
Download and install your CP full version from the link supplied to you via email after purchasing a GSAGolf tracking system.
After you have downloaded and installed the full version GSA Control Panel, download and install the latest GSA Golf Control Panel update
![]()
Please note that software download links are no longer available directly from this website
Software download links are sent to you via email after product purchase.
Contact us if you haven't received them
Links to the CP updates are on the Tech News page
Click above image
Install and run the latest CP after installing the full version CP

![]()
Error message when first starting the CP ?
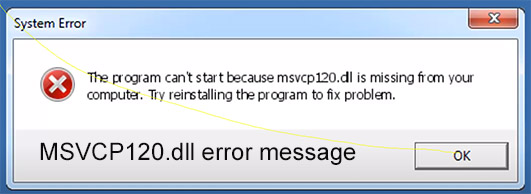
If you see the above error message when first starting the Control Panel (CP)
then your PC requires the VC Redistributable files.
Click on the above image to see an installation video
Download VC redistributables hereHere
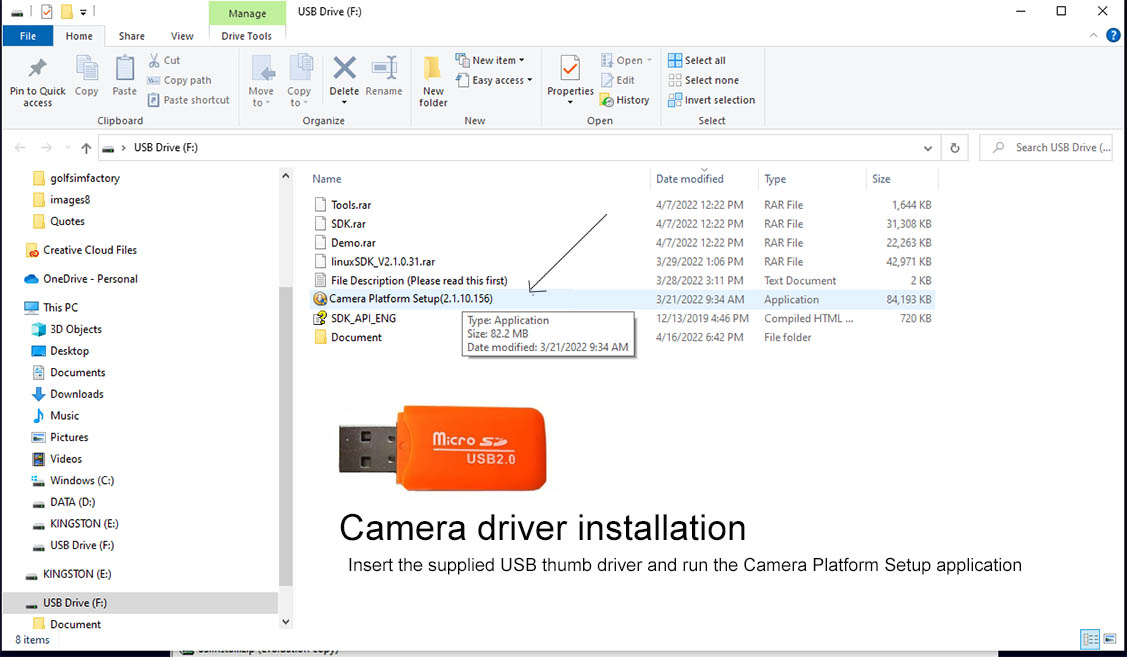
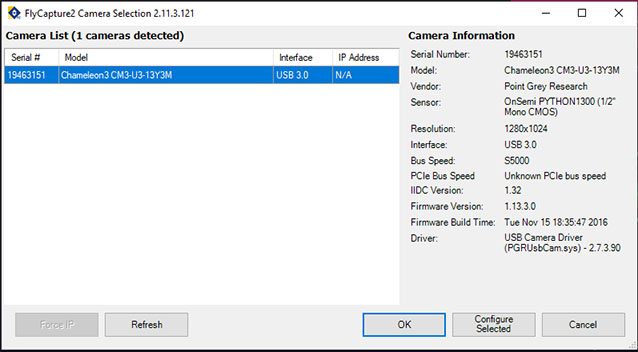
Installing the Camera driver software
SSi camera driver installation
All new cameras are now SSi cameras
Click above to read more
![]()
Follow these instructions only if using older Flir cameras
Flir camera driver installation
Camera Driver 2.11 33MB
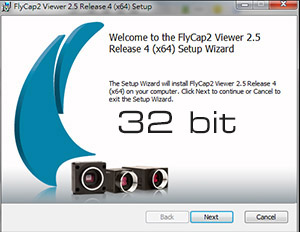
Click above to download and install the Camera FlyCap2 Viewer application
The app is located in the
C:\Program Files (x86)\Point Grey Research\FlyCap2 Viewer\bin folder
and is called Point Grey FlyCap2
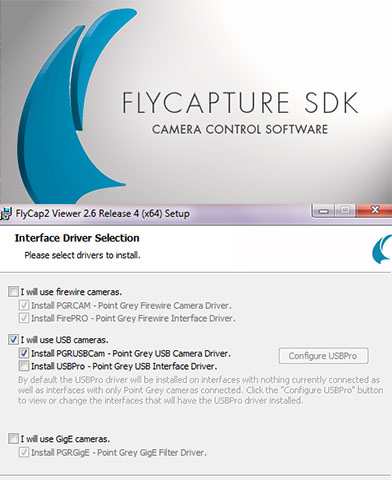
Select "I will use USB cameras" and select "Install PGRUSBCam driver" when prompted.
Important ! Do not select the "USBPro" option !
If you have previously run this install program and think you may have selected the USBPro option then you must uninstall the FlyCapture Viewer and re-run it
![]()
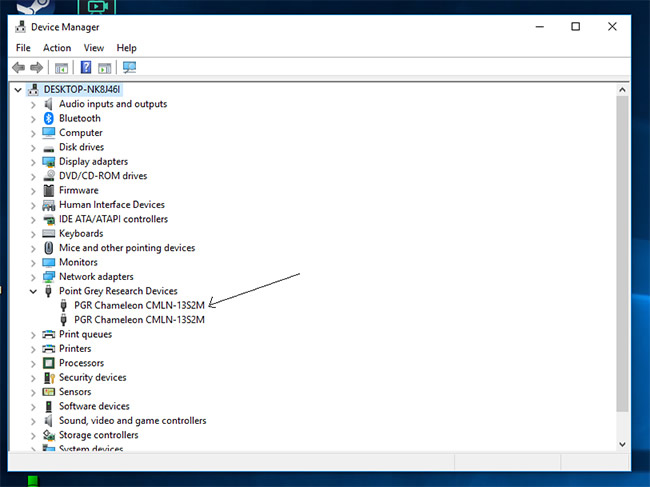
Once the drivers are installed and the cameras connected to the PC you should see in the Windows Device Manager that the cameras are detected as PGR cameras.
Cameras not registered?
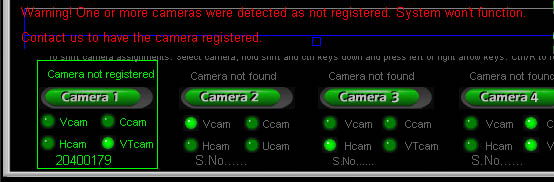
Cameras are registered in the Control Panel's executable program.
If you see the above message stating that the cameras are not registered,
then download and run the latest CP Beta update.
![]()
Click the above button image to download the latest Alpha CP update
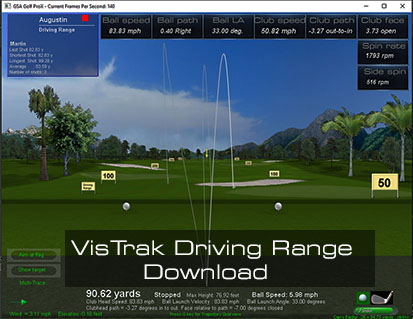
Installing the game software
ProX Driving Range
Please note that software download links are now sent to you via email.
Contact us if you haven't received them
![]()
GSA Golf Game software download
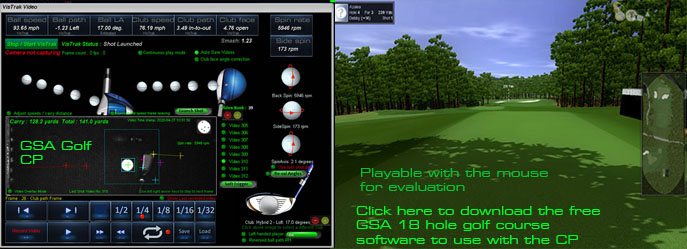
Please note that software download links are now sent to you via email.
Contact us if you haven't received them
Note: If you encounter a windows error message stating that it could not find d3dx9_30.dll when starting GSA Golf,
download and copy the d3dx9_30.dll to your windows\SysWOW64 folder.
Download here d3dx9_30.dll
![]()
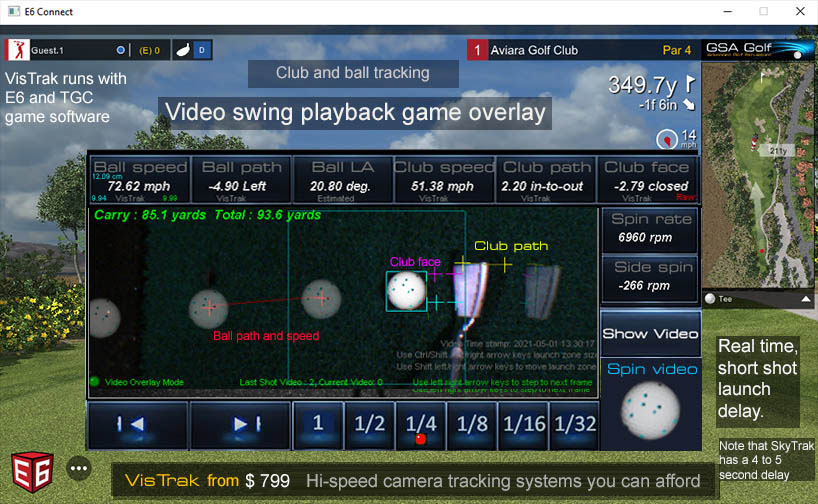
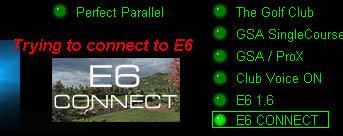
E6 Connect download

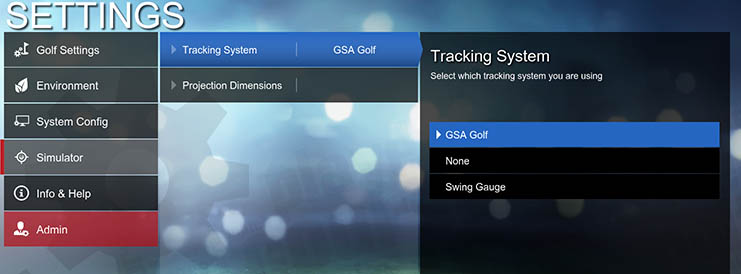
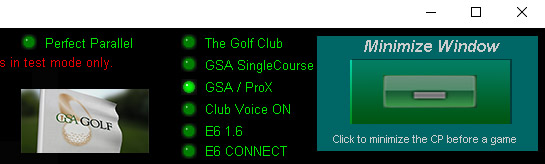
Select GSA Golf in the Settings / Simulator options
 -
-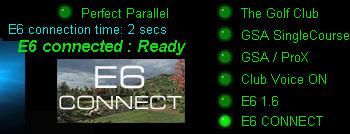
Select E6 CONNECT in the GSA Golf Control Panel's main window
VisTrak Eagle camera mounting
--
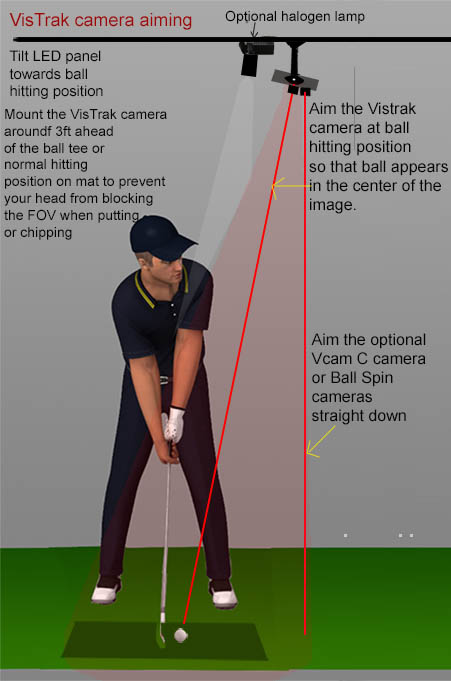
1. Mount the VisTrak camera and IR LED lights around 3 ft ahead of the ball strike zone on the ceiling.
Mounting height should be around 9ft.
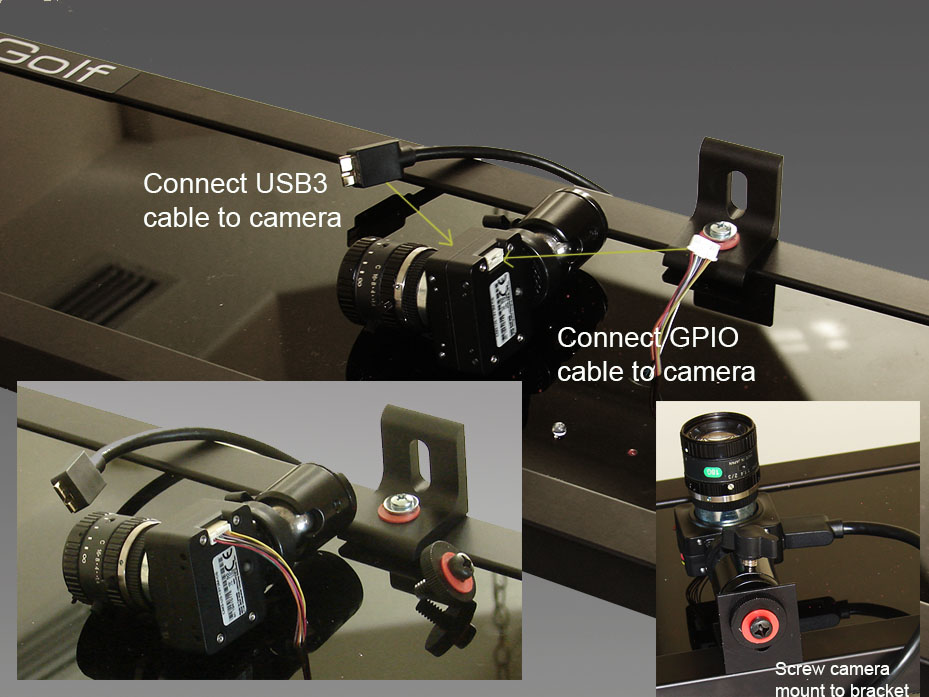
2. Connect the USB 3 extension cable to the VisTrak camera
and Connect the active USB 3 cable to a USB 3 port on the PC
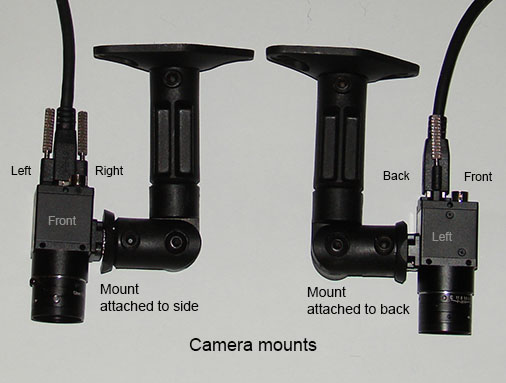
Depending on which side of the camera the mount is attached,
cameras may have to be rotated in order to obtain the correct orientation
![]()
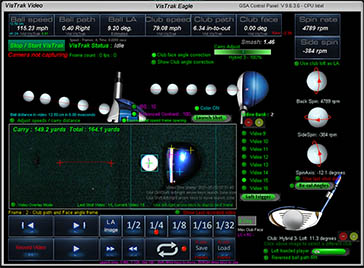
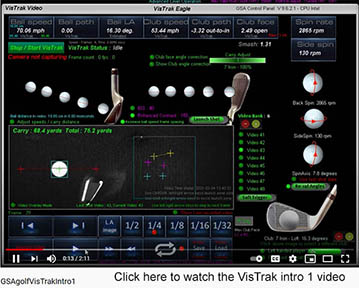
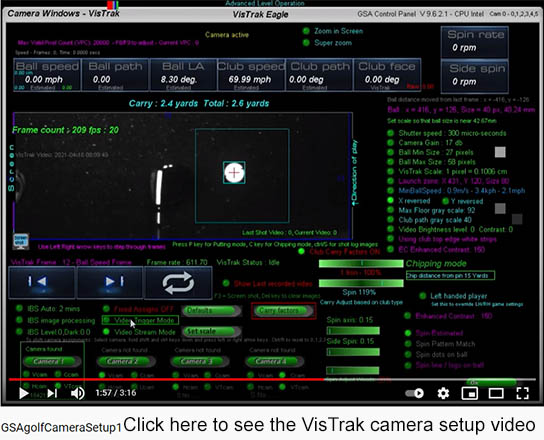
VisTrak Eagle System Setup
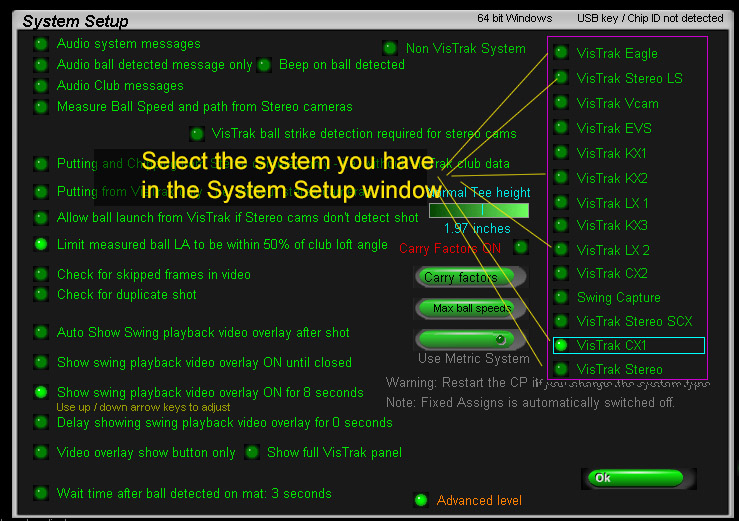
Select VisTrak Eagle in this case
Start the Control Panel and select "Vistrak Eagle"in the Control Panel's setup window.
Go to the Camera window and to see the camera settings.
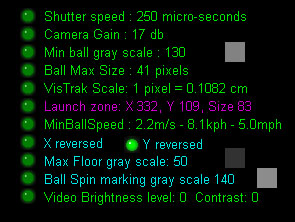
Camera settings should be as (or similar) as shown above

![]()
Adjusting the focus
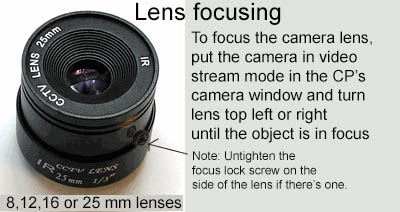
It is essential that the camera be focused as best as possible.
1. Place a ball on your hitting surface at the usual striking position

2. Click the Soft Trigger button to grab a new frame
3. If the ball appears not to be in focus - select the "Video Stream Mode"
4. Adjust focus by turning the camera lens focus dial back or forth.
You may require a second person either watch the screen or turn the dial.
![]()
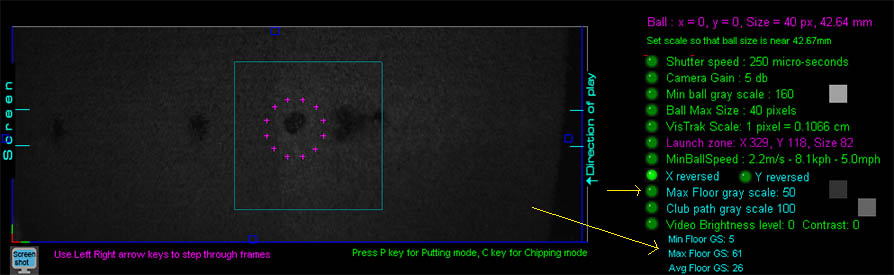
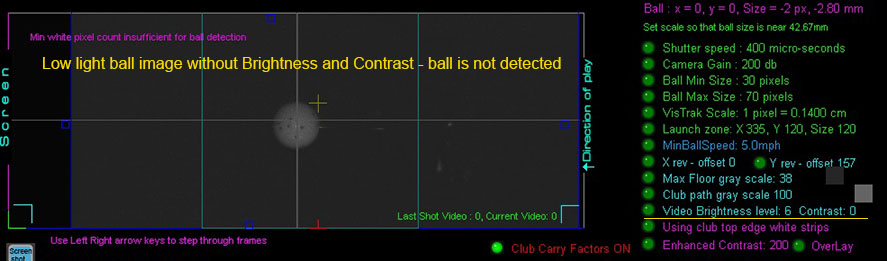
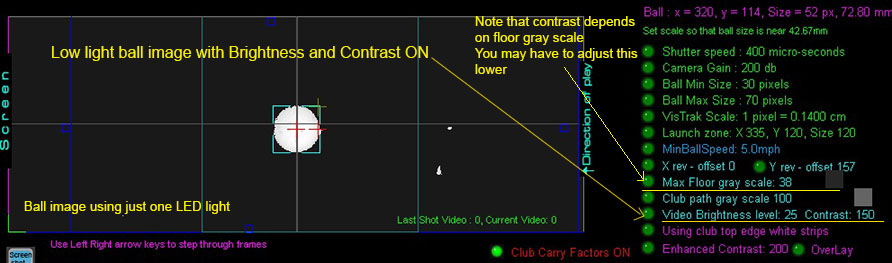
Setting the Max floor gray scale level
Soft trigger to get an image without a ball on the striking mat
The system will calculate the Minimum, Maximum and Average gray scales found in the on the mat.
The Max floor GS level is usually in the 50 to 60 range but you can set it to the calculated Average Floor GS.
Ball detection
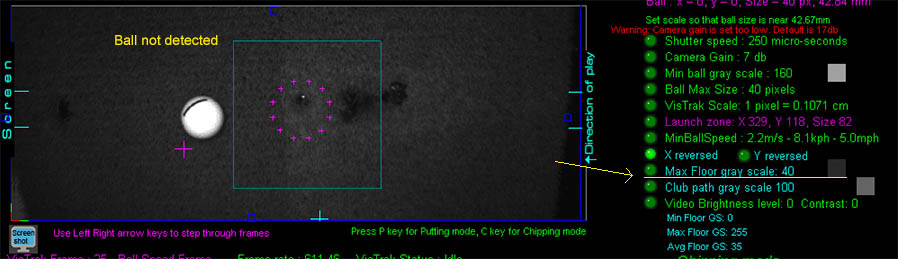
Move the ball to to another position on the mat ahead of the launch zone area and click the Soft Trigger to grab a new image.
If the Max Floor Level is set too low, then the ball won't be detected (as shown above with a floor GS of 40).
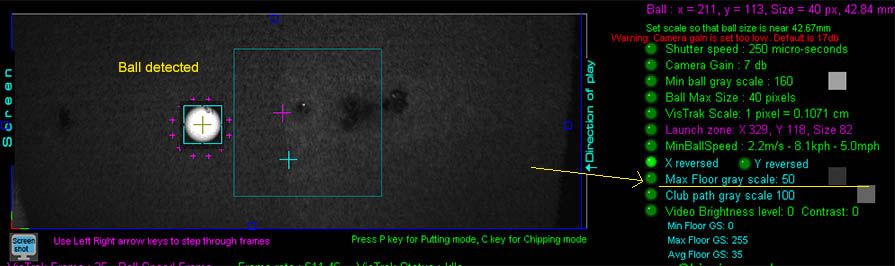
Increasing the Max floor GS level to 50 fixes the problem.
![]()
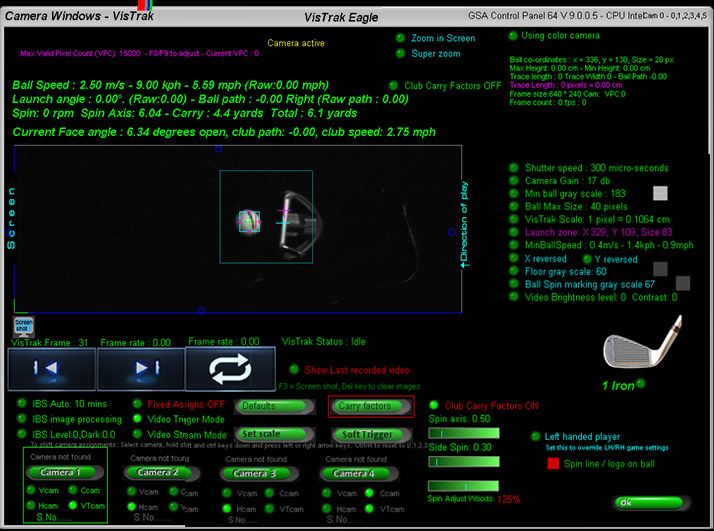
Orientation and direction of play
Direction of play as seen in the Camera window is always right to left.
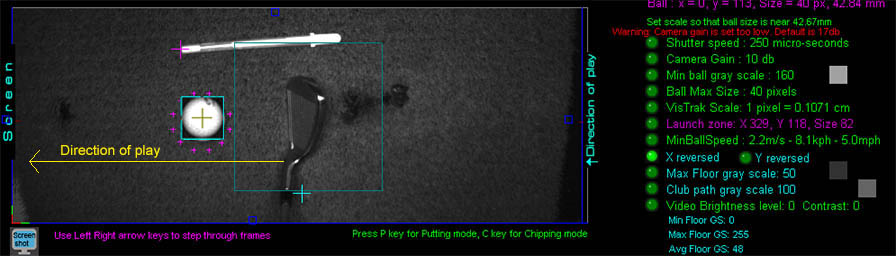
To confirm, place a club and any object above it in the FOV of the camera in the usual direction of play to help with orientation.
If you see the club facing the wrong direction or the club face reversed, you can use the "X and Y reversed" options to flip the image.
Soft Trigger to get a new image after every reverse action to confirm that all is correct.
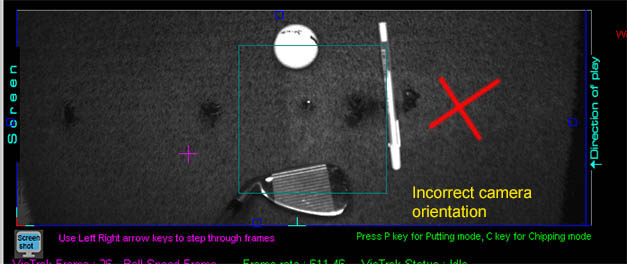
If you see that orientation is vertical (as in the above image) then the camera has to be rotated 90 degrees on its ball mount
Due to the camera pixel chip not being square, the frames or images cannot be rotated. Just flipped.
![]()
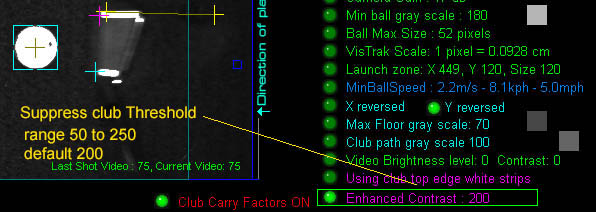
Club detection with green fiber grass mats
Due to the amount of light reflection from green fiber hitting mats,
there won't be sufficient contrast between the club and the underlying surface for the system to detect a club
The above image shows no club detection
When using such a hitting surface,
a white strip will have to be applied to the leading edge of irons and the top edge of woods in order for the system to detect the club.
With dark light absorbing mats, the system can usually detect the club without the requirement to apply white strips.
If your images look dark - as in the above - then set the "Min ball gray scale" to around 130 and the "Max Floor gray scale" to around 50

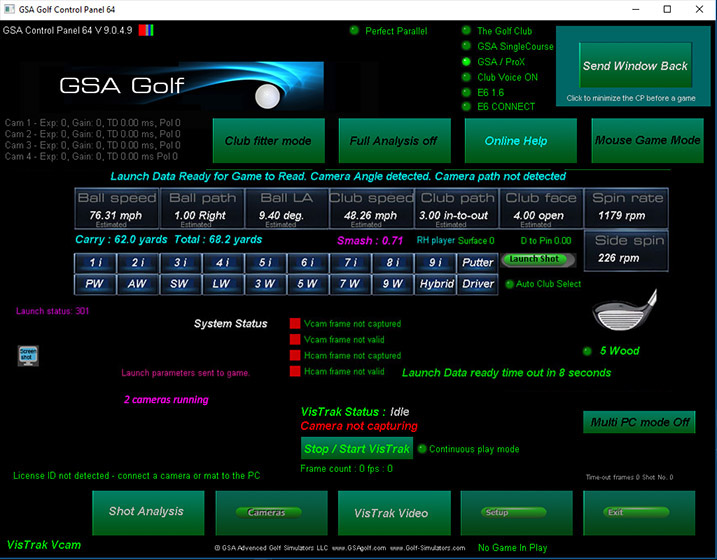
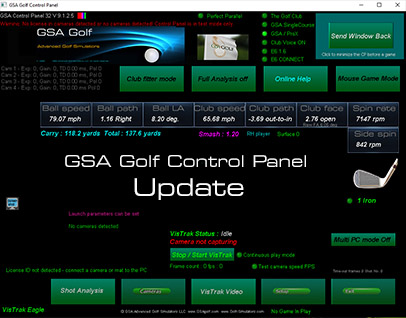
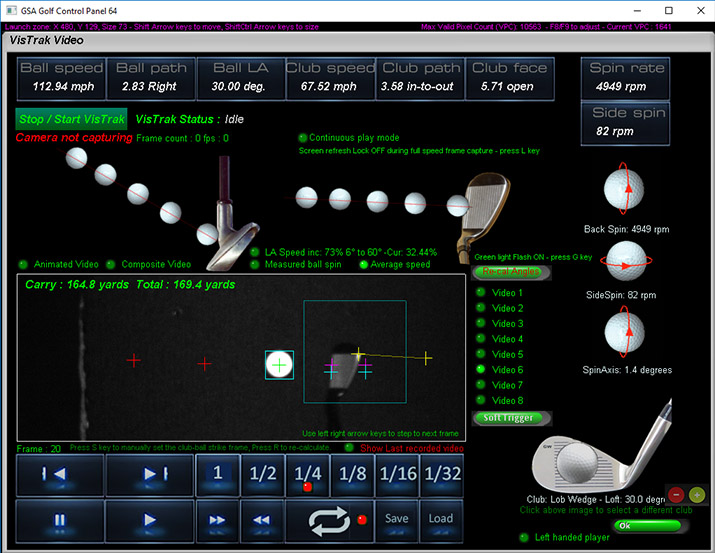
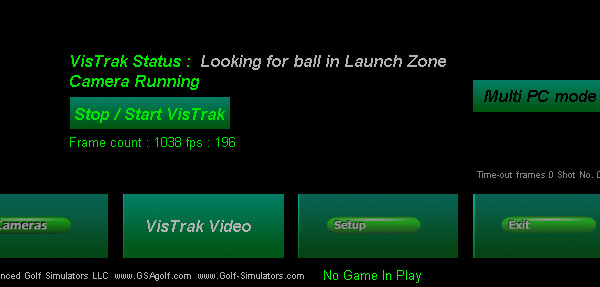
From the Control Panel's main window, you should see the "Cameras running" message
and that the VisTrak status is "Idle"
i.e. not grabbing frames
![]()
How to confirm that the camera is running
To confirm that the camera is operational, select the "Video Stream Mode"
or click the "Soft Trigger" button in the Camera window.
You should then see that new images are being grabbed and displayed
Go to the Cameras window in the CP and click the "Video Stream Mode" option ON
Place a ball in the usual striking position on the mat and adjust the camera's aim so that
the ball appears more or less in the center of the image.
![]()
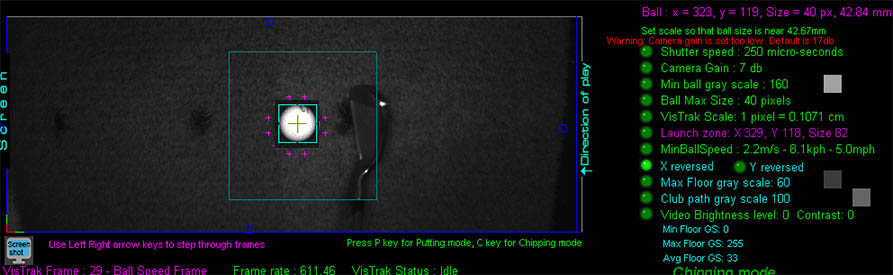
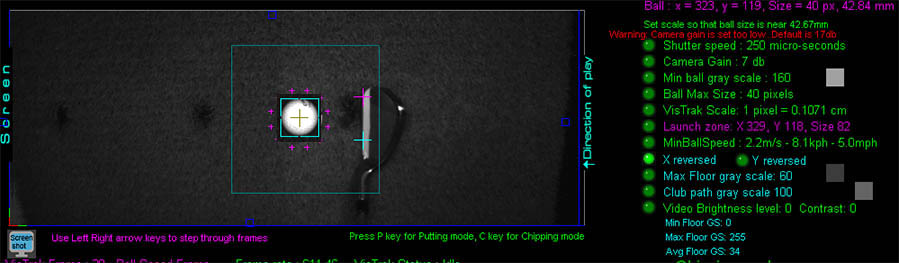
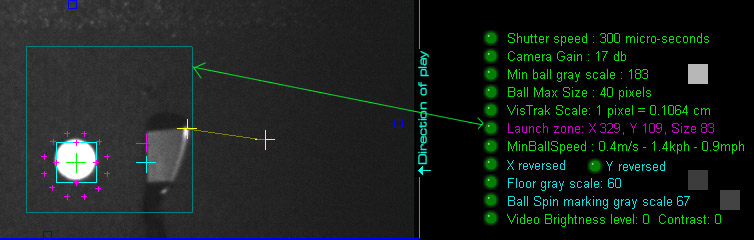
Scaling factor
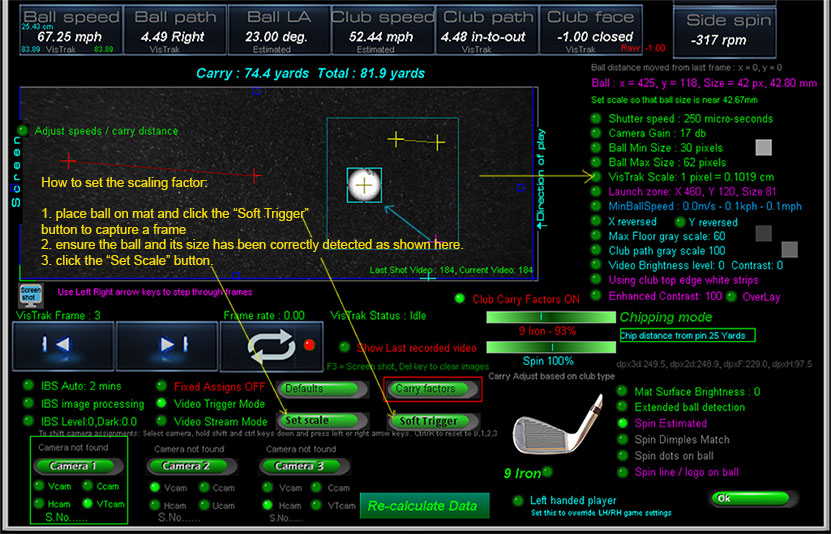
The scaling factor is used to convert distances measured in pixels (as the camera sees it)
to real world distances (i.e. cm, meters or feet, inches)
If the scaling factor for your camera is not set correctly, then measured ball speed won't be accurate.
Note that this scale setting procedure is only required one time during the installation
The procedure is performed in the VisTrak camera window.
Depending on what system you have, this will be camera 1 if using a single camera,
camera 2 if using a dual camera system or camera 3 if using a 3 camera system,
![]()
Launch Zone
The ball must always be played from within the launch zone (shown by the green square).
The launch zone is user adjustable (size and position) but would normally be in the center of the frame
and be around the size as shown above.
Note that the ball can be moved around in the launch area without a ball launch being triggered.
A system ball launch is only triggered if the ball moves outside of the launch zone
at or more than the user defined "Min Ball Speed".
Adjust the camera lens focus by turning the dial on the lens until you get a sharp image.
Adjust Shutter speed to around 250 to 300 micro seconds and Gain to 17db if not already set.
Click the Stop/Start button. The Camera will then start to look for a ball at around 200 fps and the green LED light will start flashing.
Once a ball has been detected, the green LED light will switch constanly on, or/and an optional audible beep will sound and the system will wait a minimum of 3 seconds.
The wait time is to ensure the ball has settled in its launch position and the player isn't moving it.
Note that you still move the ball and as long as it doesn't move out side of the launch zone, the movement won't trigger a shot.
Important !
Once the ball has been detected in the launch zone,
do not waggle the club over the ball, do not bend over the ball and do not move the ball.
Doing any of the above will cause a shadow to be cast over the ball which will trigger the cameras
and may cause an inadvertent ball launch in the game software
and/or restart the "Looking for ball in Launch Zone" mode.
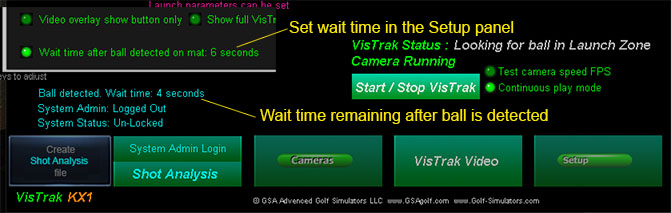
You can adjust the "wait time" in the Setup window
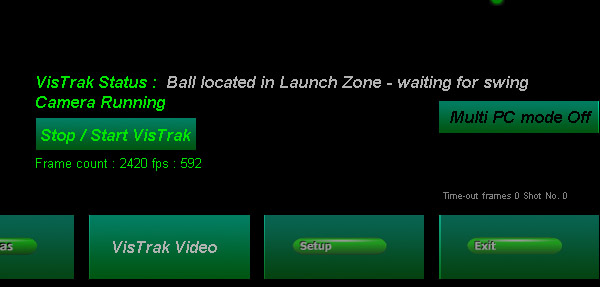
The status will then change to "waiting for swing" and the frame rate will increase to around 600 fps.
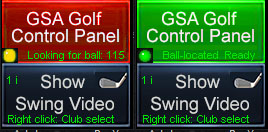
To better indicate to the player what status the CP is in, the overlay minimized CP window is colored.
When the system has detected the ball and is ready and waiting for the swing, the CP minimized window is shown in green.
Otherwise, it will be shown in red.
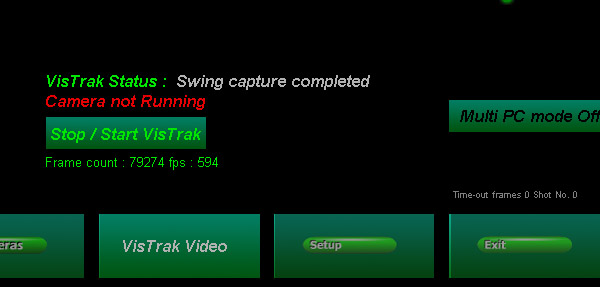
After striking the ball the status will change to "Swing capture completed"
and the ball and club data will be sent to the game software to launch the ball.
The camera image grabbing during the ball flight will be stopped until the ball has landed.
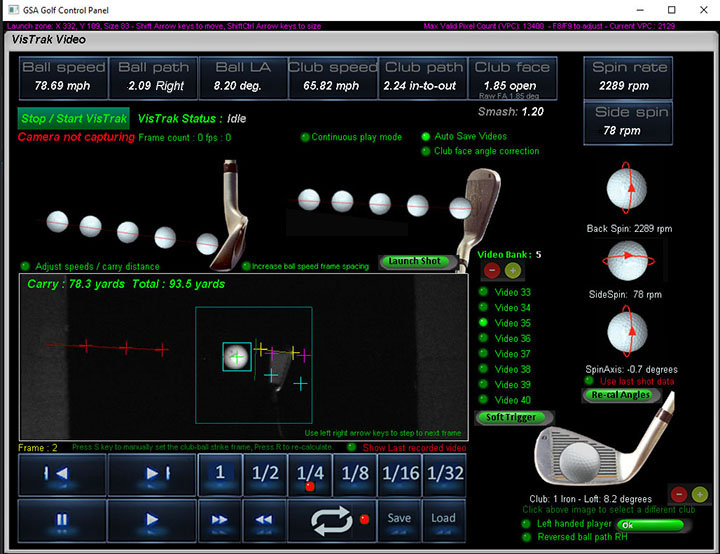
You then have the option to view the swing playback in the new VisTrak video playback window.
You can also check each frame in the Cameras window.
After the ball has landed the system would normally loop back to "Looking for ball" status for the next shot.
![]()
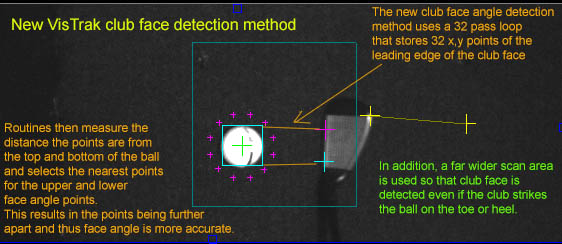
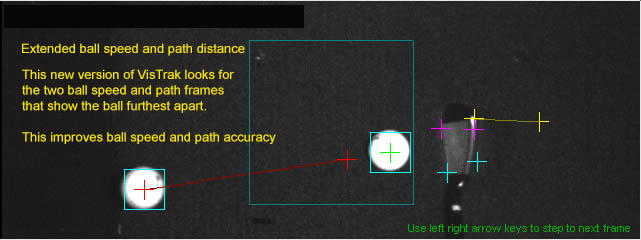
Min / Max ball image sizes
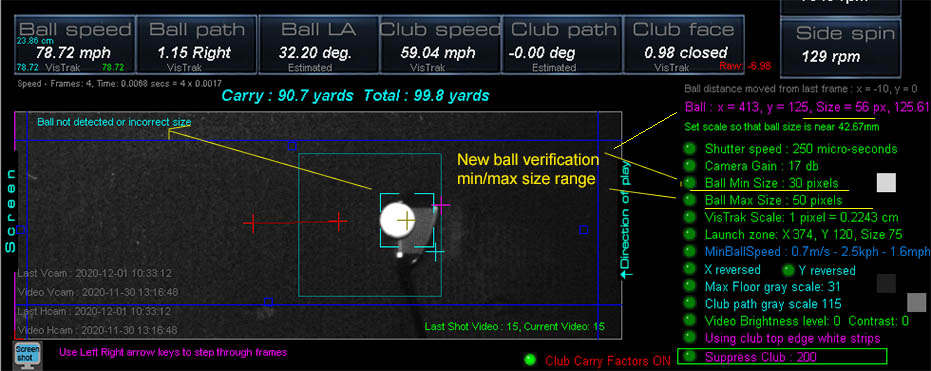
The openCV method of ball detection can sometimes detect the club with the ball if the ball is over over the club face,
so an additional check is now made to see if the result is correct.
Just a simple min / max size check solves the issue. Default min / max size is 30 to 50 pixels in diameter.
Should the test fail (as in the above image), this frame will not be used in any ball speed or ball path calculations.
Note that the new "Suppress Club" feature usually solves this issue too but - as club markings can also cause problems - the min max ball size check should always be made.
![]()
Enhanced Contrast option with club track strips
Note: the "Enhanced Contrast" option was previously called "Suppress Club"
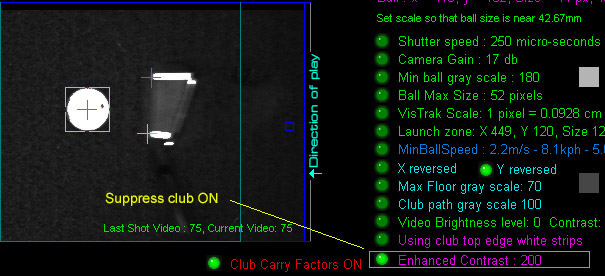
Use the "Enhanced Contrast" feature to accentuate the ball and club markings
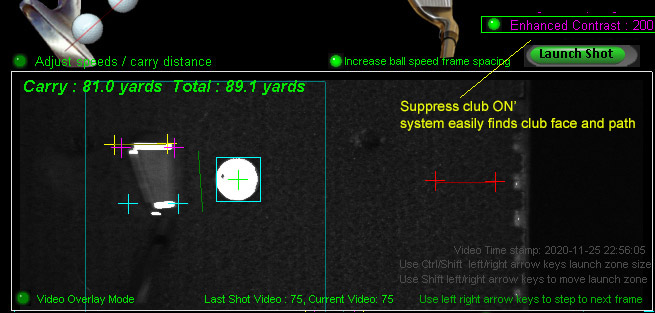
The "Enhanced Contrast" option in the VisTrak window too.
![]()
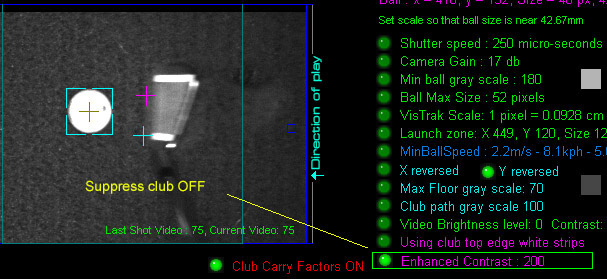
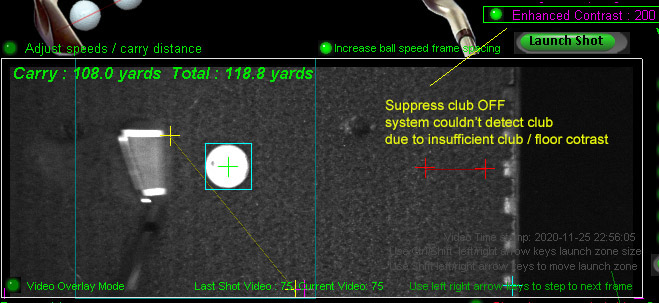
Enhanced Contrast option Threshold
For those that are not using sufficient lighting to illuminate the ball and club tracking strips to the standard gray scale level of over 200,
there is now a new user adjustable "Threshold" level so that balls and club strips that have a gray scale level below 200 are also switched to white.
Note: the "Enhanced Contrast" feature is the same as the old IBS (image background suppression).
IBS switches any pixel brighter than the threshold (e.g. 200) to white and darkens any pixel equal to or below the threshold.
To adjust the threshold level, move the mouse over the option and use the up/down arrow keys.
1. switching the "Enhanced Contrast" OFF immediately restores the video back to its original state so you can compare the effect.
2. adjusting the Threshold immediately shows the results of the new setting.
VisTrak voice audio
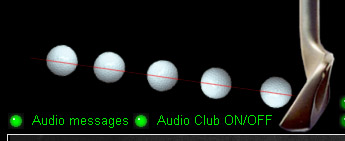
When the "Audio messages" option is ON ( default ON - switch ON/OFF in the VisTrak window)
the system will tell the user what status the camera is in.
Camera audio status messages can be :
1. Looking for ball
This message is played every 10 seconds until the ball is detected in the hitting launch zone
2. Ball detected. Waiting for swing.
Ball was detected in the hitting launch zone.
System goes into high speed camera mode, ready to capture the swing.
3. Ball detected outside of launch zone area
This indicates that the ball was placed on the hitting surface but was outside the launch zone
and should be moved back into hitting launch zone
4. Ball moved within launch zone.
This indicates that the ball was in the launch zone but was moved and didn't leave the launch zone.
System will then go back into "Looking for ball" mode.
5. Swing mis-read
The system detected a shot but something went wrong.
System will then go back into "Looking for ball" mode.
Camera controls
![]()
VisTrak Golf Game Play
VisTrak interfaces with TGC (The Golf Club), GSA ProX, GS Pro, RedChain, E6 1.6 and E6 Connect golf game software.
Select the game software you are using from the radio buttons at top right corner of the Control Panel's main window.
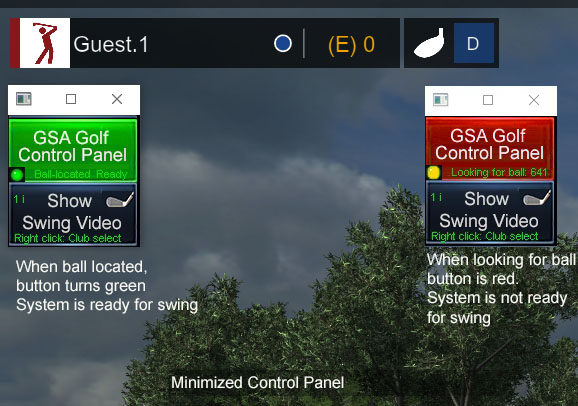
Click the large "Minimize Window" button to show the two button overlay window.
This small window will show at the top left hand side of the game software.
Click the GSA Golf Control Panel button to bring back the full size Control Panel window.
Click the Show Video button to display the last shot video in the game software.
There are a number of options for the overlay buttons in the Setup window.

In order that overlay buttons are visible in the game software,
the setting "Control Panel window not on top of other windows" must be set OFF.
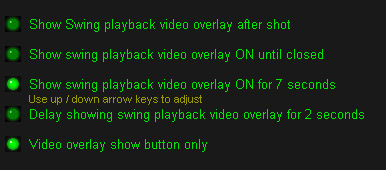
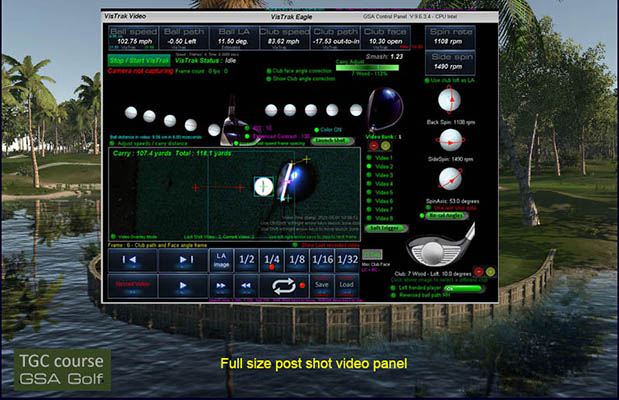
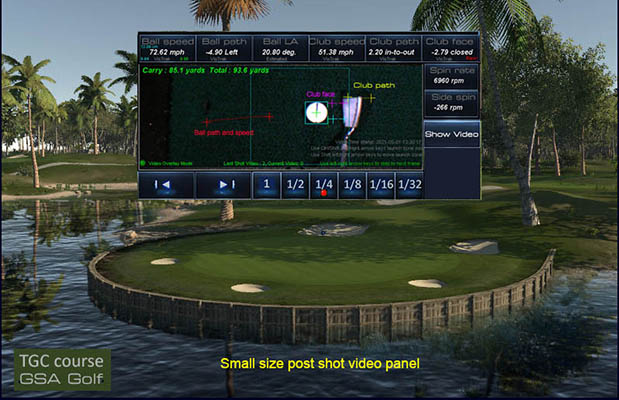
Full panel post shot video overlay
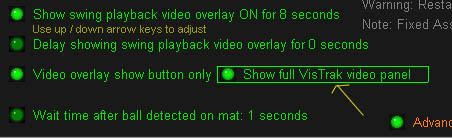
For those that would prefer to see the VisTrak video full panel after a shot instead of the smaller window video,
you can now set this option ON in the setup window.
![]()
VisTrak lighting options
VisTrak LED Spotlight
Studio LED spot light (60w $134 to the "Big Bertha" 150w studio lamp $299)
Click above image to purchase on Amazon
Studio LED spot light lens $54.00.
![]()
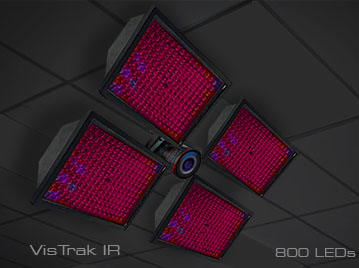
VisTrak IR LED panel
Separate or Replacement LED 800 Panel
Note: If purcasing the VisTrak IR this LED panel is already included
$ 800
Individual 200 IR LED Lamps suitable for both the VisTrak and Stereo camera systems are available on Amazon.
$ 70 each
At least 4 are required for the VisTrak camera and another 2 for the stereo cameras.
Note that these LED lamps are included in the price of the VisTrak Eagle and VisTrak Stereo
IR LED lighting with high powered 648 IR LEDs
New camera image and brightness controls that turn low light dull images of the ball and club into vibrant bright images.
Non-cased version - 1LED light using hi-contrast camera settings
VisTrak problem solving.
Click the below button to find solutions to common VisTrak user issues
VisTrak Installation Check Lists
![]()
1. VisTrak Camera and Light mounting
1. You have mounted the camera on the ceiling (no more than 10ft high) pointing at the ball strike zone?
2. You have either mounted a LED 65 watt plus visible light video spotlight with lens on the ceiling
or 4 high powered IR LED illuminators next to the camera pointing at the strike zone?
![]()
2. VisTrak Camera cables and USB 3 ports
1. You have confirmed that the VisTrak is connected to the PC with an active powered USB 3 cable ?
2. You have confirmed that the VisTrak is connected to a USB 3 port on the PC ?
The VisTrak camera is a USB 3 camera and must be connected to a USB 3 port on your PC.
You can identify a USB 3 port by the SS symbol next to the port
Current max VisTrak cable length is 16ft
![]()
3. VisTrack camera operation
1. You have downloaded and installed all the software as described on the VisTrak Installation page ?
2. You have confirmed that the camera is running ?
In the main window of the Control Panel you should see the "Camera 1 running" message
![]()
4. You have confirmed that the camera is operational ?
To confirm that the camera is operational, select the "Video Stream Mode"
or click the "Soft Trigger" button in the Camera window.
You should then see that new images are being grabbed and displayed
![]()
5. You have confirmed that the camera is operating at the correct speed ?

To confirm that the camera is running at full speed, click the " Test camera speed FPS" button.
After a few seconds, you should see that the fps rate is at least 590.
![]()
6. You have confirmed that the camera goes into "Looking for Ball In Launch Zone" after you have started the VisTrak camera?
![]()
7. You have confirmed that the camera detects the ball when placed in the launch zone
after you have started the VisTrak camera ?
To start the VisTrak camera, click the "Stop/Start VisTrak" button from the Control Panel's main window.
Note: when clicking the "Minimize Window" button, the camera is automatically started
If the ball is located, then you should see the above message in the CP's main window.
![]()
8. After striking the ball, you see the
"Shot Launched" and "Launch Data Ready for Game to Read"
messages in the Control Panel's main window ?

![]()
![]()
Technical Support
Email and remote access support is available for all original purchasers of GSA Golf systems.
E-mail support is free of charge for all original purchasers of GSA Golf systems.
Remote access support is available for all purchasers for $75 per session (max 1 hr per session)
Note that your 1 hour session can be divided up to 2 sessions of 30 min or 4 15min sessions
Remote support sessions are available 7 days a week (including weekends i.e. Sat or Sun) at 2pm ET
Remote access support requires that you have "TeamViewer" installed on your PC
Go to www.teamviewer.com to get your free team viewer installed
Buy GSA Golf remote support 1 hr session for
Price: $ 75.00
![]()
![]()
![]()
 Home
Home Products
 Cameras
 Software
 Enclosures
 GSA Courses
 E6 Courses
 Business
 Tech News