![]()
Technical Support


![]()
Before we begin
Ensure you're using the latest 64bit CP software

with the latest CP update
Click the above button to read how to do this.
Send us your CP shot videos and screen shots
Note that we'll probably require you to send in screen shots of the main panel, setup and camera panels and shot videos
in order to resolve issues.
Go to sections 24 and 25 near the end of this page to see
how to make Screen shots and send shot videos
![]()
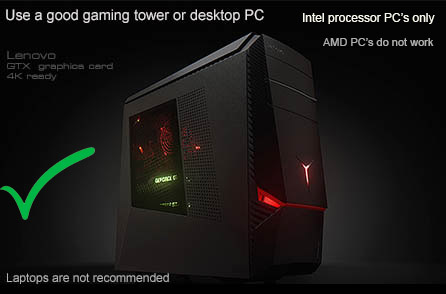
Check the minimum PC requirements
 -
-
Intel i5 or above Processor
Warning! Do not use PC's with AMD processors!
Warning! It is not recommened to use custom made PCs
Only use stock PC's !
i.e. those that are available on Amazon in the $1,000 to $1,500 plus range
Our experience over the years has shown that the USB speeds with
custom made PCs do not meet the camera USB requirements.
Warning! Do not use older PC's that have been modified in anyway
(i.e. new mother board, additional USB3 cards etc)
Experience has shown that the high-speed cameras do not function with such older or modified PCs
![]()

Click the above button for specific system intial installation setup steps
![]()
1
Common start up issues
![]()
1.1 White screen displayed when starting the Control Panel (CP)
This happens when the USB connection to a camera has been corrupted.
In this case, a call to initialize a camera never returns and thus the CP just hangs.
Probable cause
When plugging in the cameras via the USB cable to the PC, the connection is intermittent due to waggling the cable.
Note that PC USB port connections are often not very secure and any cable waggle will cause this.
How to resolve
Shut the Control Panel down and disconnect the cameras from the PC.
Plug the cameras back into the PC and restart the Control Panel.
You should hear a single audible device connect sound from windows when doing this for every camera.
When connecting the second camera, ensure you only hear the second single device connection sound
and don't hear a device disconnect sound from windows.
If you do, then repeat the disconnect and connect procedure.
1.2 The Control Panel (CP) hangs and freezes
This can happen if you adjust certain camera adjustments while the cameras are running in stream mode.
Always stop the cameras (i.e. set them to Trigger mode) before adjusting shutter speeds and gains etc
See section 18 below for more info on this
1.3.1
SCX stops working after restarting the PC
EVi stops working after restarting the PC
Probable cause
Left and Right Cameras have been reversed during the PC start-up
How to resolve
In the Camera panel, switch to video stream mode in camera 1
and place a club over the left camera's lens (SCX) or Ceiling camera (EVI)
to confirm that left camera is indeed being recognized as a left camera.
i.e. you should see that the camera's images are being blocked by the club.
Please note:
When running the cameras in stream mode, do not have GSpro or TGC or E6 selected.
Select GSA API.
Otherwise the system will constantly try to connect to these game softwares
which will result in the cameras being reset to trigger mode
If it turns out that the left camera is not being blocked by the club, then the Left/Right camera assignment didn't function.
In this case, click on the "Swap camera positions" button to resolve.
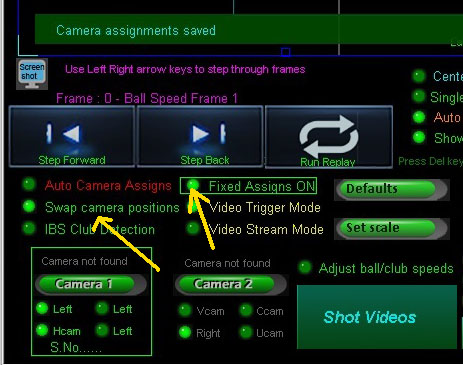
Then click on the Fixed Assigns button.
1.3.2
Shots are not detected
It maybe that the club with the ball is being detected together and thus the ball size exceeds the Ball Max Size setting.
Fix
Increase "Ball Max Size" to 60, 70 or even 80
See section 5.1.2 below for more info on this
![]()
1.3 The system states "no cameras detected"
Possible cause 1.
You started the control panel first and then plugged in the cameras.
Always ensure that the cameras are plugged in before you start the control panel.
Possible cause 2.
You didn't install the driver software as described above.
Possible cause 3.
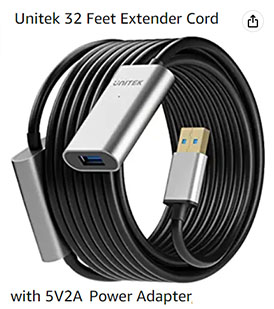
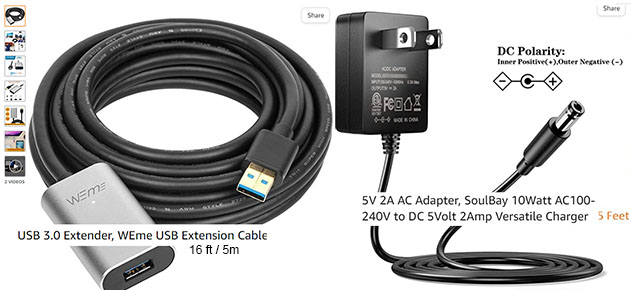
You are not using the USB3 cables that are supplied with the system
and/or the cable power adapter is not plugged into the extension cables.
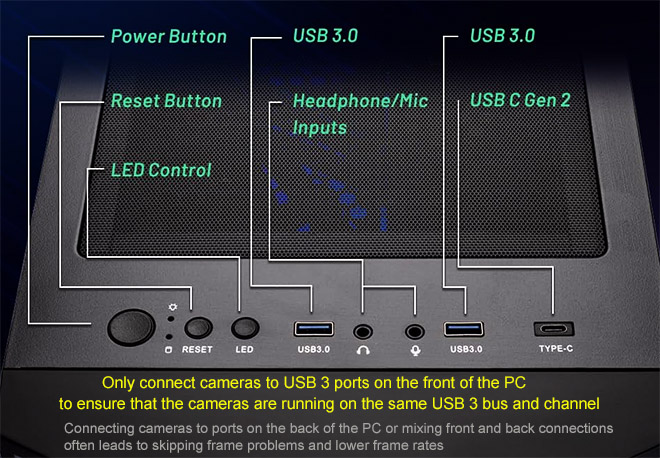
Possible cause 4.
You are not connecting the cameras to USB3 ports on the PC
(Usually only on the front of the PC)
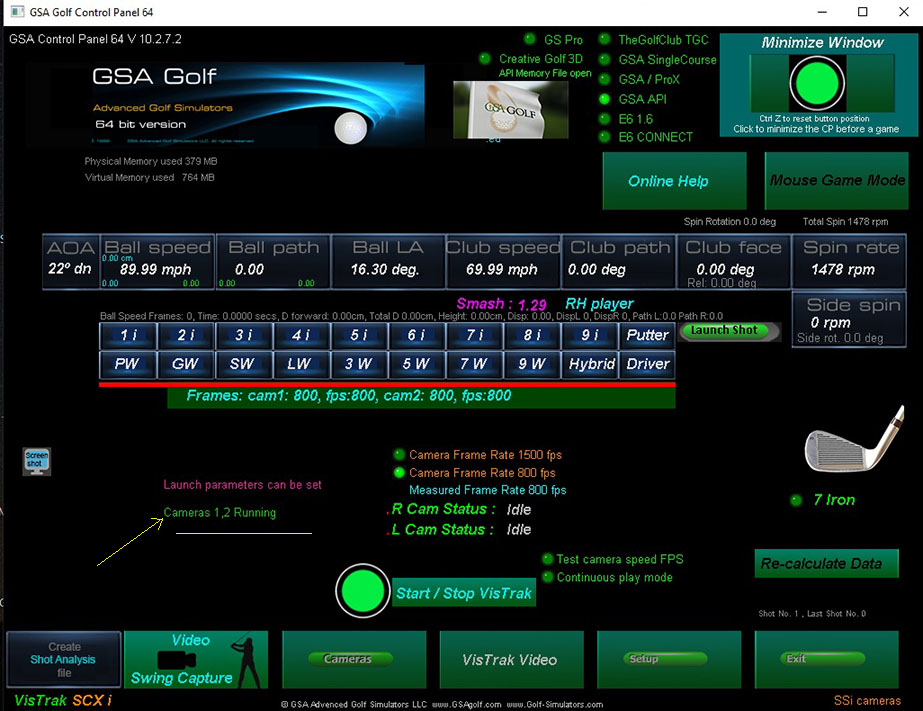
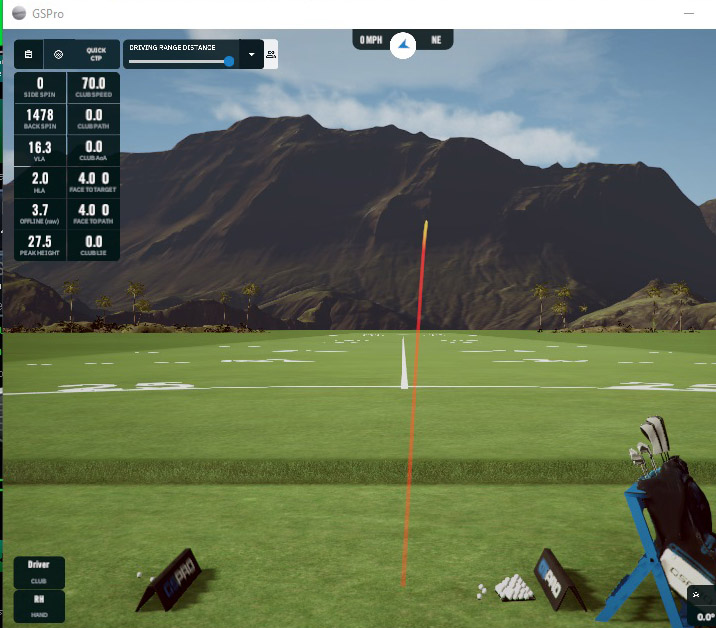
The CP main window
Depending on what system you have, you should see either 1 or 2 cameras are running
Cable Warning
Do not add any additional USB3 cables to the already supplied powered 40ft cables
Cameras will either not run at all or the connection will be unstable in this case
![]()
1.4 When I set the cameras to Stream mode,
they automatically go back to Trigger mode
Probable cause
When running the cameras in stream mode, do not have GSpro or TGC or E6 selected.
Select GSA API.
Otherwise the system will constantly try to connect to these game softwares
which will result in the cameras being reset to trigger mode
![]()
1.5
SCX Ball Vertical Launch angles (VLA) too high or too low
Probable cause
VLA (Vertical Launch Angle) adjustments not set correctly
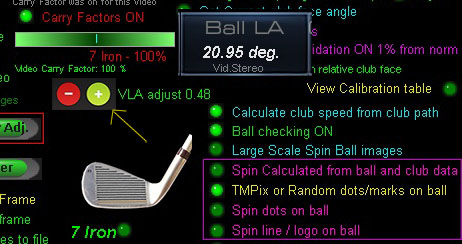
Fix
Use the new VLA adjustments buttons to adjust the VLA in the camera panel
Default setting is 0.48
![]()
1.6
Ball speeds (carry distances) too high or too low
See section
15
below for possible causes and fixes
![]()
1.6
Wedge and short iron shots not being detected correctly
See section
5.5
The system doesn't detect small chips with bright faced wedges.
below for possible causes and fixes
![]()
2. I have two cameras but only one is detected
Possible cause 1.
You are not using the USB3 cables that are supplied with the system
and/or the cable power adapter is not plugged into the extension cables
Possible cause 2
You are using an older PC or Laptop that can't supply sufficient power to power 2 cameras
Fix: Use the optional extra external camera power supplies
Possible cause 3
One of the USB3 cables is defect
Try the following:
1.
Swap the cables around.
i.e. connect the camera that is working to the cable of the camera that is not working
and vice versa.
If the camera that was not working is now working, then it's probably a cable issue
2.
Swap the cable connections to the USB3 ports on the PC around.
If the camera that was not working is now working, then it's probably a PC issue
3.
Restart the PC and CP
4.
If all else fails, then you have a defect camera that has to be replaced
![]()
2.1 Cameras going off-line or CP freezing/locking-up?
Probably cause : using unpowered USB3 cables or Electrical Magnetic Interference (EMI) on the cables
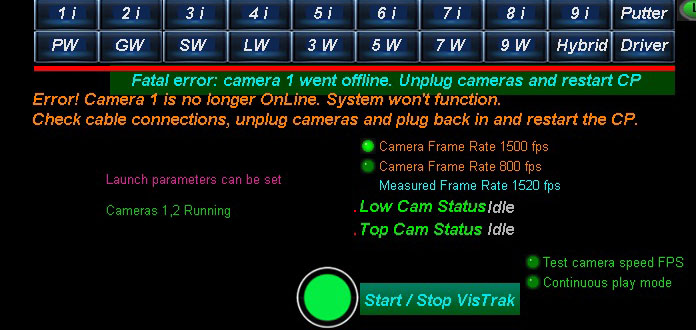
Usually unplugging the cameras and restarting the CP fixes this.
However, there are instances where the cameras require a hardware reset.
In order to initiate a camera hardware reset, all power to the cameras must removed.
Unfortunately, just unplugging the cameras from the PC won't always work,
as the cameras will still be getting power from the USB powered active cables.
In this case, the power to the USB cables should also be removed.
If the issue persists, then it is recommended to connect the USB active cable's power adapters to a switchable power plug-board
so that a real camera hardware reset can be initiated.
![]()
3. The CP states that the cameras are not registered
Cause
You are using an older version of the CP.
Cameras are registered in the CP software.
To fix: Install the latest version of the CP from the Tech News page on this website.

![]()
4. Cameras are detected but run slow and/or skip frames
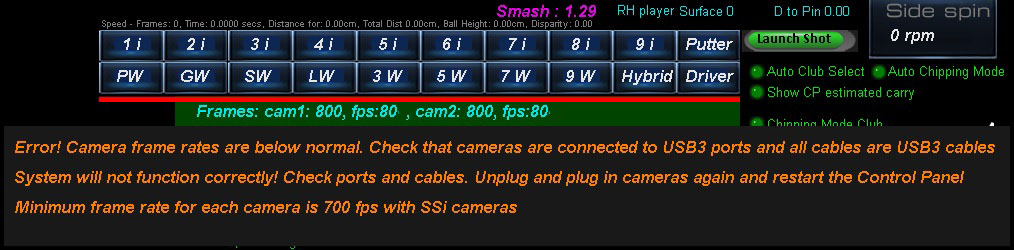
Ensure you are only using the supplied USB3 cables with the 5v power adapter and that the cables are connected to only USB3 ports on your PC
If USB2 extension cables are used or the cameras are connected to USB2 ports, then the running FPS speed will be too low.
Also check that your camera exposure (shutter speed) settings are below 300 fps in the CP's camera panels.
Right Click on the "Defaults" button to automatically set this
Check the minimum PC requirements
-
Intel i5 or above Processor
Warning! Do not use PC's with AMD processors!
Warning! Do not use custom made PCs
Only use stock PC's
i.e. those that are available on Amazon in the $1,000 to $1,500 range
Our experience over the years has shown that the USB speeds with
custom made PCs do not meet the camera USB requirements.
8GB R
8GB RAM Nvidia 1070 Graphics Card or equivalent
25GB of Hard Drive Space
Windows 10 or 11 (Required)
Internet Connection
(Required if using 3rd party game software such as E6, TGC or GSPro)
USB3.1 10Gbps ports (Required)
Note: The cameras are USB3 cameras
and will only run at the correct speed when connected via USB3 cables directly to separate USB3 ports
at the front of the PC.
USB Ports at the back of the PC don't usually work well
Warning
If using 2 cameras, do not connect the cameras together with a Hub !
All cameras must be directly connected to separate USB3 ports on the PC
Use only the supplied powered USB3 extension cables
Usually unplugging the cameras and restarting the CP fixes this.
However, there are instances where the cameras require a hardware reset.
In order to initiate a camera hardware reset, all power to the cameras must removed.
Unfortunately, just unplugging the cameras from the PC won't always work,
as the cameras will still be getting power from the USB powered active cables.
In this case, the power to the USB cables should also be removed.
If the issue persists, then it is recommended to connect the USB active cable's power adapters to a switchable power plug-board
so that a real camera hardware reset can be initiated.
![]()
Warning! Do not use older PC's that have been modified in anyway
(i.e. new mother board, additional USB3 cards etc)
Experience has shown that the high-speed cameras do not function with such older or modified PCs
![]()
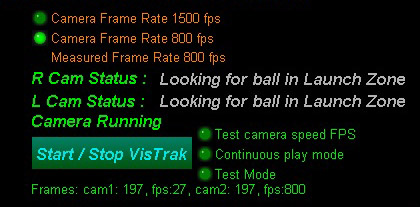
Checking the cameras speeds with the camera manufacturer's application
Important: switch to GSA /Prox or GSA Single course or GSA API during the setup procedure
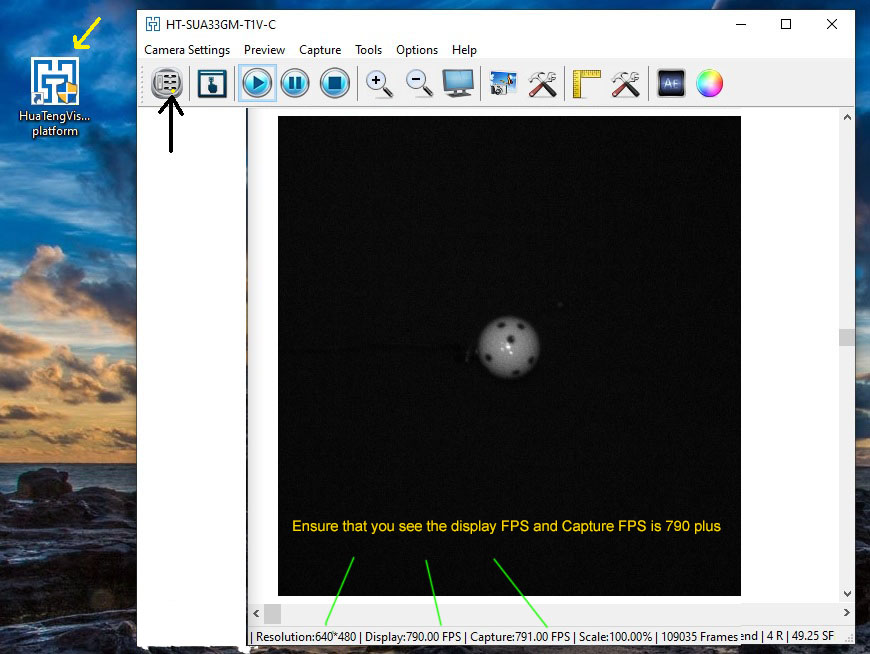
You can use the HuaTeng Vision application to check that the SSi cameras on your PC are running at the correct speed
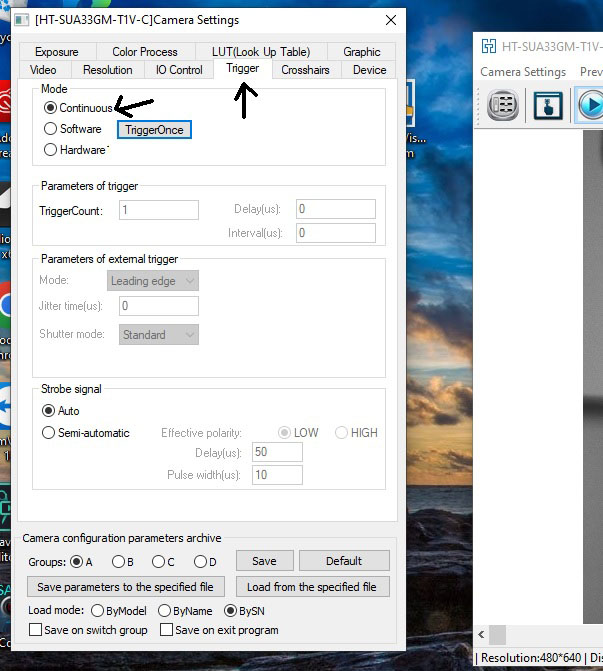
Select "Continuous" in the Trigger panel to start grabbing frames
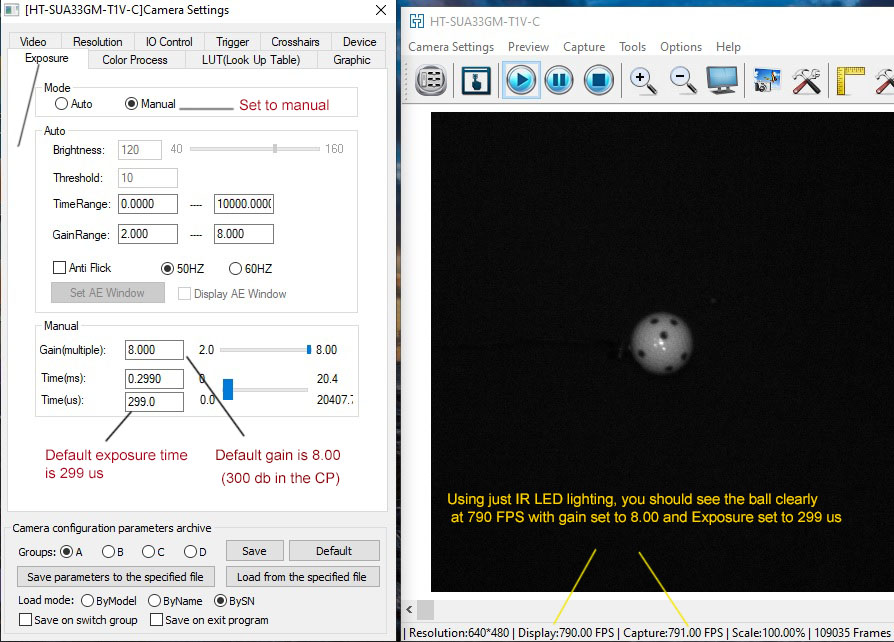
Select "Manual" in the Exposure panel.
Set gain to 8.00 and Exposure time to 299 us
You should see at least a camera FPS rate of 790 FPS.
If not, then you are not connecting the cameras to USB3 ports on the front of the PC
or you are using USB2 extension cables
or you are not using the 5v adapter with the extension cables
![]()
If all else fails, unplug cameras, wait 2 seconds and plug them back in again
We have noticed that if a camera loses connection and comes back online again,
one of the cameras may start to run slow.
Currently we do not know what is causing this sporadic slow down
but unplugging the cameras and plugging them back in usually fixes the issue.
When doing this, ensure that the CP and/or HuaTeng app is shut down beforehand.
Camera speed check summary
1. All cameras are connected to USB3 ports in the front of the PC
Ports at the back of the PC don't usually work well
2. All cameras have a shutter speed setting of at or below 300 micro-seconds
Right click on the Defaults button in the camera panels to ensure this.
3. You are only using the supplied USB3 cables and not adding on additional extension cables
Adding addition extension cables will slow the frame rate down
4. You have tried connecting each camera separately
i.e. running the system with just one camera at a time to see if the problem is being caused by a one camera but not the other.
You may have to switch to VisTrak Eagle mode in the setup window for this test
5. You are using the current version of the CP
Important!
When disconnecting and re-connecting cameras, you must restart the Control Panel
![]()
4.1
Each camera runs at full speed when connected to the PC separately
but when a second camera is connected,
the frame rate drops significantly.
This would indicate that your PC USB3 bus has insufficient bandwidth to cope with 2 cameras running at full speed.
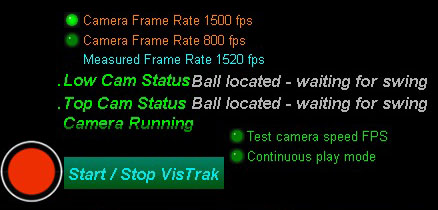
You can try setting the cameras to 1500 fps in the CP's main panel and restarting the CP.
As the frame size is halved when setting the cameras to 1500 fps, you may be able get 600 fps or more when running the 2 cameras.
While not ideal, at least the system will then be playable.
![]()
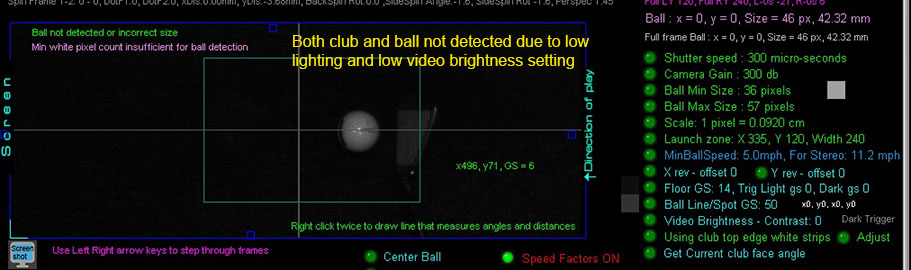
5. I only see black or very dark blurry images
Possible cause 1.
Insufficient lighting
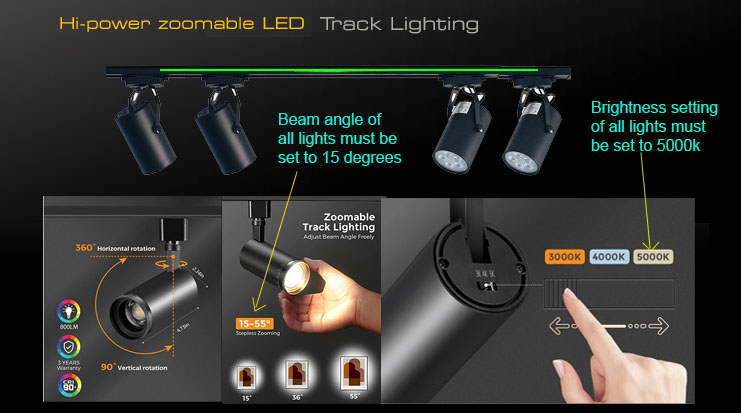
If using an overhead system like the Eagle, SCX or EVi with track lights, ensure all 4 lights are ON and pointing directly down on to the hitting mat,
that all brightness settings on the lights are set to 5000K and that the spot size on the lights are set to 15 degrees
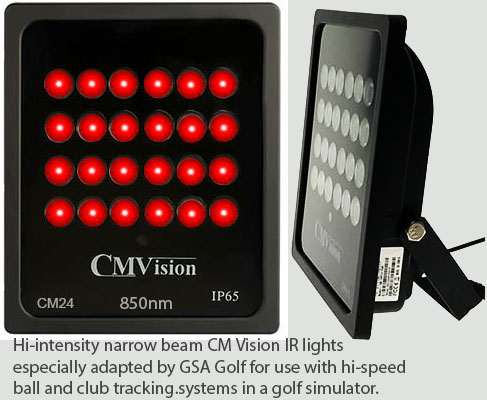
If using an overhead system with IR lighting
ensure the unit is pointing directly down on the ball on the mat.
Note: if your system is well over a year old, it may be that the IR lights on your system wasn't supplied with narrow beam lenses.
Contact us for a free replacement or a free conversion kit
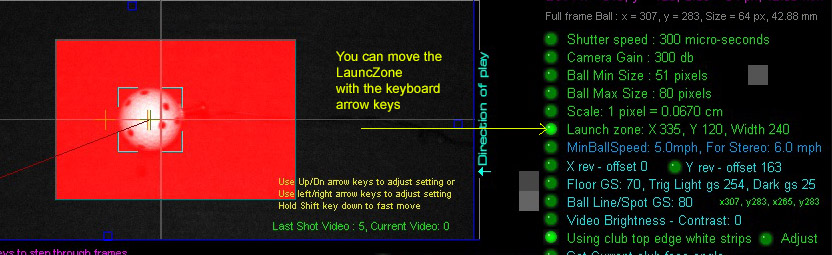
Possible cause 2
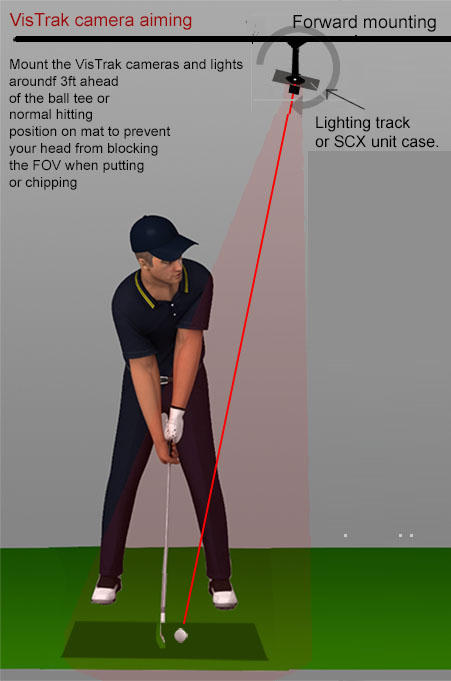
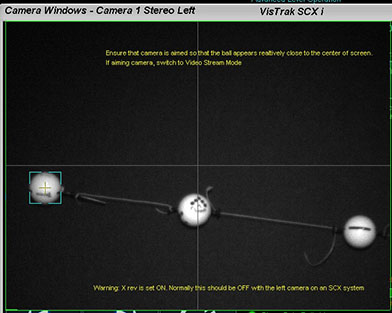
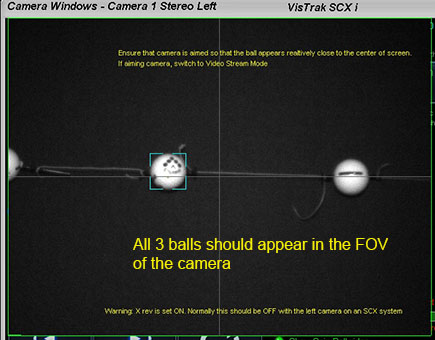
The cameras are not aimed at the ball on the mat
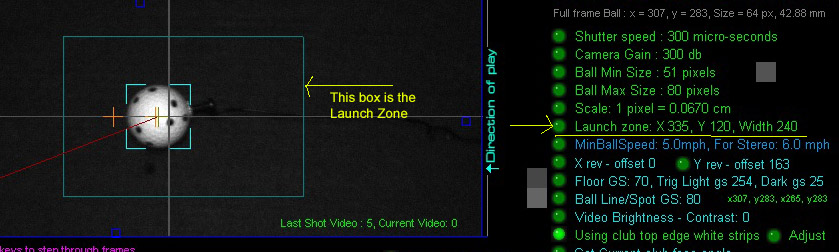
Important ! Both cameras have to be aimed such that the ball appears near the center of the screen
when the system is in "Full Ball Frame mode" as shown below
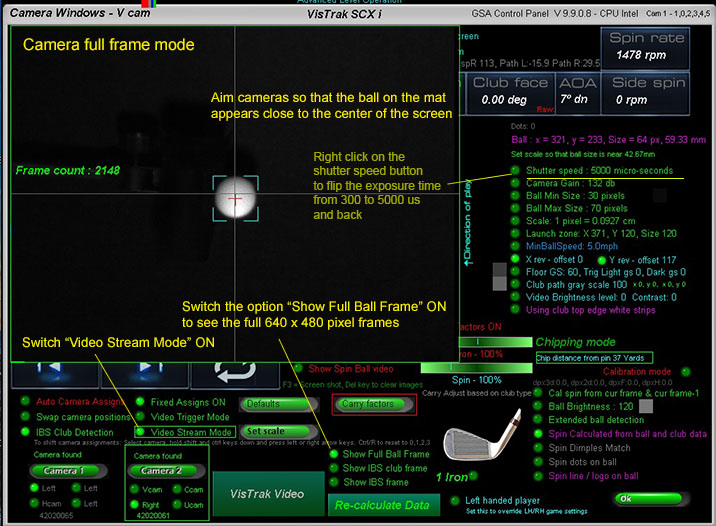
To help with aiming the cameras, switch to "Full Ball Frame" mode,
increase the camera exposure time by either right-clicking on the "Shutter Speed" button
(this will significantly increase the exposure time from its default 300 us to 5000 us)
or manually increment the exposure time by clicking on the UP Arrow key on you PC' keyboard.
Then set to "Video Stream Mode".
With the exposure time set to 5000 us, the images will be very bright and you will be more able to see what the camera is aimed at.
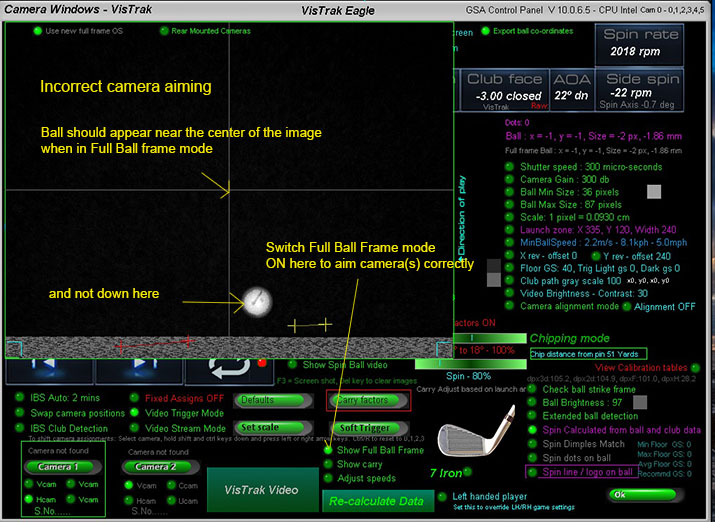
The above image (from a customer support session) shows how off the camera aiming is.
The system won't function with camera aiming this far off.
Possible cause 3.
The camera lens is not focused
It's important that the camera lenses are in focus.
To focus, place a ball on the center line of the enclosure and point the camera at the ball.
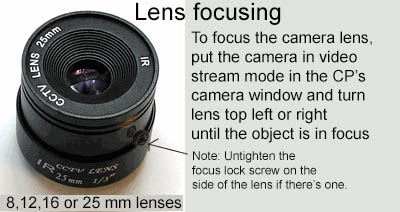
Switch to "Video Steam Mode" in the CP's camera window so that you see the captured images.
Rotate the outer dial on the lens in or out until you see that the ball is in focus.
Possible cause 4
The camera gain or shutter speed setting is set too low.
Default setting is 300 db for Gain
Default Shutter speed is 300 micro seconds
Possible cause 5
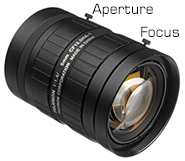
The lens aperture setting is not in the fully open position
(Only relevant if the lens you are using has an aperture dial)
Important: switch to GSA /Prox or GSA Single course or GSA API during the setup procedure
![]()
5.1. The system finds the ball on the mat and shows the message
"Ball detected. Waiting for swing"
but doesn't detect a shot or the shot is way off
Possible cause 1.
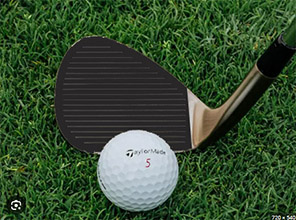
Camera orientation is incorrect.
Ensure that when a club is placed behind the ball, the club is indeed shown behind the ball in the camera panel.
Use the X rev and Y rev options to flip the image
Note that direction of play is always shown right to left in the camera images.
Possible cause 2.
Insufficient lighting spread
The light spread should be sufficient to detect the ball anywhere in the FOV of the camera.
To test, put camera in Video Steam Mode and place ball at far ends (left and right, top and bottom).
You should see that the ball is detected in all of the FOV of the camera
Possible cause 3.
Shutter speed (exposure time) is set too high.
Max shutter speed should not exceed 400 micro seconds.
Default is 300 micro seconds.
If shutter speed is set too high, then motion blur will occur and the ball in flight won't be detected and thus no ball launch will occur.
Possible cause 4
The cameras are not aimed at the ball on the mat in Full Ball Frame mode
Switch to "Show Full Ball Frame" and Video Stream Mode mode
and aim the camera(s) so that the ball appears near the center of the image.
Important : When running the cameras in stream mode, do not have GSpro or TGC or E6 selected.
Select GSA API.
Otherwise the system will constantly try to connect to these game softwares
and will result in the cameras being reset to trigger mode
The above image (from a customer support session) shows how off the camera aiming is.
The system won't function with camera aiming this far off.
Important!
Only aim cameras when in "Full Ball Frame" mode
Do not try to aim cameras when not in full frame mode
System won't function in this case
Possible cause 5
Unequal light over the hitting area
It is essential that the SCX or Eagle overhead unit is aimed such that the light is equally spread over the hitting area.
If using IR Light, you can use brown cardboard (use the box that the unit was shipped in for this)
placed over the hitting area to see the light spread with the SCX cameras running in video stream mode.
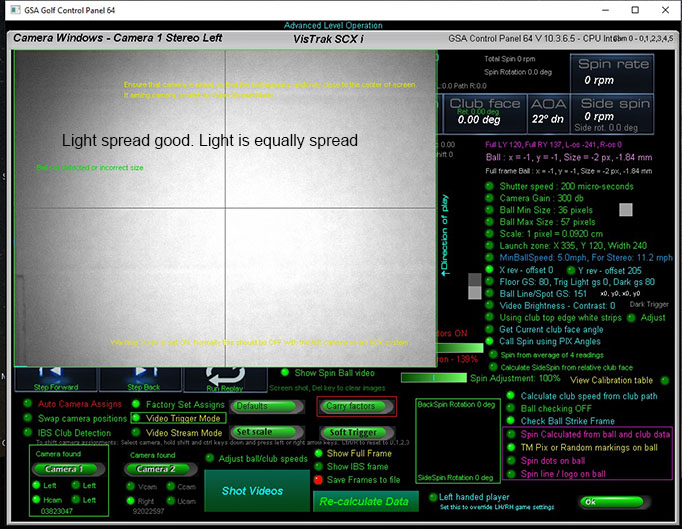
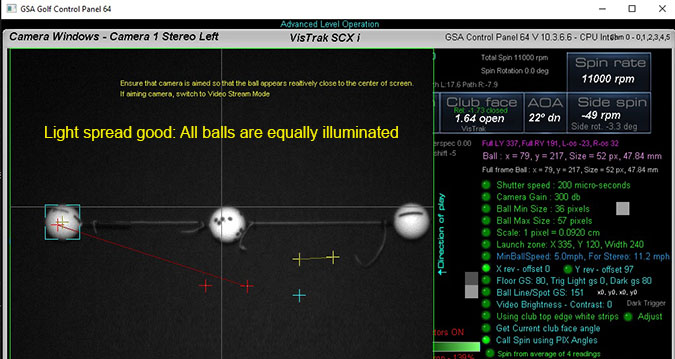
With the unit aimed such that the light is equally spread, then all balls in the hitting area
will appear bright and will be detected
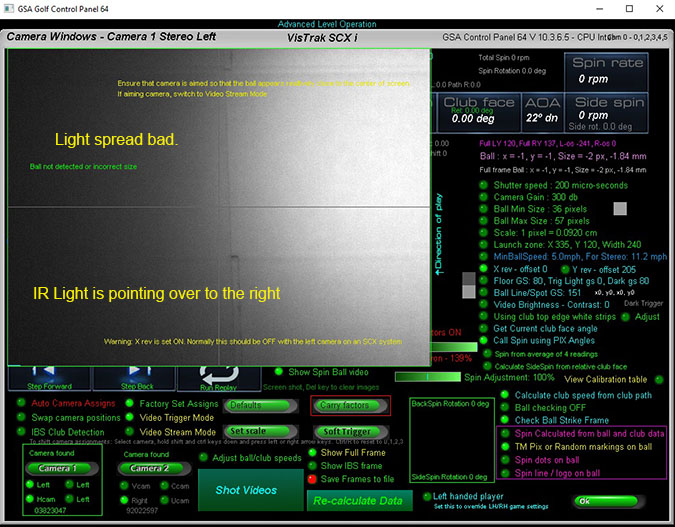
if the unit is aimed away from the hitting area, then the light spread will not be equal
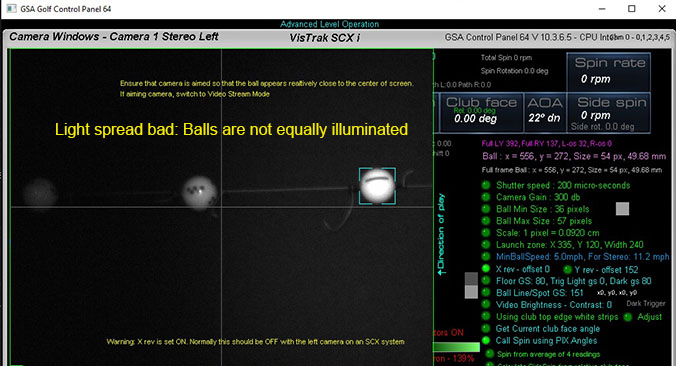
In this case, balls in the center of the FOV of the camera of left of it won't be detected and the system won't function.
Possible cause 6
The unit is mounted back to front.
In this case, all camera images will appear upside down and reversed and thus no launch will be detected.

Ensure that - when standing back from the unit - the unit is mounted so that the green / white LED strip is at the front and the lettering is readable.
Possible cause 7
The ball wasn't placed on the mat so that it appears in the Launch Zone in both cameras.
See section the 8
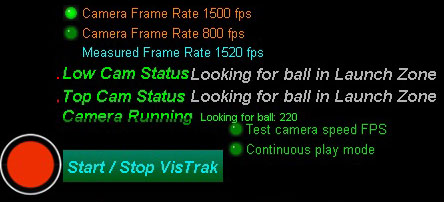
The CP stays in "Looking for ball in the Launch Zone" mode
below for more info
Possible cause 8
There are other bright reflecting objects in the FOV of the cameras.
Ensure that only the ball is being detected in frames.
![]()
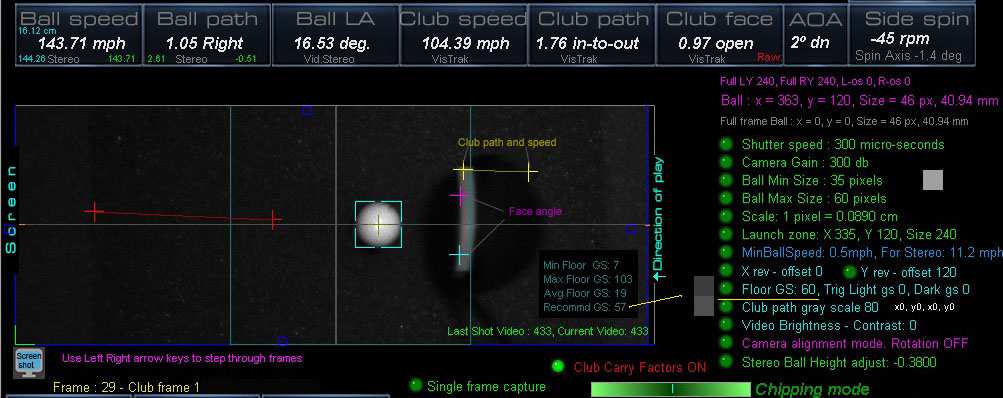
5.12
Occasional shots are not detected
Probably cause 1
User is waggling the club over the ball or moving the ball on the mat but not waiting for the CP to re-detect the ball.
Waggling the club over the ball will initiate a new ball detection mode which takes a couple of seconds.
Only play the shot when the green strip light on the unit turns green
Probably cause 2
The option "Ball checking" is set ON ( now default ON btw)
but the ball image didn't meet the requirements to be indentified as a ball.
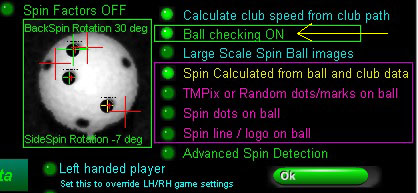
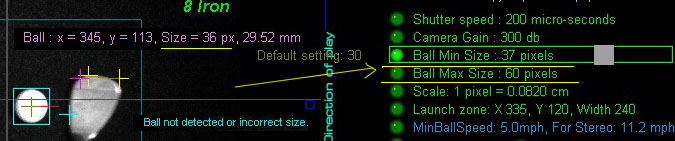
When "Ball checking" is set ON, the ball image size must greater than the "Ball Min Size" and less than the "Ball Max Size" settings.
In the above screen shot, the ball image size (36) was less than the Ball Min Size setting of 37 and thus the ball was not detected.
It maybe that the club with the ball is being detected together and thus the ball size exceeds the Ball Max Size.
Fix
Increase "Ball Max Size" to 60, 70 or even 80
![]()
5.2 The CP constantly fluctuates between "ball located" and "looking for ball"
after starting the cameras
Possible cause 1
This can happen when one camera finds the ball but the other doesn't
Check section 8 below "Ball not detected"
Possible cause 2
Ball in one camera is located in the launch zone area but the other isn't
Check section 8 below "Ball not detected"
Possible cause 3
Ball in cameras not being centered correctly.
Fix for this is in CP update
CP update 10.4.5.2
![]()
5.3 The Control Panel detects the shot
but there's no launch in the golf game software

After a ball valid strike, the CP will show the Launch sent message
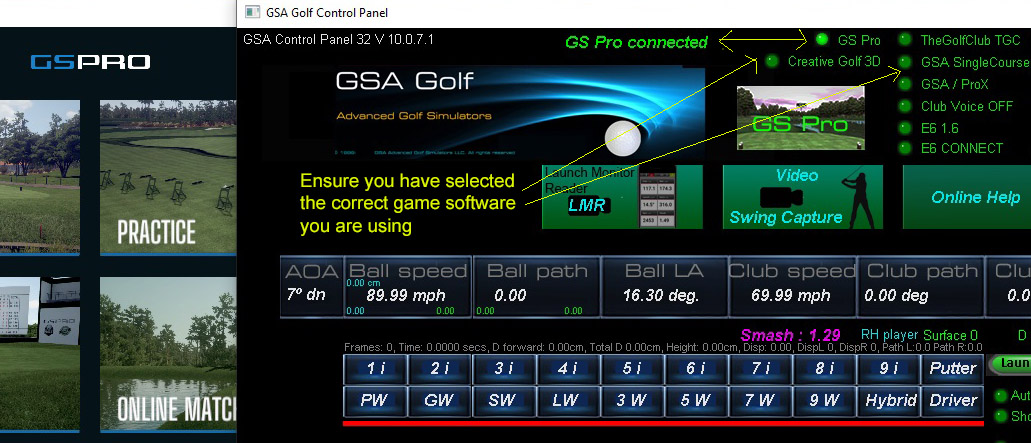
Probable cause:
The CP is not connected to the golf game software you are using.
When using GSPro, E6 Connect, TGC or Creative Golf game software,
an Internet connection has to be established.
You should therefore see the "Connected" message as shown above.
GSpro not launching the shot?
To test: Ensure you have GSpro selected in the GSA Golf's CP and you see the message "GSpro Connected"
Click on the "Launch Shot" button in the CP's main panel to launch a test shot in GSpro
If you have had to restart the CP and find that shots are not being launched, select a club in GSpro to re-activate the connection
![]()
5.4. The system doesn't detect small putts or small chips.
The message "Ball did not leave launch zone area" is displayed
Probable cause:
Camera frame rate is too high for these small shots.
Fix
1. Play ball further ahead of the Launch Zone area
or
2. Run cameras at 790 fps instead of 1500 fps (for all shots)
or
3. Use Chipping and Putting modes to slow the camera frame rate down so that the ball appears to leave the Launch Zone area
When using Chipping and Putting modes, select the option "Permit Putting and Chipping modes" in the Setup panel
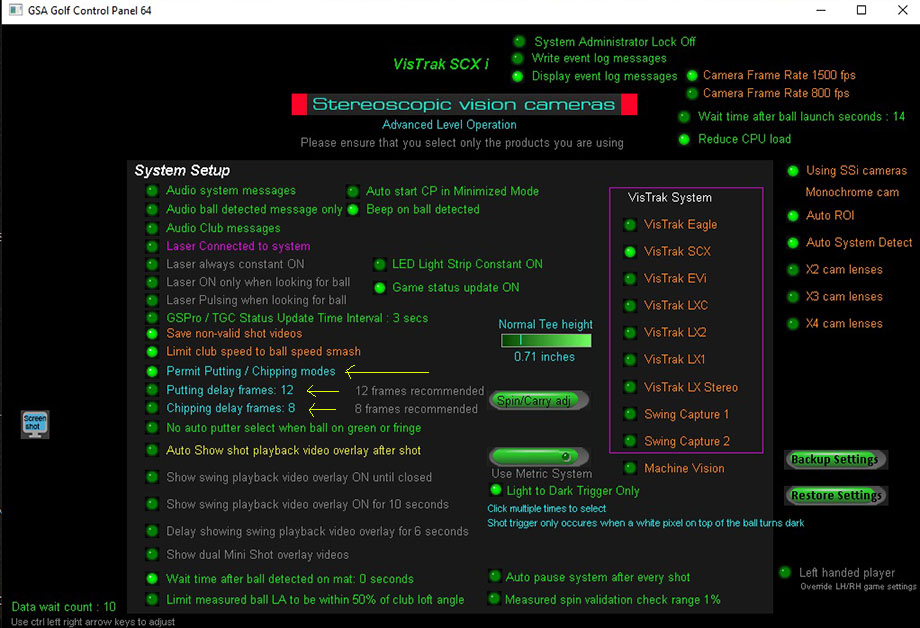
When using these modes, the frame rate of the camera will be reduced by the "Delay Frames"
These are user adjustable if required
Putting modes will automatically be used if a Putter is selected or the "P" key is pressed
Chipping modes will automatically kick in when either:
1. the ball is within a certain distance from the green
or
2. the "C" key is pressed on the keyboard
or
3. a user designated Chipping Mode club is selected.
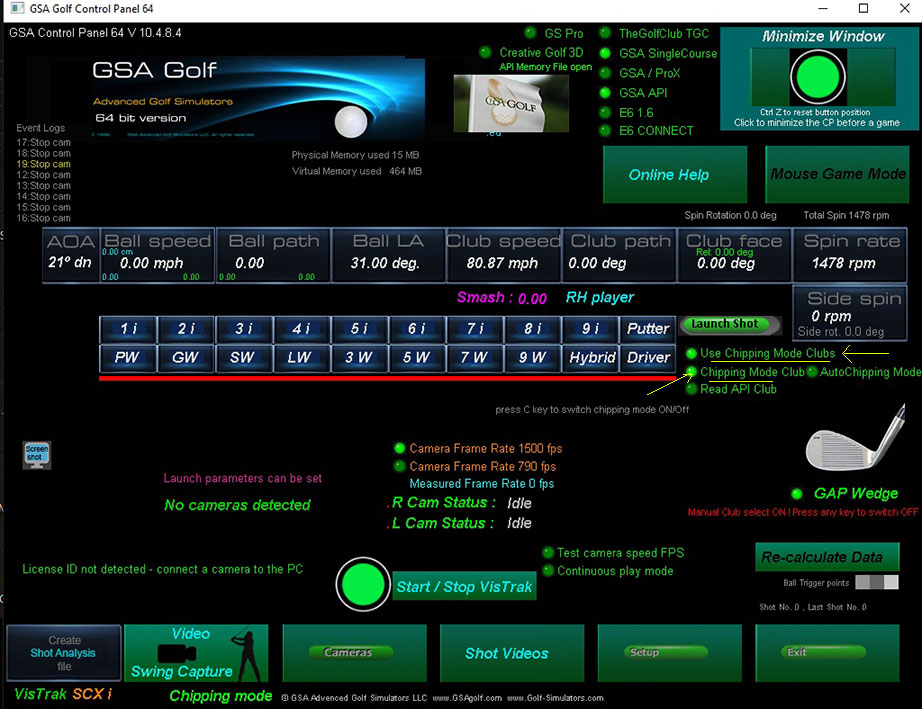
In order to designate a certain club as a chipping club:
1. Switch the option "Use chipping mode clubs" ON in the CP's main panel
2. Select the desired club by clicking on the club image to run through clubs
3. Click the "Chipping Mode Club" button
You can select any number of clubs to be designated as a chipping mode club.
When this is setup, the system will automatically go into chipping mode every time the club is selected (either manually or via the game software i.e. GSpro)
To de-designate a club to be a chipping mode club, click again on the "Chipping Mode Club" button again with the club selected.
Note: This Chipping Mode club feature is only available as of CP version 10.4.8.5
New Chipping mode ball speed/carry adjustment
Set in the Camera panel.
Select Chipping mode by pressing the C key, and the regular Club Carry Factor slider bar will convert to the new Chipping mode carry factor.
Note: This Chipping Mode ball speed feature is only available as of CP version 10.4.8.6
![]()
5.5 The system doesn't detect small chips with bright faced wedges.
SCX Limitations
Currently, it cannot be guaranteed that small chips with bright faced wedges will be detected.
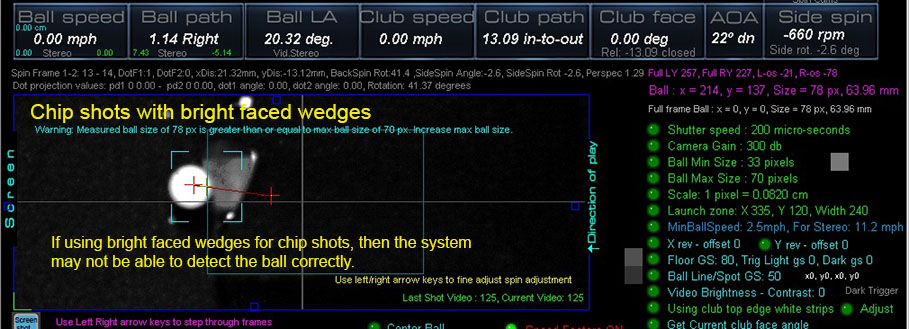

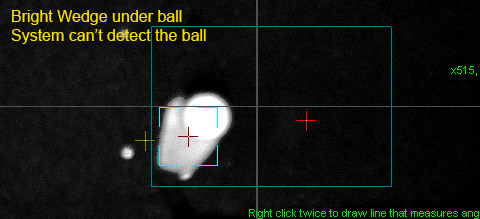
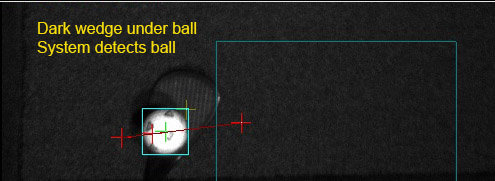
If the issue persists, you'll have to use dark colored wedges or apply the supplied sticky back matte black stickers to the wedge face.

Above image showing how the wedge looks when the wedge black sticker is applied
Just email us with your address for your free black wedge stickers pack if you didn't already receive them.
![]()
6. The cameras are reversed or images appear upside down
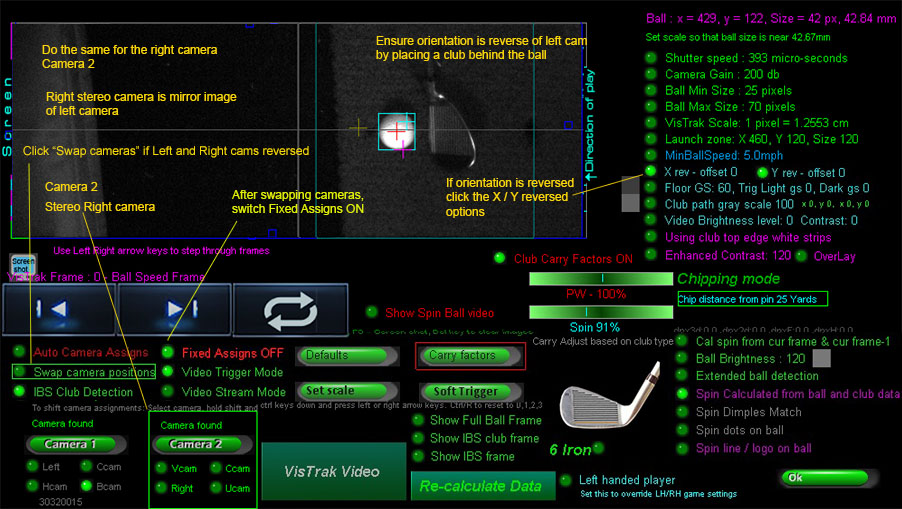
Possible cause 1.
The Cameras assignments are incorrect
With EVi and LX systems, the overhead camera is camera 1 and Vcam camera is camera 2.
If this appears to be reversed, click on the Swap Camera Positions.
With SCX systems, the left camera is camera 1 and right camera is camera 2.
If this appears to be reversed, click on the Swap Camera Positions.
After swapping, click the Fixed Assigns option ON
Possible cause 2.
The Xrev and or Yrev options are incorrectly set.
Change the Xrev and / or Yrev options to correct so that the orientation of the images appear as shown above
SCX camera orientation and direction of play
The direction of play in both left and right cameras is always from right to left in the image frames
To Check:
place and ball on the mat and lay a club down behind it.
After clicking the "Soft Trigger" button. your image in the left camera should look like the above image.
![]()
7. When I strike a ball, the CP always states "Ball did not leave the Launch Zone"
and shot is not detected.
Probable cause 1
Camera orientation is incorrect and the system is seeing the ball going backwards.
See the above section 6
Probable cause 2
You are using an older version of the Control Panel
Update to the latest CP version from the Tech News page
![]()
8. The CP stays in "Looking for ball in the Launch Zone" mode
Probable cause 1
The ball is not in the Launch Zone
Probable cause 2
The ball is in the Launch zone but the ball itself is not being detected
When the ball is placed on the mat, it should appear within the launch zone in both cameras after the cameras have detected it
Probable cause 3
The cameras are not aimed at the ball when in Full Ball Frame mode
With the "Show Full Ball Frame" and "Video Stream Mode" options switch on in the camera window,
ensure that the ball in both cameras appears approximately in the center of the images as shown above.
It doesn't have to be exact as the cameras will position the ball automatically.
Important!
Only aim cameras when in "Full Ball Frame" mode
Do not try to aim cameras when not in full frame mode
System won't function in this case
Important: switch to GSA /Prox or GSA Single course or GSA API during the setup procedure
![]()
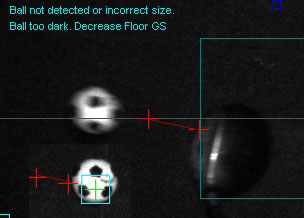
8. Ball not detected (1)
Bright objects or flooring in FOV of camera

Ensure there are no reflective objects or parts of flooring that reflect light in the FOV of the camera.
![]()
9. Ball not detected (2)
Measured Ball size not within limits
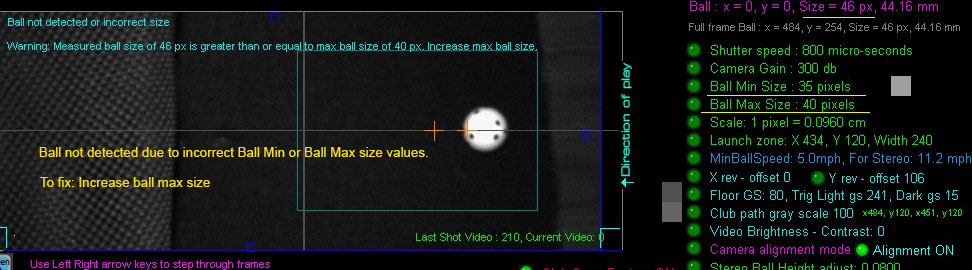
In the above example, the measured ball size was 46 pixels but the "Ball Max Size" setting was set at only 40 pixels.
![]()
10. Ball not detected (3)
The system cannot find the ball on the mat
System stays in "Looking for ball" mode

Ensure the ball is placed in the Launch Zone area in both cameras.
In order for a ball launch to be detected,
the ball must first be detected within the Launch Zone and then seen to have left the Launch Zone.
Ensure that the ball on the mat is within the launch zone area in the camera window in both cameras.
![]()
11. Ball not detected (4)
Do not use soccer balls!
The system requires the ball to be predominately white and balls with large black soccer markings on them
cause the system to either not detect the ball at all or the ball is detected as too small.
![]()
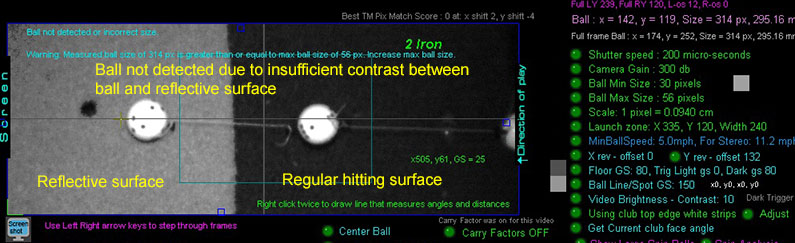
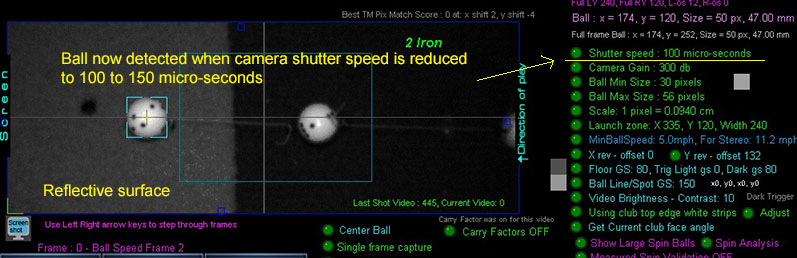
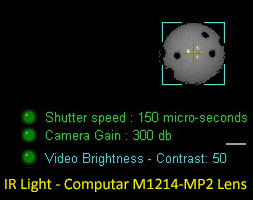
12. Ball not detected (5)
Insufficient lighting, cameras and lighting are mounted too high on the ceiling or shutter speed set too low
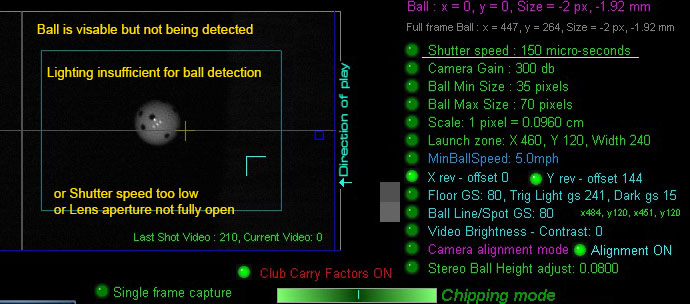
In the above case, the 150 us shutter speed is set too low for the amount of lighting.
Increasing to 300 us will fix the issue.
Ceiling mount height too high
If the cameras and lighting on the ceiling are mounted too high, then the amount of light getting down to the ball will be diminished.
Try to keep the mounting height below 9ft.
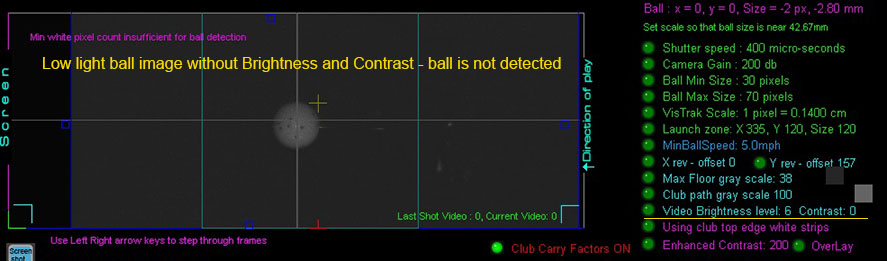
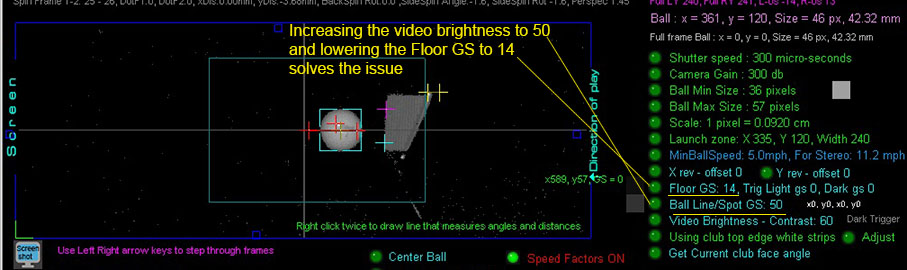
You can also adjust the Video Brightness/Contrast setting to increase the brightness of the ball
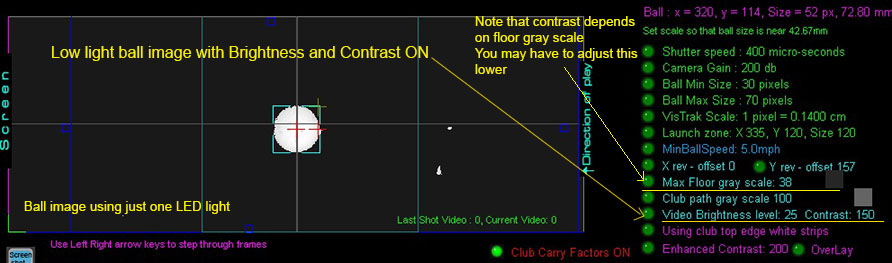
If the Brightness/Contrast setting is set too high, the ball will appear washed out. i.e. all white without any markings visible.
12.1 Ball not detected (6)
![]()
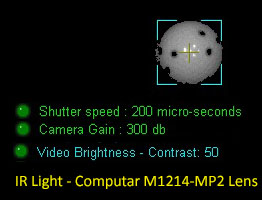
Improving image ball and club detection
using higher Contrast settings

Click the above image to see more examples of how higher contrast settings can improve image brightness with IR lighting
How the Floor GS (Grey Scale) setting effects the brightness/contrast setting.
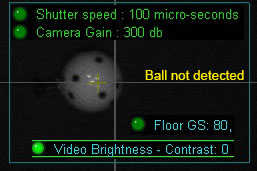
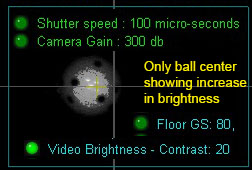
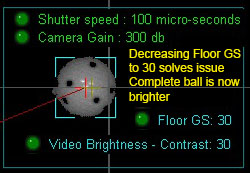
If your lighting is insufficient to illuminate the ball so that it is detected when using fast shutter speed,
you will have to increase the Brightness/Contrast level.
In so doing, you may find that only the center of the ball is showing an increase in brightness.
This is because the brightness procedure is only increasing the brightness of pixels that have a GS above the floor GS level.
The idea is to only increase the brightness of the ball itself and not the surrounding floor so that a stronger contrast is made between the ball and the floor.
It is thus important that the Floor GS setting is set closer to the actual floor gray scale in order to increase the brightness of the complete ball.
Track lighting
Ensure all lights are pointing directly down onto the ball on the mat,
that all brightness settings on the lights are set to 5000K
and that the spot size on the lights are set to 15 degrees
IR lighting
If using IR lighting and the images seem dark,
you can do one or all of the following:
1. Increase the camera contrast setting
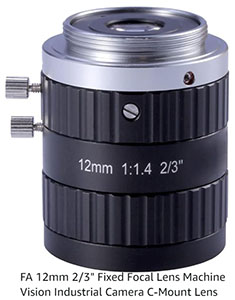
2. Use the optional extra Computar Lenses (that let in 30% more light)
3. Add additional CM Vision IR lights ($39 to $69 each)
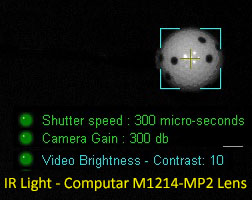 -
-  -
-
The above images were captured using only the standard IR lighting (3 x CM Vision 24 850nm)
at a distance of 8ft but with the new Computar M1214 lens.
![]()
13. Ball launches a shot immediately after detecting the ball
or
The control panel is constantly detecting a trigger
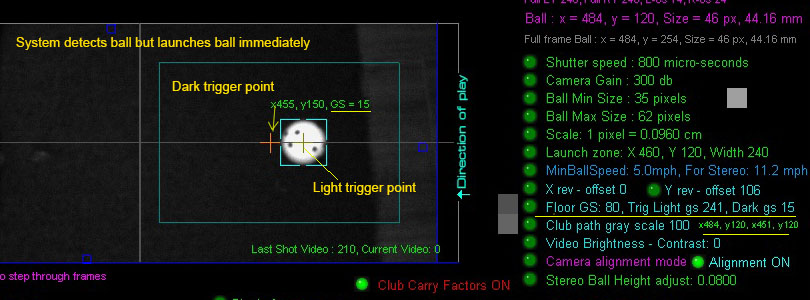
The system detects a ball strike by looking at 2 points on the ball on the mat.
A dark point and a light point.
The dark point is the pixel ahead of the ball - shown by the orange cross hair.
The light point is a pixel near the center of the ball.
The threshold is the Floor GS (Grey scale) which is user adjustable.
i.e. the dark point must be darker than the Floor GS level
and the light point must be lighter than the Floor GS level
When a ball is struck, the ball will move over the dark point, causing it to become light
and - as the ball has moved forward, the light point pixel will point to the floor and become dark.
If the Floor GS setting is set lower than the dark pixel point, then this will cause a ball struck detection
and the system will try to launch the ball.
To Fix:
Increase the Floor GS level so that it is greater than the dark point GS - normally set to 80.
You can see the dark point GS by placing the mouse cursor over the area immediately ahead of the ball.
![]()
14. Ball launches when placing ball on mat
Fix: use CP version 10.4.5.8 or higher
CP Version 10.4.5.8 has improved valid shot check
to prevent inadvertent ball launches when bending down to place the ball on the mat or waggling the club over that ball.
Ball checking has to be ON.
This is now default ON when using CP version 10.4.5.8 or higher
![]()
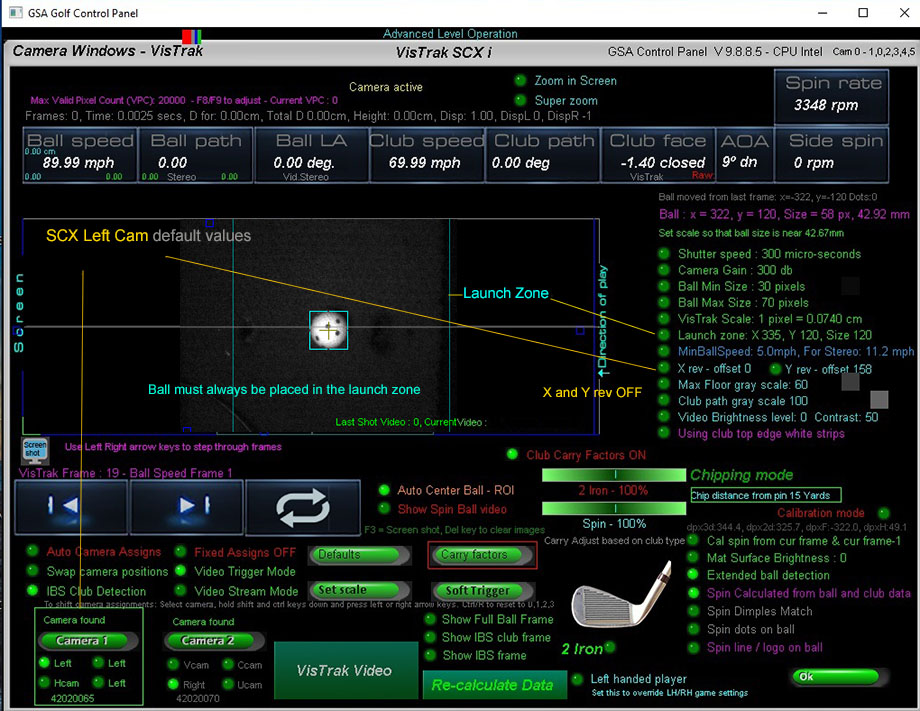
15. Ball and Club speeds are too fast or too slow
Probable cause 1
Main cause of this problem is incorrect scaling factor
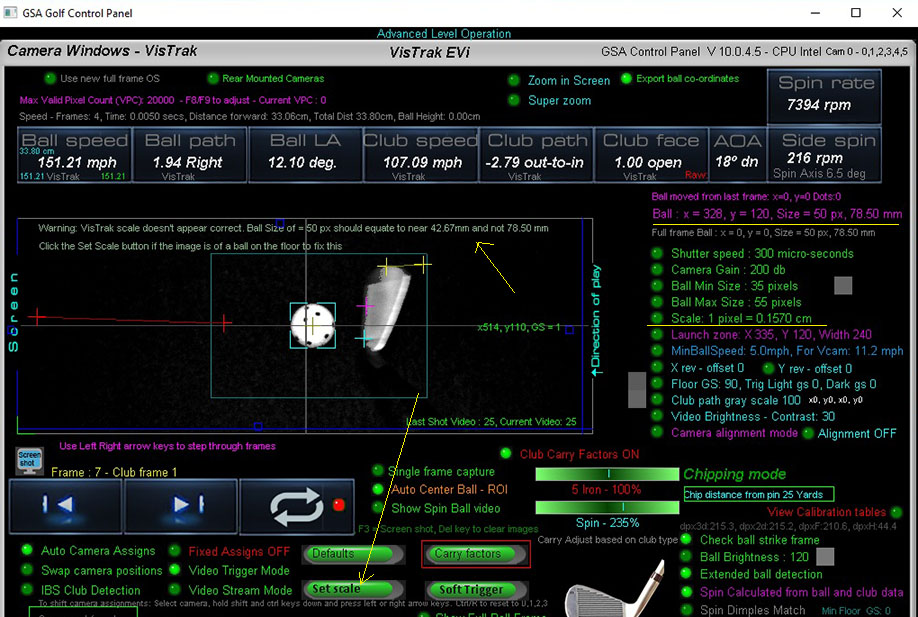
The scaling factor is used to convert distances measured in image pixels (as the camera sees them)
to real world distances measured in cm.
As a reference, the fixed diameter (42.67mm) of a golf ball is used.
In the above example, the ball size was measured at 50 pixels but the scaling factor of 0.1570 falsely converted the ball size to 78.50mm and not 42.67mm.
In this case, all distances will appear to be too long and thus ball and club speeds will be too fast
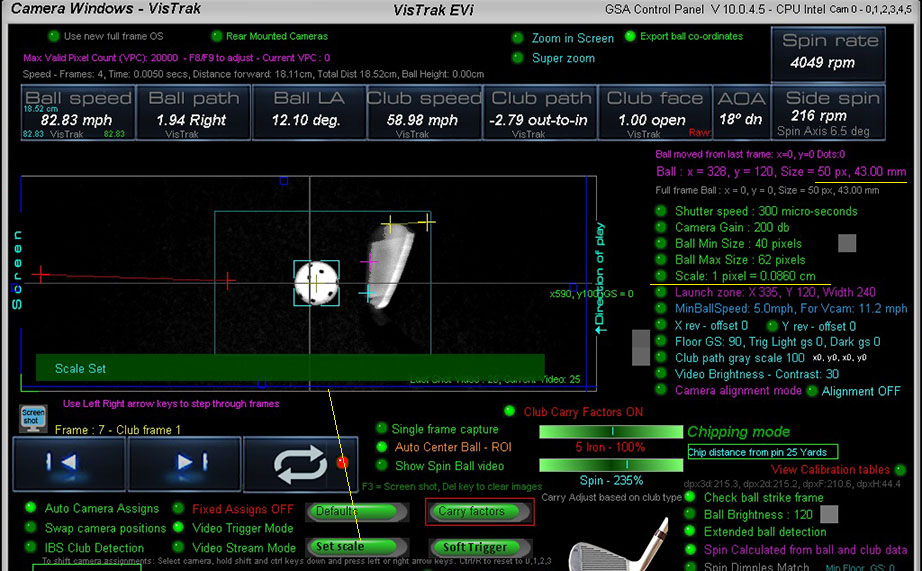
After setting the scaling factor correctly, ball and club speeds are correctly calculated
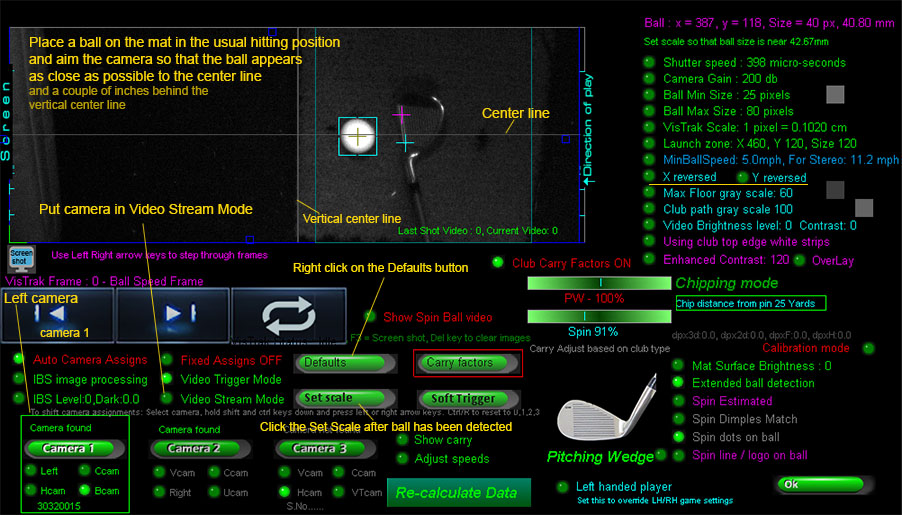
To Fix:
To set the scaling factor, place a ball on the mat and click the soft trigger in camera 1 panel.
Ensure that the ball has been correctly detected (as shown above with the aqua blue box lines around it)
and then just click the "Set Scale" button.
The scaling factor is then stored and shouldn't require any more adjustments.
Probable cause 2
Ball Speed factors or Club Carry Factors are set ON and the setting for the particular club is not correct.
To Fix:
Switch "Speed factors"/ "Club Carry factors" OFF
or
set the factor with the slider bar to a setting that produces the correct carry results for the particular club being used
Possible cause 3
The vertical launch angle is not being correctly detected
Ball speed factors
The VisTrak Eagle is a single camera system
and thus cannot detect vertical launch angle of the ball.
Vertical Launch Angle (VLA) is estimated from the loft of the club being used.
For this purpose, club dependent ball speed factors are used to help correct inaccurate ball speeds
caused by the actual ball VLA not being the same as the club loft.
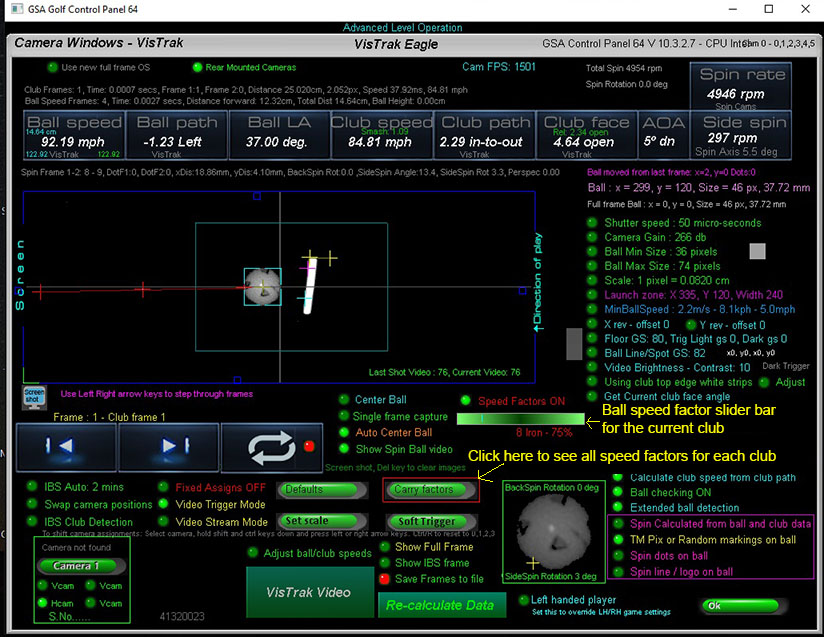
If striking the ball on the down swing, then the VLA based on the selected club loft will be too high
and thus the measured ball speed and resulting carry will be too high and too long.
Set the Speed factor to match your ball striking swing. i.e. on the down swing or square .
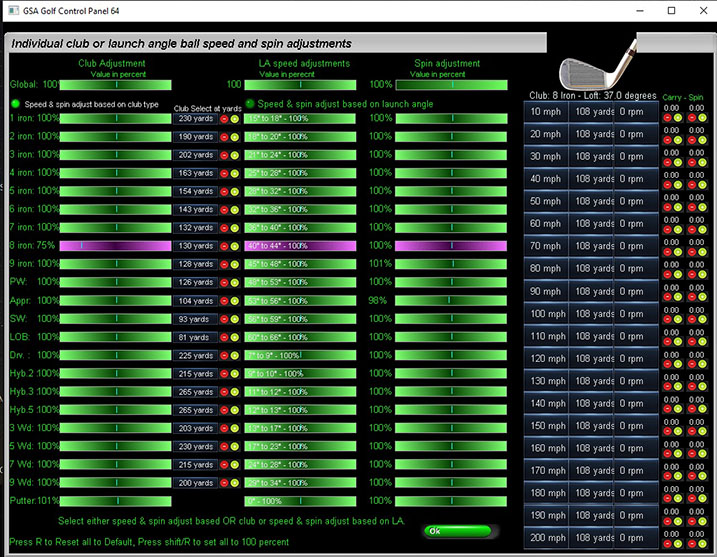
This Carry factors panel shows the speed factors for all clubs.
![]()
15.1 Spin rates are too fast or too slow
Probable cause
Main cause of this problem is incorrect spin adjustment settings
Ball Spin Adjustments

Use the spin slider bars in the "Shot Videos" panel to adjust all spin parameters.
Defaults are 100%
The sliders appear when moving the mouse over to the right side of the panel.
Note that back spin adjustments are separate for irons and woods
Click on the club image to select either an iron or a wood (drivers or Hybrids).
![]()
15.2 Some shots after going to the next hole in the GSpro game software
only carry a couple of yards
Probable cause:
The CP is stuck in putting mode.
We're not sure how this can happen yet and are woking on a solution with GSpro support.
In the meantime, switch the "Permit putting and chipping modes" OFF in the setup panel
and set the camera frame rate to 800 fps from the CP's main panel.

![]()
In case of suspected incorrect ball carry distances
Send in your shot videos for us to do an analysis of the shot.
See section 24 for details about this procedure
24. Shot accuracy issues
![]()
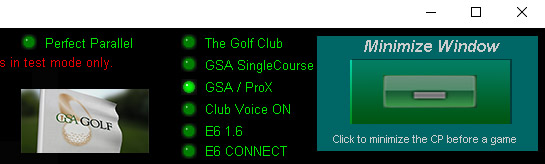
16. I don't see the minimized CP after clicking on the Minimize button
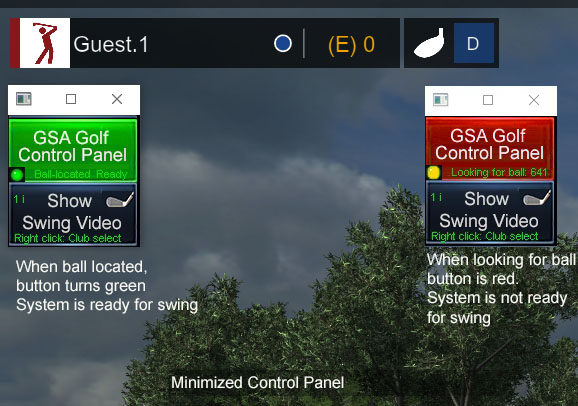
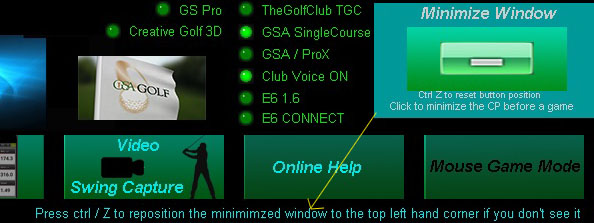
If you don't see the Minimized CP after clicking on the Minimize Window button,
press the ctrl / Z to restore its position to the top left hand corner of the monitor screen
![]()
17. The system is not detecting correct club face, path or speed

Click the above button to read how to setup the system to detect club data with or without reflective stickers
![]()
18. Cameras run okay for a while and then stop running or go off-line
Probable cause 1
Unstable or waggly USB cable connections to either the camera or the PC.
Fix: Close out Control Panel and unplug both cameras from PC to initiate a hardware reset.
Connect both cameras back into PC and restart the Control Panel
Probable cause 2
Your PC is not supplying sufficient power to the camera
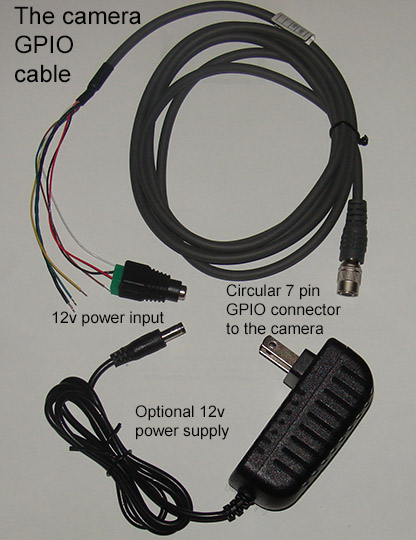
Solution
Add external 12v power via the camera GPIO (General Purpose Input Output) cable
Possible cause 3
The supplied USB3 extension cables are not connected to the 5v power adapters that come with the cables
Possible cause 4
You have added additional extension cables other than the supplied cables to the cameras
Possible cause 5
Your PC is disconnecting and reconnecting the USB device (i.e. camera)
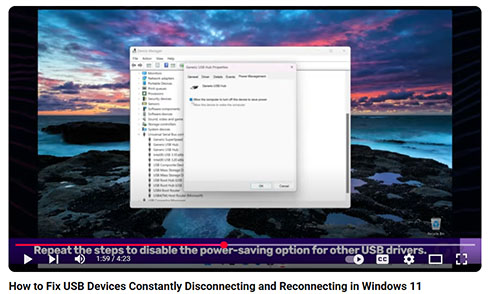
Click the above image to watch a video on how to fix this
Possible cause 6
You are running the USB cables near other electrical wires or units.
This can cause EMI (Electromagnetic Interference) on the cables which in turn can cause cameras to drop out.
When all else fails,
Event Log Files
If the above don't solve the issue, then we'll need to study the event log files to see if we can identify the cause.
Using CP version CP 10.1.4.1 or above, switch ON "Write event log messages" in the Setup Panel.

Switch on or off in the Setup panel (top right corner)
Event logs are used to trace possible crash or hang issues and are stored in C:GSAgolf / GSAGolfSystemLogs folder.
The files are dated and are named "SystemLogDDMMYY"
for example "SystemLog250624"
When a hang or crash occurs, send us a copy of the current day's system log file for analysis
New:
Real-time Event logs now being displayed in the CP's main panel
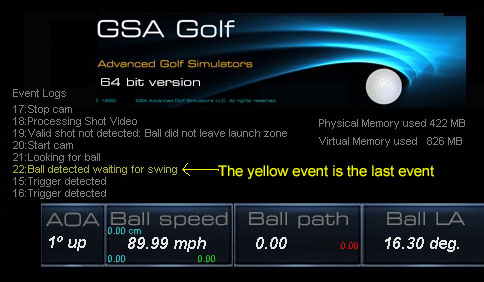
Event logs help us to trace shot errors and improve customer support. e.g. when a shot is not detected
![]()
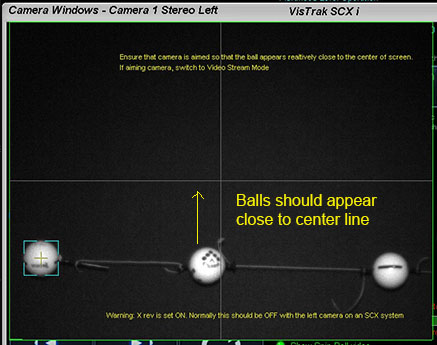
19. Ball does not appear on the center line in the camera panels
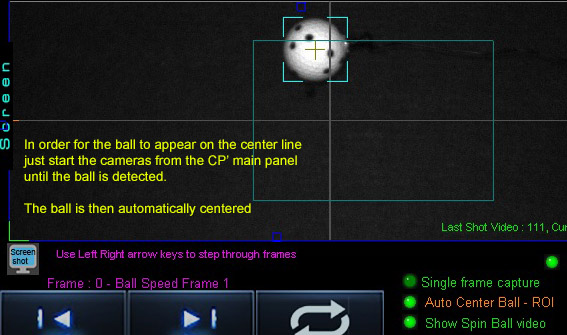
The ball is only centered after the cameras have been started from the CP's main panel
and the ball has been located.

When you then go back to camera panels, the ball will appear centered.
The centering (i.e. ROI) is done separately for every shot as the next time you place the ball on the mat,
it is unlikely to be in the exact same position as the last shot and thus has to be centered again.
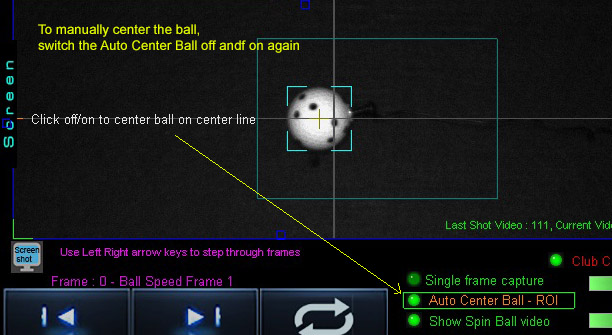
You can also manually center the ball by clicking the "Auto Center Ball - ROI" option off and on again
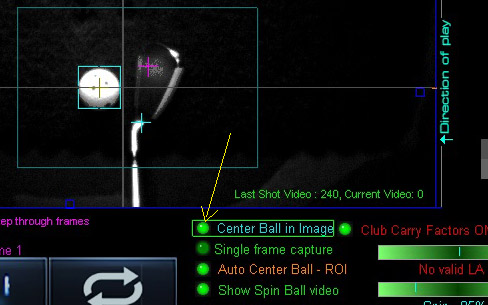
or clicking on the new "Center Ball in Image" button
Another reason could well be that your cameras are not aimed at the ball when in Full Ball Frame mode
Check your camera aiming
With the "Show Full Ball Frame" and "Video Stream Mode" options switch on in the camera window,
ensure that the ball in both cameras appears approximately in the center of the images as shown above.
It doesn't have to be exact as the cameras will position the ball automatically.
Important!
Only aim cameras when in "Full Ball Frame" mode
Do not try to aim cameras when not in full frame mode
System won't function in this case
Important :
When running the cameras in stream mode, do not have GSpro or TGC or E6 selected.
Select GSA API.
Otherwise the system will constantly try to connect to these game softwares
and will result in the cameras being reset to trigger mode
![]()
20. How can I tell which camera is the Left
and which is the Right camera with an SCX system
When facing forward, the Left camera is on the left and right camera is on the Right
To confirm that the Control Panel is viewing this as such,
go to camera 1 in the camera panel,
select "Show Full Ball Frame" mode,
select "Video Stream mode"
and place an object (i.e. a club head) over the lens of the left camera.
You should see that the images go dark.
If not, then the camera positions are incorrect.
Click the "Swap Camera Positions" button to correct this.
Also, check the camera mounting orientation

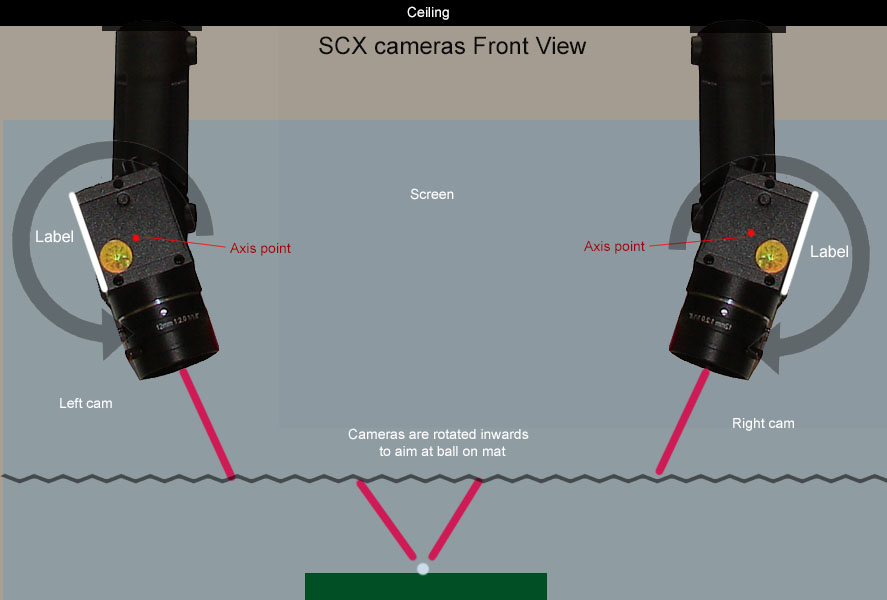
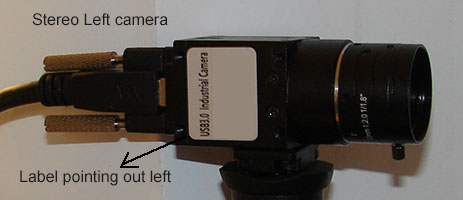
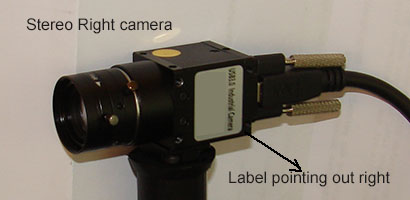
Ensure that the cameras are mounted or rotated such that the silver label on the cameras are pointing outwards on both cameras


Ensure that the X rev and Y rev settings are as shown above in the camera panels
![]()
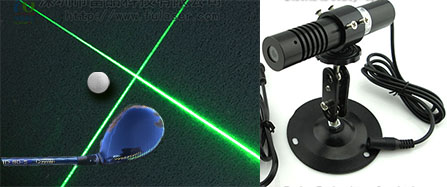
20.1 Laser not working
The laser is controlled by the right camera's GPIO cable
(that's the gray cable attached to camera).
5v Power is via a small USB cable coming out of the attached plug board at the back of the unit.
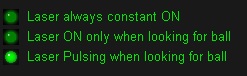
You can test if it's working by clicking on the option "Laser always constant ON" in the Setup panel
If not working, check the cable connections and ensure that the right camera is indeed the right camera and has not been assigned to a left camera.
also ensure you're using the current CP update.
If all else fails, replacement Lasers with power supplies are available for $149
![]()
20.2 Green light strip not working
The green LED light strip is controlled by the left camera's GPIO cable
(that's the gray cable attached to camera).
12v Power is via a one of the IR lights
You can test if it's working by clicking on the option "LED light strip Constant ON" in the Setup panel
If not working, check the cable connections and ensure that the left camera is indeed the left camera and has not been assigned to a right camera.
also ensure you're using the current CP update.
If all else fails, replacement Light strips with power supplies are available for $99
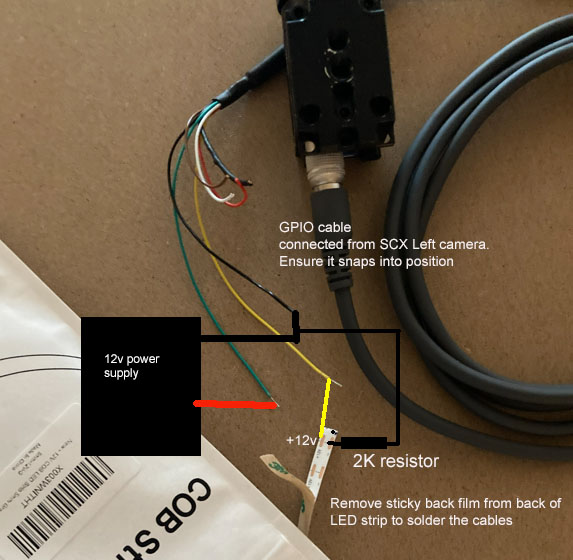
In case of trouble shootting, the above is the wiring diagram
![]()
21. Balls go to the left or right even though I hit straight shots with an SCX
or
Ball vertical launch angles are too high or too low
Probable cause
Cameras are out of alignment
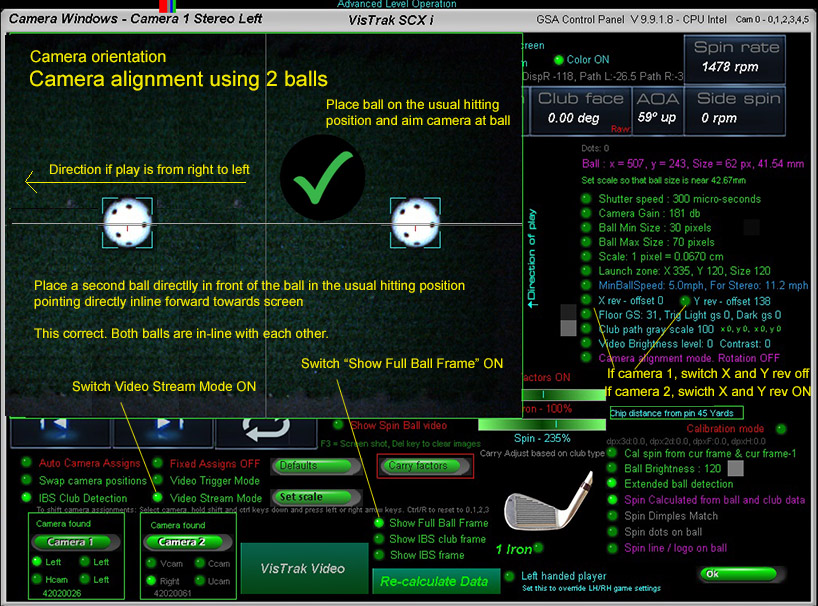
Check camera alignment as shown below using 2 balls placed directly in-line with each other
Important :
When running the cameras in stream mode, do not have GSpro or TGC or E6 selected.
Select GSA API.
Otherwise the system will constantly try to connect to these game softwares
and will result in the cameras being reset to trigger mode
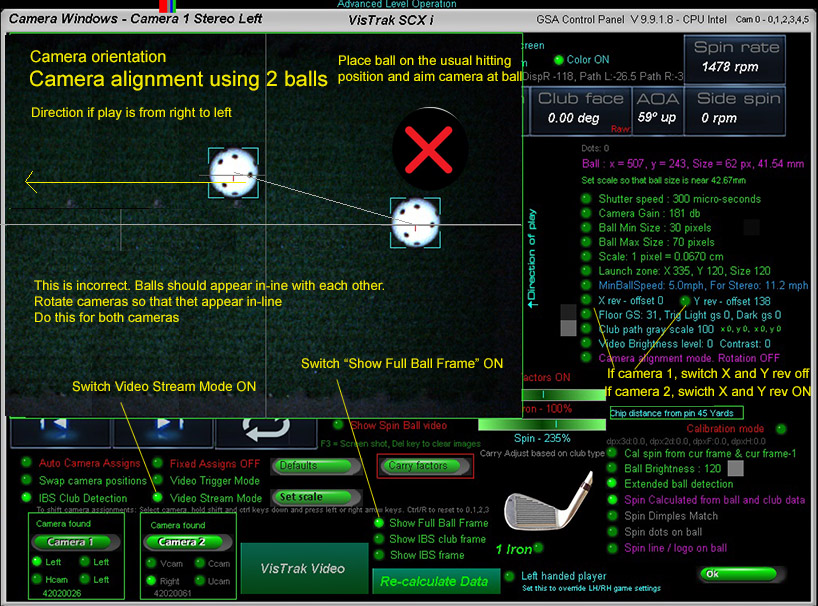
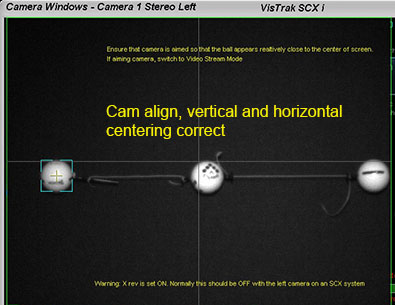
Aim and rotate each camera until you see that the 2 balls
are pointing directly forwards towards the screen and in-line with each other.
Note that the balls don't have to appear exactly on the center line. Just relatively near is sufficient
The ROI ball centering will automatically do this for you.
Do this procedure for both the left and right cameras
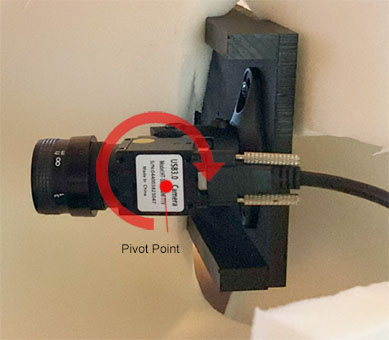
Camera alignment Checking
To check and adjust camera alignment
place a ball on the usual hitting position on the mat.
Then place another ball directly behind and another ball directly in front of the center ball
spaced at around 6 to 8 inches apart.
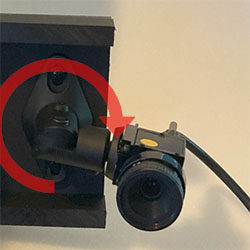
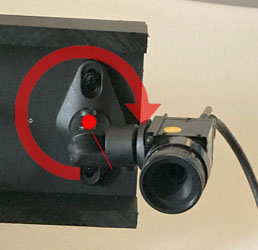
Rotate the camera on its base to adjust camera alignment

All 3 balls should appear on the same horizontal line
![]()
Vertical ball centering

Rotate the camera inwards and outwards to position the ball images onto the center line
![]()
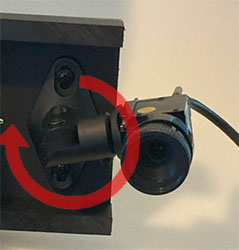
Horizontal ball centering
Rotate the camera up / down to position the ball images so that they all appear in the FOV of the camera
![]()
22. Ball vertical launch angles are either too low or too high with my SCX
Probable cause 1
The stereo calibration tables haven't been initialized to their default values.
To fix
Download and install the latest CP update if using a CP version lower than 10.0.8.5
Probable cause 2
Cameras are out of alignment
To fix
Check camera alignment as shown above in section 21

Check SCX calibration
Quick VLA adjustment

For a quick VLA adjustment, go to the camera panel and switch the "View Calibration table" option ON
Then simply adjust the "Global Height Adjust factor".
i.e. click on the button and use your keyboard's up and down arrow keys to adjust,
The above example has this value set to 0.160
![]()
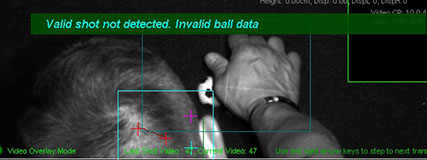
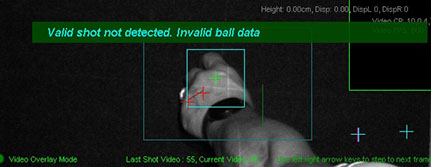
23. Shots not being detected
There are a number of reasons why a shot is not being detected.
The first thing to check is whether or not the issue is caused by the CP not detecting the shot
or is it the game software not receiving the shot data?
To test, try making several shots with just the CP running. After every shot you should see the above message in the CP's main panel.
The CP should show an error message if the shot was not detected as a valid shot.
"Ball did not leave the Launch Zone"
A common problem is the above error message when making small chips.
See section 5 and 7 on this page for solutions to this problem.
If you're seeing other error messages
send us the shot video of the shot that is not being detected for analysis
see below section 24 below for this.
![]()
24. Other Shot accuracy issues or shots not being detected
In order to resolve any other shot inaccuracy issues, we'll require you to send in the shot replay video for analysis
Shot Replay Videos
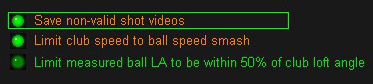
Important !
If your system is not detecting a valid shot, click the option
"Save non-valid shot videos" ON
in the CP Setup Panel
Retry a shot and make note of the shot Video number being saved.
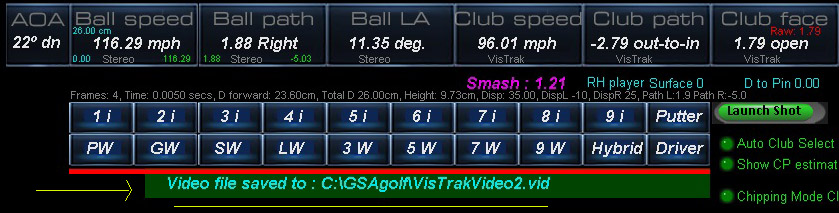
After a shot, the shot video file name and number is displayed in the CP's main panel
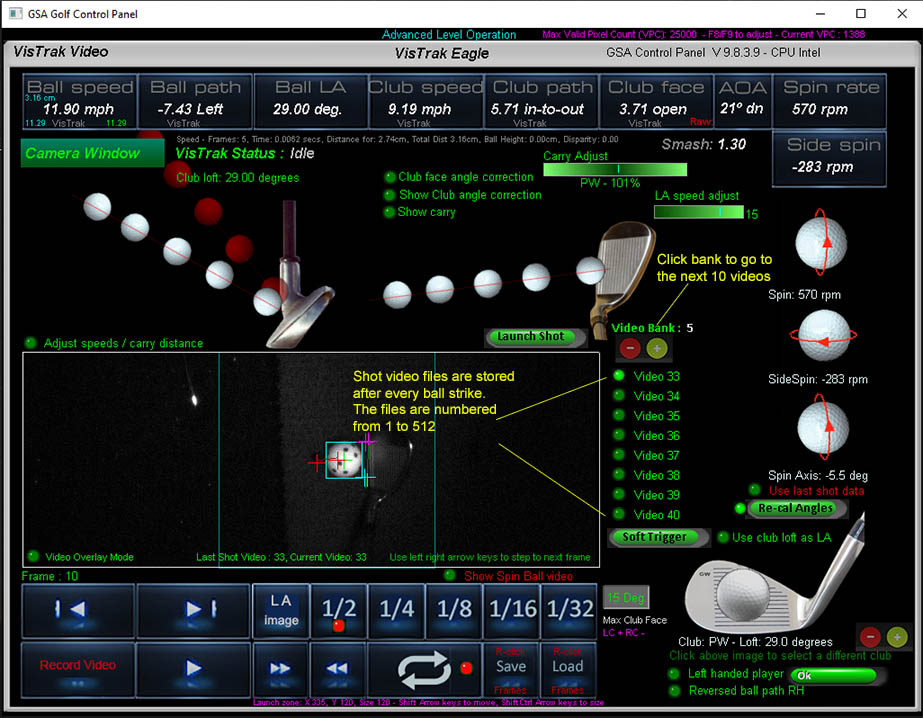
The Vistrak system stores a shot video after every shot.
These shot videos can be re-called by clicking on the video number.
GSA Golf Technical support often requires the user to send us a copy of one or more of these shot videos
as an email attachment for analysis when issues occur.
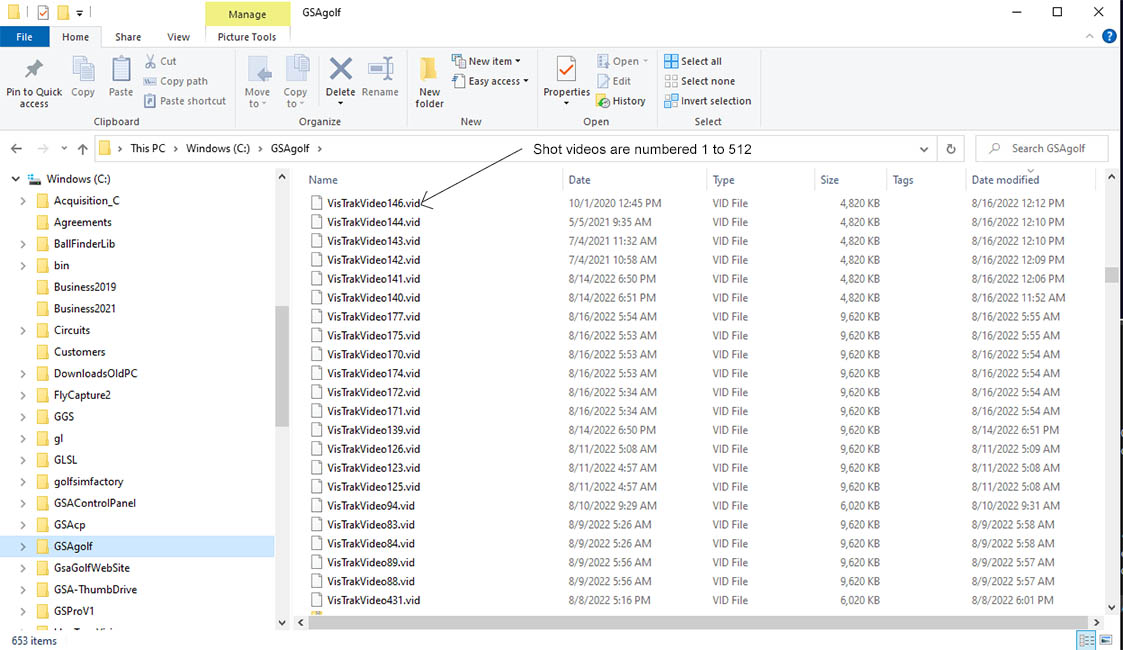
The shot video files are stored in the C:\GSAgolf folder on your PC
![]()
25. Other issues
In order to resolve any other issues,
we'll require you to send in screen shots of the main panel, setup and camera panels and shot videos.
How to make Screen shots
How to make camera setup videos
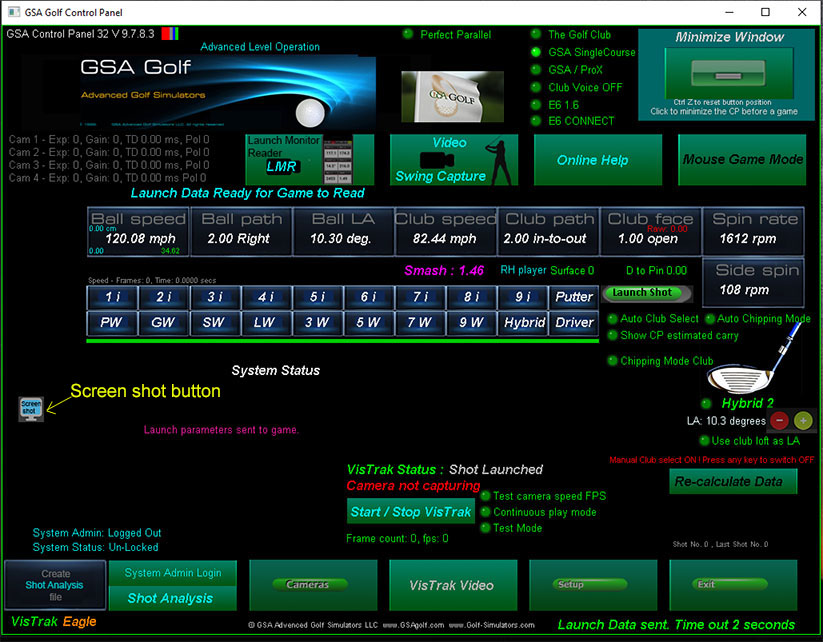
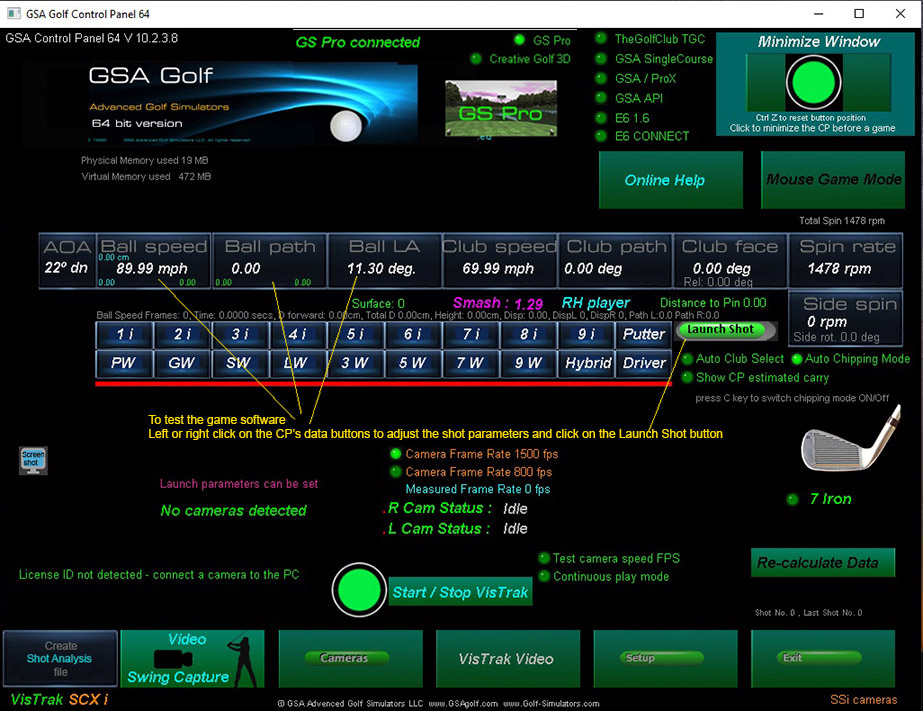
1. Place ball on the mat on the usual hitting position and place a club behind it
2. Either click on the "Start/Stop VisTrak" button from the CP's main panle or go to the camera panel and Video Stream Mode so that frames are captured
3. Go back to the Main panel and click on the “Create Shot Analysis File” button at the bottom far left of the panel
( as shown in the above image).
4. Note the number of the VisTrak Video file created and send it to us as an email attachment.
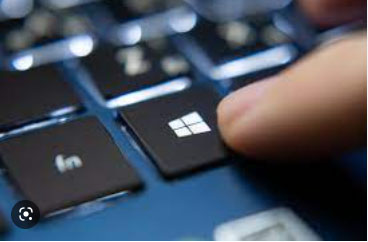
How to make Screen shots
GSA Golf Technical support often requires the user to send us a control panel screen shots
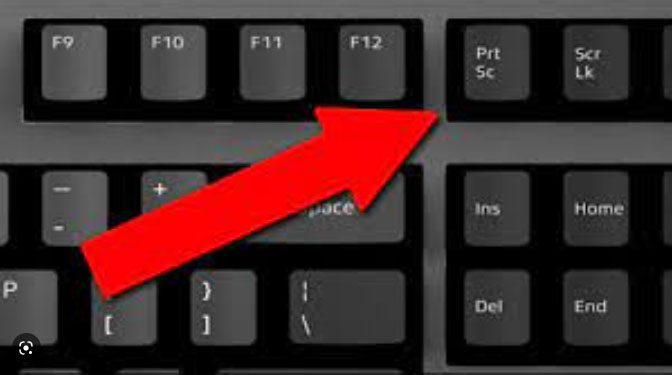
To make a screen shot, press the PrtSc button on your keyboard.
Note: some CP screens have a Screen Shot button too.
This places a copy of the screen image into the PC's Clipboard.
You can then paste the image into the Paint application and save it.
Alternatively
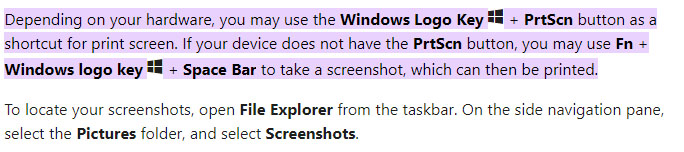
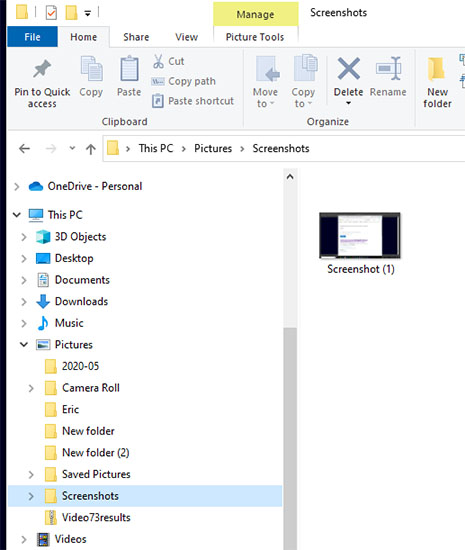
You can then either paste or attach the image in an email to us for analysis
![]()
26. How to test the communication with the CP and your game software
![]()
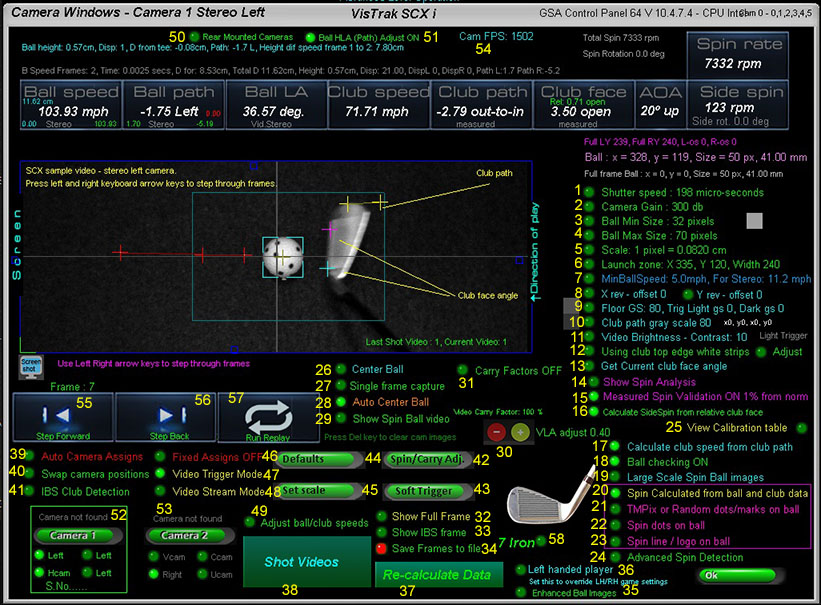
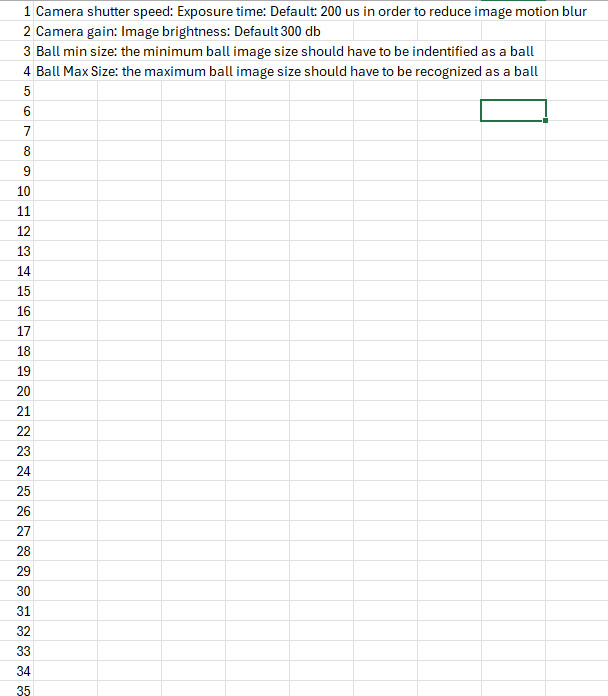
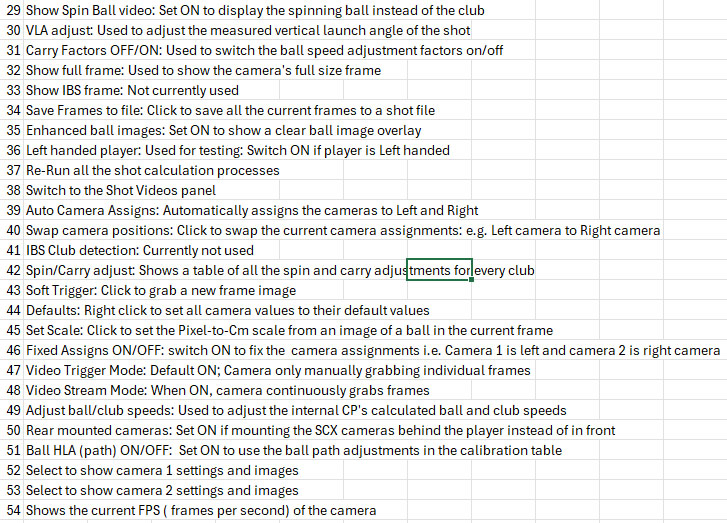
The Control Panel Camera settings explained
![]()
More helpful links...


Click the above buttons for more specific system information
![]()
GSA Golf system minimum PC requirements
Intel i5 or above Processor
Warning! Do not use PC's with AMD processors!
8GB RAM Nvidia 1070 Graphics Card or equivalent
25GB of Hard Drive Space
Windows 10 or 11 (Required)
Internet Connection
(Required if using 3rd party game software such as E6, TGC or GSPro)
USB3 ports (Required)
Note: The cameras are USB3 cameras
and will only run at the correct speed when connected via USB3 cables directly to separate USB3 ports on the PC
Warning
If using 2 cameras, do not connect the cameras together with a Hub !
All cameras must be directly connected to separate USB3 ports on the PC
Use only powered USB3 extension cables if the supplied cables are not long enough
![]()
Installing TeamViewer
If you require remote access support, you need to have TeamViewer installed on your PC.

Go to www.TeamViewer.com or click the above image to download the free version of TeamViewer

When calling us for a remote access support session, have your TeamViewer up and running with your ID and Password being displayed.
![]()
Technical Support
 Home
Home Simulators
 Cameras
 Software
 Enclosures
 ProTee
 Installation
 Business